Erik Hjelmvik
,
Friday, 04 April 2025 10:53:00 (UTC/GMT)

I am very proud to announce the release of NetworkMiner 3.0 today!
This version brings several new protocols as well as user interface improvements to NetworkMiner. We have also made significant changes under the hood, such as altering the default location to where NetworkMiner extracts files from network traffic.
Some of the major changes in this new release are:
- New protocols: QUIC, CIP (EtherNet/IP), UMAS and Remcos RAT.
- Improved passive OS fingerprinting.
- Additional filtering capabilities.
- User interface adapted for Linux.
Filtering of Displayed Artefacts
A tooltip text is temporarily displayed when a filter is activated. The tooltip shows the number of visible items after the filter is applied. This tooltip can also be shown at a later point by hovering with the mouse over the filter text or the Apply button.
Right-clicking on an item or artefact in any of NetworkMiner’s tabs brings up a context menu. We’ve now added an “Apply as Filter” option to this context menu, which can be used to let NetworkMiner automatically generate a filter based on the clicked item. This feature saves time for the analyst and reduces risk of misspellings.
We have also added a keyword filter to the Credentials tab and updated the image filename filter to ignore case.
Other User Interface Improvements
The File Details window, which shows metadata and contents of an extracted file, now has a “Show as” menu that can be used to preview the contents of a file as ASCII, Hex, Unicode or UTF-8.
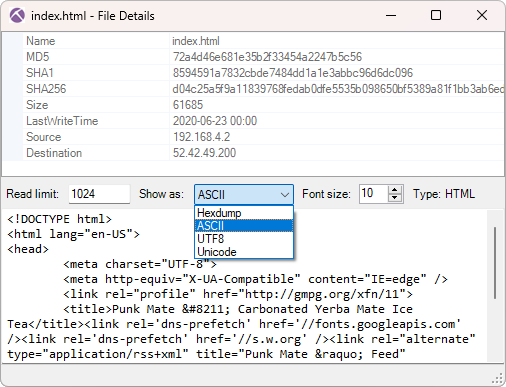
This file details window can now also be accessed directly from the Images tab by right-clicking on a thumbnail of an extracted image.
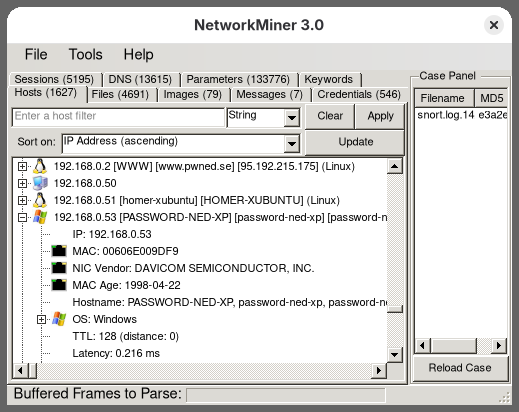
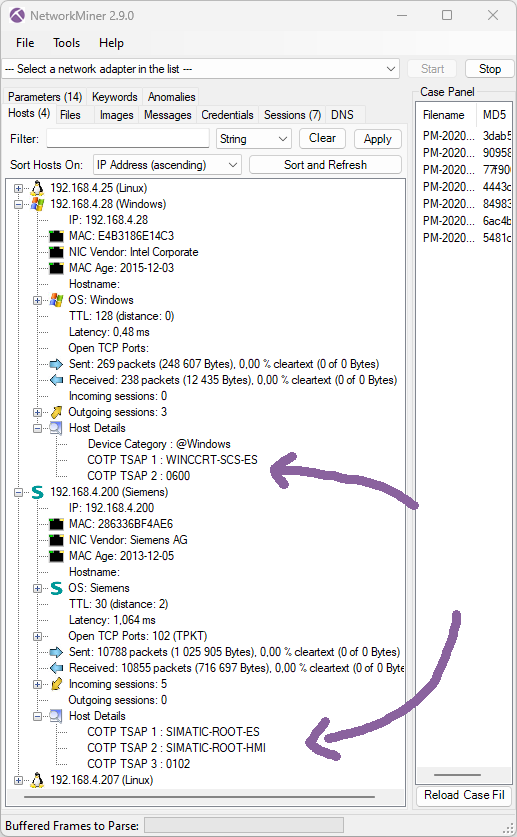
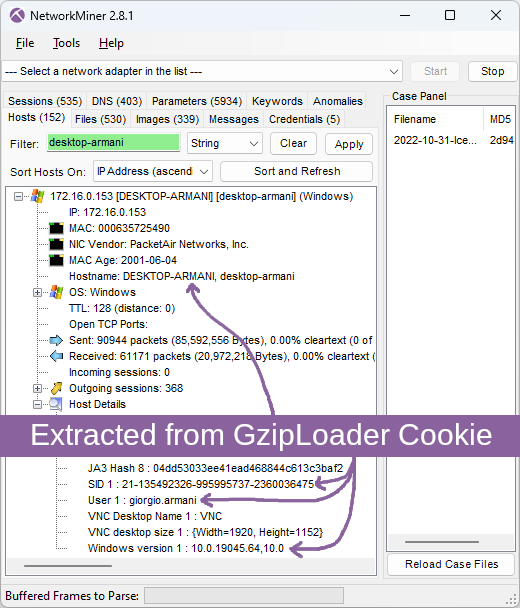
NetworkMiner 3.0 extracts Maximum Segment Size (MSS) values from TCP handshakes and show them under Host Details for each respective IP address.
This value can help with determining if a host is behind a VPN. An MSS value below 1400 indicates that the traffic might have passed through some form of overlay network, such as a tunnel or VPN.
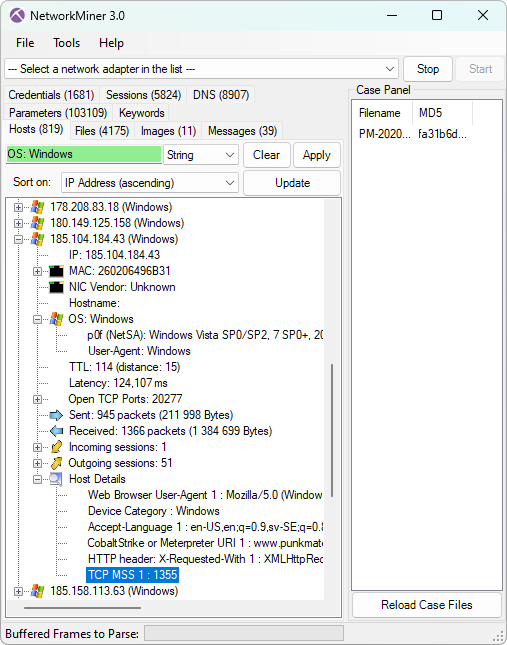
Image: Details for a host communicating through a VPN
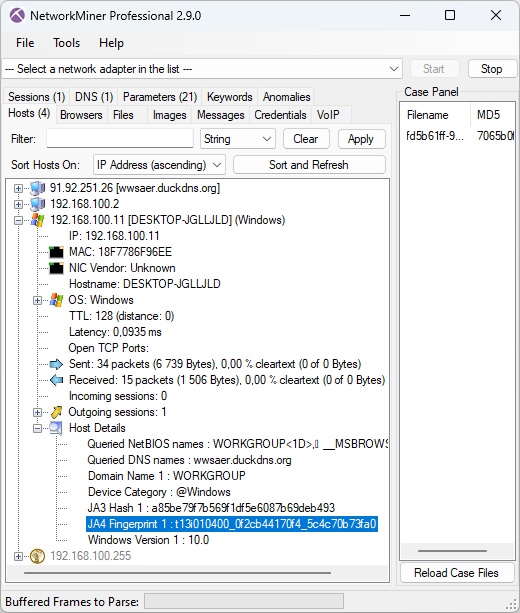
Other indicators that can help identify VPN and tunnelled traffic is IP TTL and latency, which NetworkMiner already extracts.
The screenshot above also shows that the operating system was identified as Windows, both with help of p0f as well as based on the client’s web browser user-agent. The user-agent based OS fingerprinting is a new feature that we added in NetworkMiner 3.0. This is a nice complement to the TCP and DHCP based OS fingerprinting features that NetworkMiner already performs. We’ve configured this feature to also detect operating systems of user-agent strings sent over UPnP/SSDP.
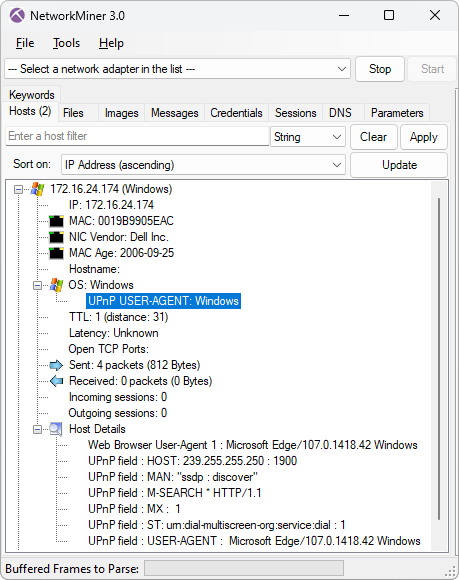
Image: Operating system identified from User-Agent string in UPnP
The text on a few of NetworkMiner’s buttons were not visible on some Linux distros, depending on how much button padding the respective window manager and theme added. Button sizes have therefore been increased in this release to reduce the risk of text not being visible when NetworkMiner is run in Linux.
New Protocol: QUIC
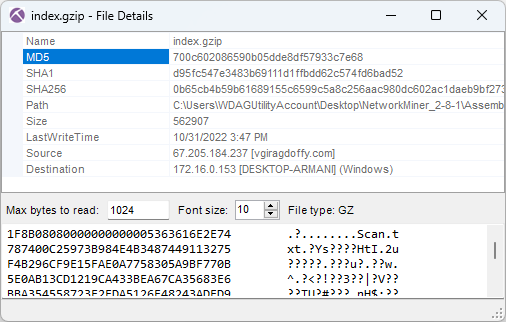
NetworkMiner 3.0 parses initial packets from the QUIC protocol (RFC 9000), which is the UDP based protocol used to transport HTTP/3. The QUIC parser allows NetworkMiner to extract TLS handshakes from UDP 443 traffic, from which the server’s hostname can be read if the client uses the SNI extension. The extracted TLS handshakes from QUIC are also used to generate JA3 and JA4 fingerprints for clients.
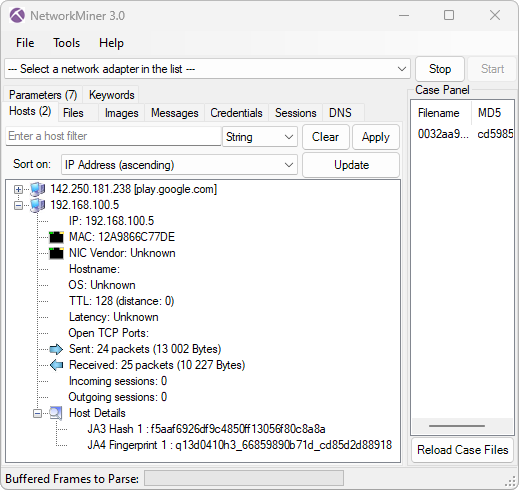
Image: Server hostname and client JA3 and JA4 fingerprints extracted from QUIC
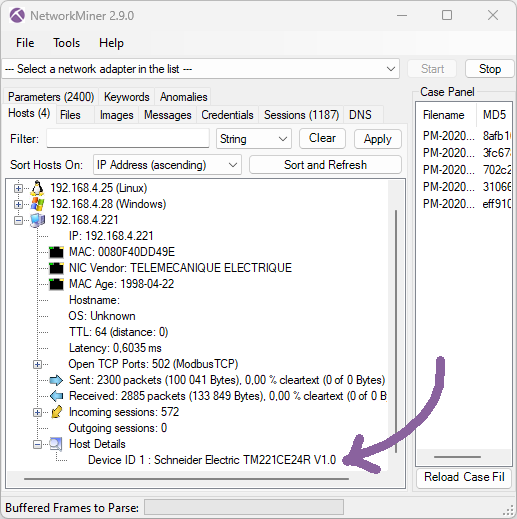
New Protocol: CIP and EtherNet/IP
We added parsers for the industrial control system protocols CIP and EtherNet/IP. The implementation does not cover all of the CIP and EtherNet/IP specifications, instead we focused on extracting device information, such as product vendor, product name, bulletin name, serial number and hostname. Such device information is crucial when performing passive asset identification of PLC’s and other industrial devices on OT/ICS networks, such as in factories and power plants. The CIP parser also supports extraction of tag data from Rockwell's proprietary version of CIP.
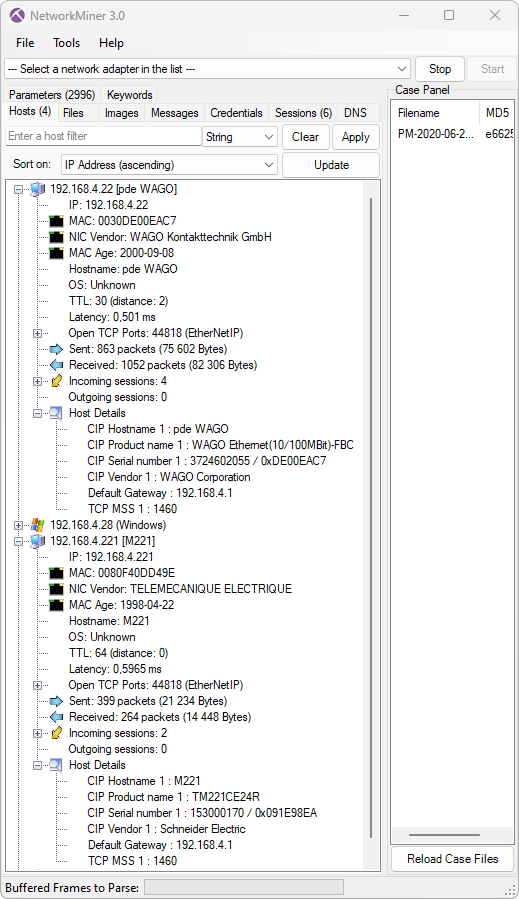
Image: Device information extracted from CIP traffic from a WAGO 750-841 controller and a Schneider Electric M221 PLC
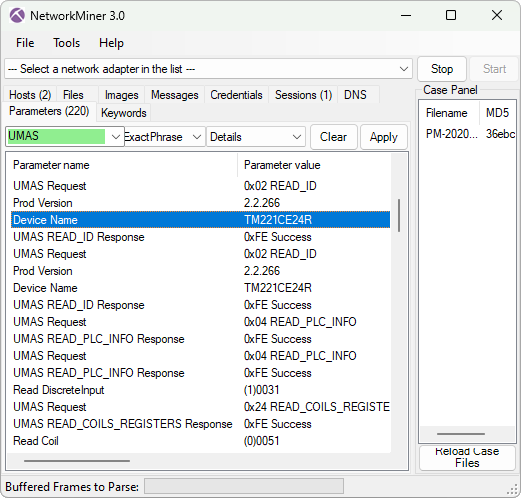
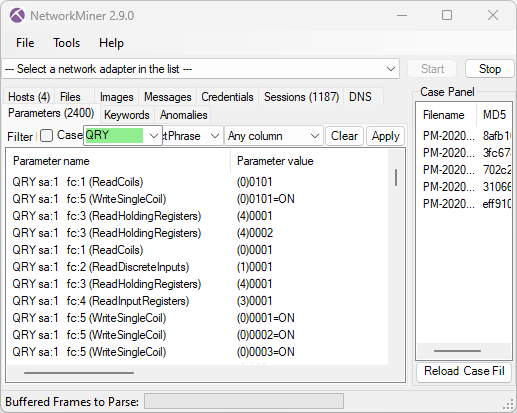
New Protocol: UMAS
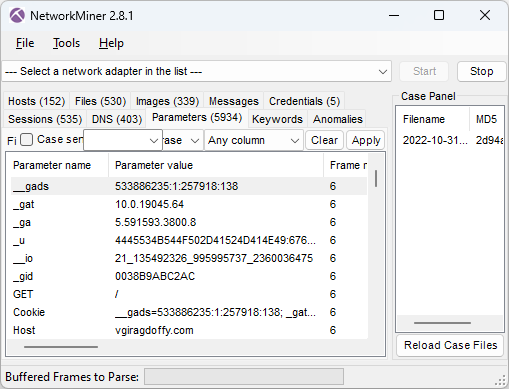
A parser for the industrial control system protocol Modbus/TCP was added to NetworkMiner 2.0 back in 2016. In today’s 3.0 release we’ve enhanced the Modbus implementation to also parse out commands from Schneider Electric's proprietary UMAS protocol, which runs on top of Modbus by using the special function code 90 (0x5a). Our implementation unfortunately doesn’t have full coverage of UMAS, since we don’t have a protocol specification for this proprietary protocol. Nevertheless, our implementation recognizes 40 different UMAS commands (aka UMAS function codes) and can extract fields and parameters from at least 6 of them. The parsed UMAS commands can be viewed in NetworkMiner’s Parameters tab.
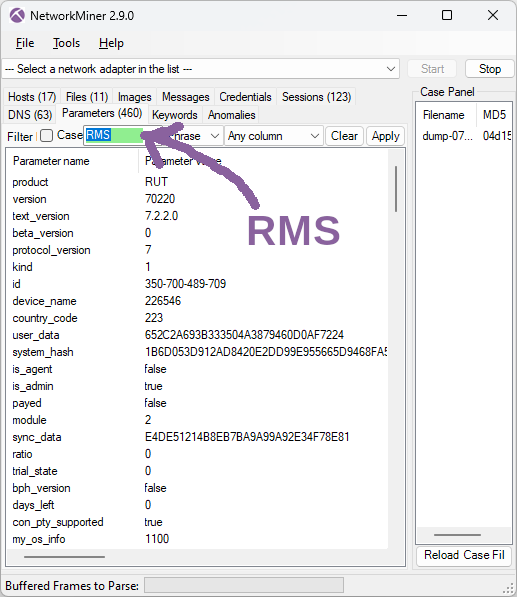
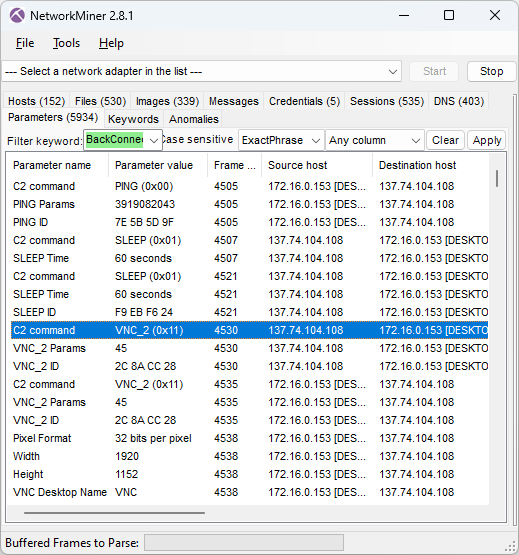
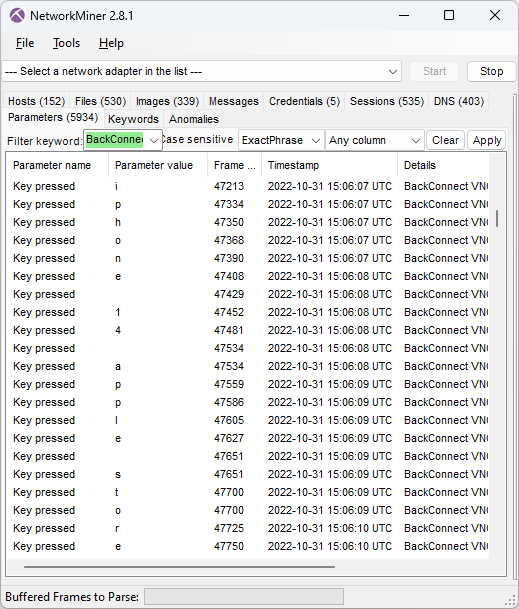
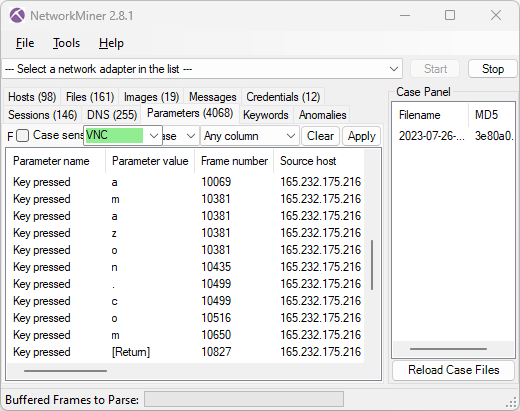
New Protocol: REMCOS C2
We started adding parsers for proprietary malicious Command-and-Control (C2) protocols, like StealC, njRAT, BackConnect and RMS, to NetworkMiner a couple of years ago. These malware C2 and backdoor protocol parsers enable security researchers to study what actions threat actors perform when accessing victim computers or honeypot systems.
We’re continuing on our endeavour of creating parsers for malicious protocol by adding support for the Remcos RAT C2 protocol to NetworkMiner 3.0.
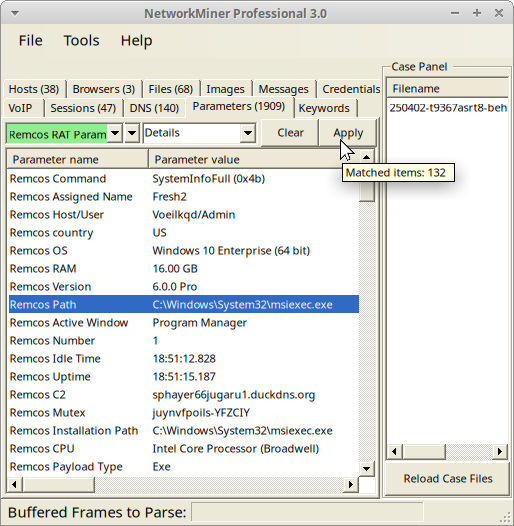
Image: Remcos C2 parameters from PCAP file on tria.ge with NetworkMiner Professional in Linux
Naturally, NetworkMiner’s Remcos parser can’t extract the C2 comms if Remcos uses TLS. Another limitation is that the free version of NetworkMiner is only able to parse Remcos traffic when the C2 server is running on a standard port like TCP 2404. The port-independent-protocol-identification feature in the Professional edition of NetworkMiner, however, identifies and parses Remcos traffic regardless of which port the C2 server listens on (the C2 server in the screenshot above was running on TCP port 1961).
Improved Protocol Parsers
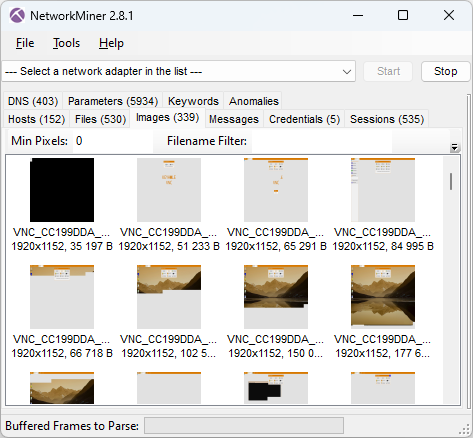
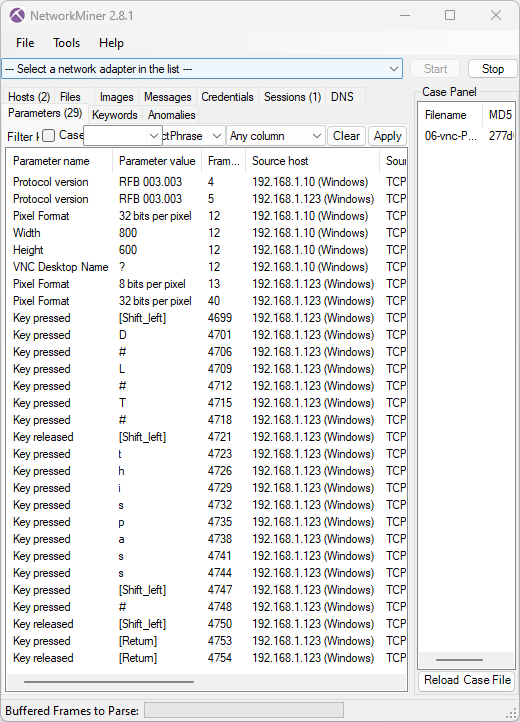
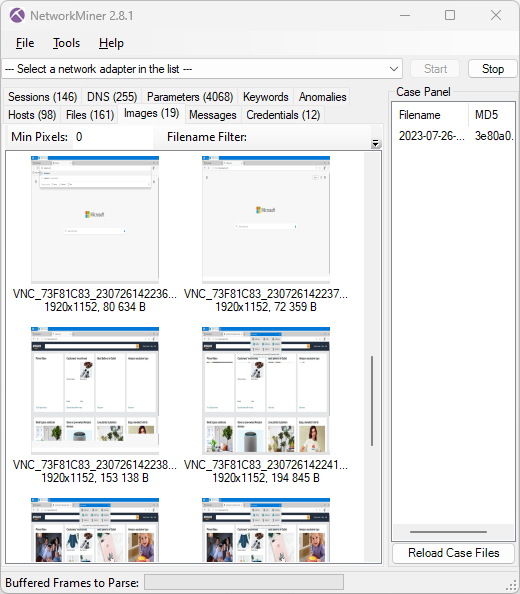
We have also improved several of NetworkMiner’s existing protocol parsers. NetworkMiner’s parser for the trojan/backdoor njRAT (Bladabindi) protocol has, for example, been extended to reassemble full desktop screenshots from njRAT’s Remote Desktop feature.
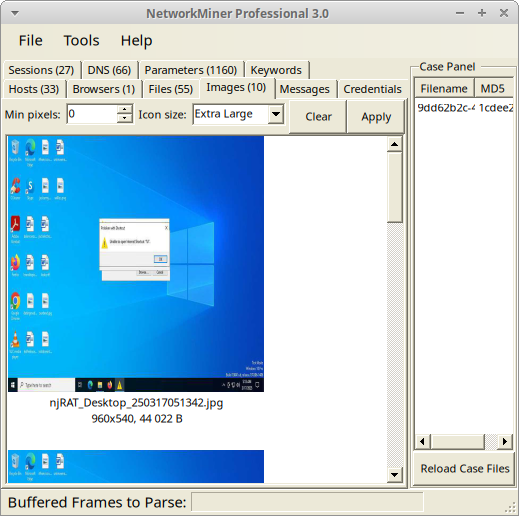
Image: njRAT desktop image extracted from PCAP file on any.run with NetworkMiner Professional in Linux
NetworkMiner’s parser for Modbus has also been extended to support additional function codes and the NTLMSSP parser (for SMB/SMB2) is now better at extracting hostnames to NetworkMiner’s Hosts tab.
Bugs Fixes
A bug in NetworkMiner’s timestamp comparison code previously caused items to be sorted incorrectly when the Timestamp column header was clicked. This bug has now been fixed. We have also fixed a bug relating to extraction of parameters sent in JSON encoded HTTP POST requests.
Breaking Changes
Some of the changes introduced in the 3.0 release might require some users to adapt their workflow. One such change is that the default output path for extracted files and captured packets has changed from NetworkMiner’s directory to %LocalAppData%\NetworkMiner\ in Windows and ~/.local/share/NetworkMiner/ in Linux. This means that you no longer need to add write permissions to the NetworkMiner application directory or subdirectories thereof, since NetworkMiner no longer creates or modifies files there.
Another breaking change is that we have removed the Anomalies tab from the user interface. Windows users can still see alerts by starting NetworkMiner with --filelog, while Linux can use --debug to print debug, warning and error messages to stderr. Use --loglevel warning to suppress info and debug messages.
A change that only affects users of NetworkMiner Professional is that the command line tool NetworkMinerCLI now requires a Corporate License. If you currently have a single-user license, then you will still be able to use the command line tool in your 2.x version of NetworkMiner Professional, but not in the new 3.0 release.
NetworkMiner Professional
There are several improvements in the 3.0 release that only affect users of NetworkMiner Professional. One noteworthy update is that the Pro release has become significantly faster, especially for capture files containing many short TCP sessions. NetworkMiner Professional now saves around two milliseconds in parsing time for every TCP session. This might not sound as much, but it actually makes a huge difference when parsing capture files containing thousands of small TCP sessions.
NetworkMiner’s support for the TLS fingerprinting method JA4 has also been extended even further in the 3.0 release. NetworkMiner Professional now leverages FoxIO’s JA4 database to identify operating systems as well as applications based on client TLS handshake packets.
Other improvement of NetworkMiner Professional include:
- Network operator and AS number displayed on Hosts tab.
-
File OSINT lookup includes Censys body_hash lookups.
- IP and domain OSINT lookups added to NetworkMiner’s DNS tab.
- PcapNG packet comments displayed in the Parameters tab.
Upgrading to Version 3.0
Users who have purchased NetworkMiner Professional can download version 3.0 from our customer portal, or use the “Check for Updates” feature from NetworkMiner's Help menu. Those who instead prefer to use the free and open source version can grab the latest release of NetworkMiner from the official NetworkMiner page.
Posted by Erik Hjelmvik on Friday, 04 April 2025 10:53:00 (UTC/GMT)
Tags: #NetworkMiner
#JA3
#JA4
#njRAT


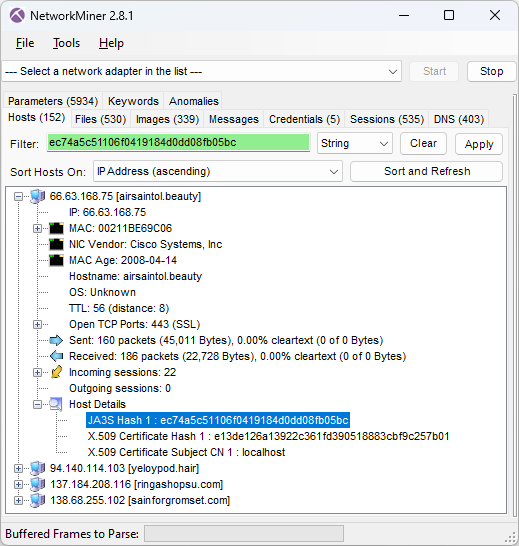
![Self-signed X.509 certificate issued to localhost from ringashopsu[.]com with thumbprint d14983ecbe0f97023721d0960f5dc98388809cc9](https://www.netresec.com/images/X-509_certificate_d14983ecbe0f97023721d0960f5dc98388809cc9_ringashopsu-com_405x515.png)


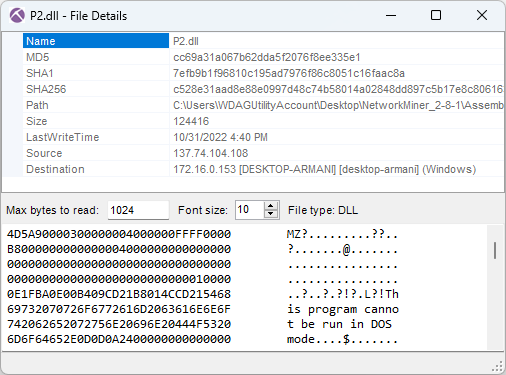
 As you can see in the screenshot above, the MD5 hash of P2.dll is


