NETRESEC Network Security Blog - Tag : proxy

rss Google News

PolarProxy in Windows Sandbox

In this video I demonstrate how PolarProxy can be run in a Windows Sandbox to intercept and decrypt outgoing TLS communication. This setup can be used to inspect otherwise encrypted traffic from malware or suspicious Windows applications, which communicate over HTTPS or some other TLS encrypted protocol.

The Windows Sandbox WSB file used in the demo can be downloaded from here: https://www.netresec.com/?download=PolarProxySandbox

Note: Windows Pro or Enterprise is required to run WSB files

Parsing Decrypted TLS Traffic with NetworkMiner

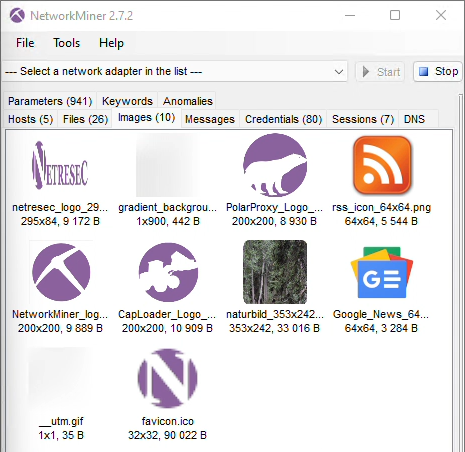
This sandbox also includes NetworkMiner, primarily because it can be used to read a real-time PCAP-over-IP stream with decrypted traffic from PolarProxy. As shown in the video, this feature can be used in order to extract files, images or parameters from the decrypted TLS traffic in near real-time.

Images extracted from decrypted HTTP/2 traffic shown in NetworkMiner

For more info about how to run NetworkMiner in Windows Sandbox, please see our blog post Running NetworkMiner in Windows Sandbox.

Configuring a Proxy Server in Windows Sandbox

Windows’ built-in proxy settings are unfortunately not available in Windows Sandbox, which is why I installed a third-party proxy client that redirects all outgoing network traffic to PolarProxy’s SOCKS server. I used Proxifier in the video, which has the additional benefit of being able to redirect all traffic to the proxy, even from applications that aren’t proxy aware. This feature is crucial when attempting to intercept and decrypt TLS traffic from malware that doesn’t respect the proxy settings configured in the operating system.

Command Log

Start PolarProxy with a PCAP-over-IP listener on TCP 57012, SOCKS server on TCP 1080, HTTP proxy on 8080 and a transparent TLS proxy on port 443:

PolarProxy --pcapoverip 57012 -x ..\proxyroot.cer --socks 1080 --httpconnect 8080 --nontls allow -p 443,80

Test PolarProxy’s SOCKS server by sending an unencrypted HTTP request through the proxy:

curl --socks4 localhost http://www.netresec.com

Test PolarProxy’s SOCKS server by sending an HTTPS request through the proxy:

curl --insecure --socks4 localhost https://www.netresec.com

Test PolarProxy’s HTTP CONNECT proxy server by sending an HTTPS request through the proxy:

curl --insecure --proxy localhost:8080 https://www.netresec.com

Start Menu Search

As shown in the video, text typed into Windows’ start menu gets sent to Microsoft. For more information about this behavior, and how it can be disabled, check out our Start Menu Search video and blog post.

Posted by Erik Hjelmvik on Monday, 31 January 2022 09:50:00 (UTC/GMT)

Tags: #PolarProxy#NetworkMiner#SOCKS#proxy#Windows Sandbox#Sandbox#PCAP-over-IP#pcapoverip#Windows#TLS#HTTPS

Short URL: https://netresec.com/?b=221d46b


PolarProxy 0.9 Released

PolarProxy 0.9

PolarProxy was previously designed to only run as a transparent TLS proxy. But due to popular demand we’ve now extended PolarProxy to also include a SOCKS proxy and a HTTP CONNECT proxy. PolarProxy automatically decrypts all proxied SSL and TLS traffic, regardless if the remote server is running on TCP 443 or some other port, as long as the traffic passes through PolarProxy. As from now we also release a Windows build of PolarProxy, alongside the Linux x64, ARM and ARM64 builds.

SOCKS Proxy

Use the command line argument “--socks [port]” to start PolarProxy’s SOCKS proxy server. This SOCKS proxy supports multiple versions of the SOCKS protocol, including SOCKS 4, SOCKS 4a, SOCKS 5 and SOCKS 5h.

As an example, the command below starts a SOCKS server on TCP port 1080 and passes a copy of the decrypted TLS traffic as a PCAP stream to tshark.

PolarProxy --socks 1080 -w - | tshark -r - -d tcp.port==443,http2
Note: The “-d tcp.port==443,http2” argument in the command above is used to tell tshark to parse traffic to port 443 as HTTP/2 instead of TLS. An alternative method would be to instead configure PolarProxy to output decrypted 443 traffic as if it was port 80, by supplying the “-p 443,80” argument to PolarProxy.

You can then use curl to run some HTTPS traffic through the SOCKS proxy:

curl --insecure --socks4 localhost https://www.netresec.com

After doing this you should see the decrypted HTTP/2 traffic in tshark’s output.

HTTP CONNECT Proxy

We’ve also added a HTTP proxy to PolarProxy 0.9, but it only supports the CONNECT request method. This means that normal unencrypted HTTP requests, like GET or POST requests, will be rejected by PolarProxy. Most web traffic is TLS encrypted nowadays anyway, so we don't consider this limitation to be a big issue.

The HTTP CONNECT proxy service is activated with the “--httpconnect” argument. Decrypted TLS traffic from PolarProxy’s HTTP CONNECT proxy can be forwarded to tshark just like in the SOCKS example, but the traffic from these proxies can also be accessed through PCAP-over-IP like this:

PolarProxy --httpconnect 8080 -p 443,80 --pcapoverip 57012

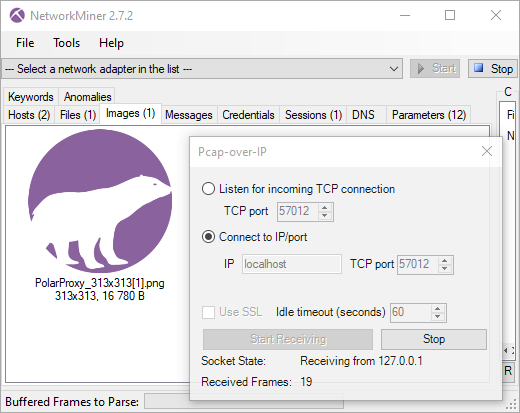
You can then connect to PolarProxy’s PCAP-over-IP service with NetworkMiner by clicking File, Receive PCAP over IP, select “Connect to IP/port”, enter “localhost” and click the “Start Receiving” button. You’ll now be able to see a real-time feed of all the traffic that PolarProxy decrypts. As an example, let’s download the PolarProxy logo over HTTPS to see if NetworkMiner can extract it from PolarProxy’s decrypted PCAP-over-IP stream:

curl --insecure --proxy localhost:8080 https://www.netresec.com/images/PolarProxy_313x313.png

The PolarProxy logo immediately shows up in NetworkMiner’s images tab:

NetworkMiner reading PCAP-over-IP from PolarProxy

Port-Independent TLS Protocol Detection

When PolarProxy is running as a transparent TLS proxy all incoming traffic can be expected to be TLS. But that’s not the case when, for example, PolarProxy is running as a SOCKS proxy. We have therefore added port-independent TLS protocol detection for proxied traffic, so that TLS traffic can be detected and decrypted even when it runs on other ports than the standard 443, 465, 853, 990, 993, 995 and 5061 ones.

There is one crucial limitation to the automatic SSL/TLS protocol detection though, it doesn’t support explicit TLS traffic that relies on opportunistic encryption features like STARTTLS, which bootstraps TLS into an already established application layer session.

Allow Non-TLS Traffic

SOCKS and HTTP CONNECT proxies can both be used to transport other protocols than TLS. PolarProxy blocks all non-TLS traffic by default, but this setting can be overridden with the “--nontls allow” argument to allow any traffic to be proxied. The allow non-TLS override has no effect on PolarProxy’s transparent proxy though, because it will need to see a valid SNI field in order to know whereto the traffic should be forwarded.

Windows Build

There wasn’t much need for a Windows build of PolarProxy prior to the release of version 0.9, because the Windows firewall can’t be configured to redirect outgoing port 443 traffic to a local service. However, now that PolarProxy also includes SOCKS and HTTP CONNECT services, the situation is completely different. There are many ways to configure a Windows PC, as well as web browsers and other applications, to use a local proxy server.

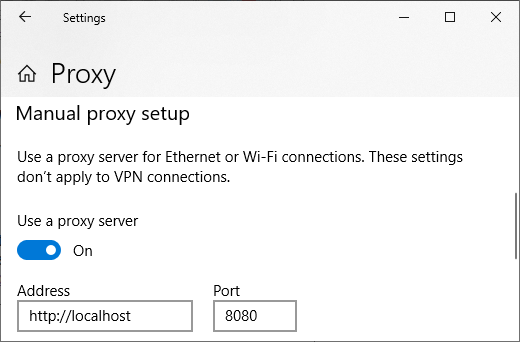
You can use the Proxy settings window in Windows 10 and 11 to enable a local HTTP proxy like this:

Windows 10 Proxy Settings

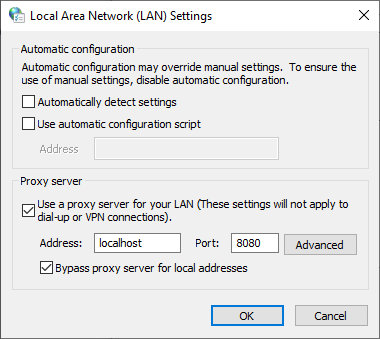
Another option is to run “inetcpl.cpl” (Internet Options), open the “Connections” tab and click the “LAN settings” button to configure an HTTP proxy.

Windows Internet Options LAN Proxy Settings

You can, of course, also configure your browser to use a local SOCKS or HTTP proxy in Windows, just as you’d do on any other operating system.

But don’t forget to configure your OS and/or browser to trust your PolarProxy instance’s root CA certificate first, as explained in the “Trusting the PolarProxy root CA” section of our PolarProxy documentation.

The Windows version of PolarProxy is a .NET framework-dependent application, which requires the .NET 6 runtime to be installed. The PolarProxy releases for other platforms (Linux x64, ARM and ARM64) are all self-contained applications, which are published with the .NET runtime built-in.

Visit our PolarProxy page to download and install PolarProxy.

Posted by Erik Hjelmvik on Thursday, 13 January 2022 10:15:00 (UTC/GMT)

Tags: #PolarProxy#proxy#SOCKS#SOCKS5#TLS#SSL#decrypt#Windows#PCAP-over-IP#pcapoverip

Short URL: https://netresec.com/?b=221953b


PolarProxy in Podman

PolarProxy + Podman Logo

Podman is a daemonless Linux container engine, which can be used as a more secure alternative to Docker. This blog post demonstrates how to run PolarProxy in a rootless container using Podman. If you still prefer to run PolarProxy in Docker, then please read our blog post "PolarProxy in Docker" instead.

Install Podman and fuse-overlayfs

Install Podman according to the official Podman installation instructions. Then install fuse-overlayfs, which is an overlay file system for rootless containers. Fuse-overlayfs can be installed in Debian/Ubuntu with "sudo apt install fuse-overlayfs" and in CentOS with "sudo yum install fuse-overlayfs".

Create a Podman Image for PolarProxy

Create a Dockerfile with the following contents:

FROM mcr.microsoft.com/dotnet/runtime:6.0
EXPOSE 10443
EXPOSE 10080
EXPOSE 57012
RUN groupadd -g 31337 polarproxy && useradd -m -u 31337 -g polarproxy polarproxy && mkdir -p /var/log/PolarProxy /opt/polarproxy && chown polarproxy:polarproxy /var/log/PolarProxy && apt-get update && apt-get install -y curl && curl -s https://www.netresec.com/?download=PolarProxy | tar -xzf - -C /opt/polarproxy
USER polarproxy
WORKDIR /opt/polarproxy/
ENTRYPOINT ["dotnet", "PolarProxy.dll"]
CMD ["-v", "-p", "10443,80,443", "-o", "/var/log/PolarProxy/", "--certhttp", "10080", "--pcapoverip", "57012"]

Save the Docker file as "Dockerfile" (no extension) in an empty directory and start a shell in that directory. Build a PolarProxy Podman image with:

podman build -f Dockerfile -t polarproxy

Test the PolarProxy Podman Image

Take the polarproxy Podman image for a test run. Start it with:

podman run -it --rm --name polarproxy -p 10443 localhost/polarproxy

Establish an HTTPS connection through PolarProxy by running this curl command from another shell on the same machine:

curl --insecure --connect-to www.netresec.com:443:127.0.0.1:10443 https://www.netresec.com/

If everything works alright, then curl should output HTML and the interactive Podman session running the polarproxy image should print something like:

<6>[10443] 127.0.0.1 -> N/A Connection from: 127.0.0.1:44122
<6>[10443] 127.0.0.1 -> www.netresec.com Connection request for: www.netresec.com from 127.0.0.1:44122
<6>[10443] 127.0.0.1 -> www.netresec.com Action: DECRYPT

Create a Podman Container for PolarProxy

Create directories "pcap" and "polarproxy", where PolarProxy should store the decrypted network traffic and its root CA certificate.

mkdir pcap polarproxy
podman unshare chown 31337:31337 pcap polarproxy

Create a container called "polarproxy", which has the "pcap" and "polarproxy" directories mounted as volumes. The service on TCP 10080 will serve the proxy's public root cert over HTTP. The localhost:57012 service is a Pcap-over-IP server, from which the decrypted network traffic can be streamed in real-time.

podman create --name polarproxy -v $(pwd)/pcap:/var/log/PolarProxy -v $(pwd)/polarproxy:/home/polarproxy -p 10443 -p 10080 -p 127.0.0.1:57012:57012 localhost/polarproxy

Create and enable a systemd user service that will run the container.

mkdir -p ~/.config/systemd/user/
podman generate systemd -n polarproxy > ~/.config/systemd/user/container-polarproxy.service
systemctl --user enable container-polarproxy.service

Start the systemd user service to activate the PolarProxy container.

systemctl --user start container-polarproxy.service

Verify that the service is running and that you can view the logs from PolarProxy.

systemctl --user status container-polarproxy.service
podman logs polarproxy

Expose PolarProxy to the Network

Create a firewall rule to redirect incoming TCP 443 packets to the PolarProxy service listening on port 10443.
sudo iptables -t nat -A PREROUTING -d 10.11.12.13 -p tcp --dport 443 -j REDIRECT --to 10443
Note: Replace "10.11.12.13" with the IP of the PolarProxy machine

Try making an HTTPS connection via PolarProxy from another PC on the network.

C:\> curl --insecure --resolve www.netresec.com:443:10.11.12.13 https://www.netresec.com/
Note: Replace "10.11.12.13" with the IP of the PolarProxy machine

Don't forget to save the firewall redirect rule if it is working as desired!

Redirect HTTPS and Trust the Root CA

You can now redirect outgoing TCP 443 traffic from your network to your Podman/PolarProxy host. Review the "Routing HTTPS Traffic to the Proxy" section on the PolarProxy page for recommendations on how to redirect outgoing traffic to PolarProxy.

Finally, configure the operating system, browsers and other applications that will get their TLS traffic proxied by PolarProxy to trust the root CA of the PolarProxy service running in your Podman container. Follow the steps in the "Trusting the PolarProxy root CA" section of the PolarProxy documentation in order to install the root cert.

Accessing Decrypted TLS Traffic

You should be able to access PCAP files with the decrypted HTTPS traffic in the "pcap" directory.

It is also possible view the decrypted traffic in real-time by using netcat and tcpdump as a Pcap-over-IP client like this:

nc localhost 57012 | tcpdump -nr - -X

It probably makes more sense to forward the decrypted traffic to an IDS or other type of network security monitoring tool though. See our blog posts "Sniffing Decrypted TLS Traffic with Security Onion" and "Capturing Decrypted TLS Traffic with Arkime" for instructions on how to forward the decrypted network traffic to a network monitoring solution like Security Onion or Arkime.

PolarProxy in Podman on ARM Linux

PolarProxy can also run on ARM Linux installations, such as a Raspberry Pi. However, the Dockerfile must be modified slightly in order to do so.

ARM 32-bit / AArch32 / ARMv7 If you're running an "arm32" Linux OS, then change the download link in the "RUN" instruction to the following URL:
https://www.netresec.com/?download=PolarProxy_linux-arm

ARM 64-bit / AArch64 / ARMv8 If you're running an "arm64" Linux OS, then change the download link in the "RUN" instruction to the following URL:
https://www.netresec.com/?download=PolarProxy_linux-arm64

Don't know if you're running a 32-bit or 64-bit OS? Run "uname -m" and check if the output says "armv7*" (arm32), "armv8*" (arm64) or "aarch64" (arm64).

See our blog post "Raspberry PI WiFi Access Point with TLS Inspection" for more details about deploying PolarProxy on a Raspberry Pi.

ʕ•ᴥ•ʔ + 🦭 = 💜

Posted by Erik Hjelmvik on Tuesday, 27 October 2020 18:33:00 (UTC/GMT)

Tags: #PolarProxy#Docker#TLS#HTTPS#Proxy#curl#PCAP#Dockerfile#DNAT#container#arm32#arm64#AArch64#PCAP-over-IP#pcapoverip#systemctl#systemd

Short URL: https://netresec.com/?b=20A16ef


PolarProxy in Docker

PolarProxy + Docker

Our transparent TLS proxy PolarProxy is gaining lots of popularity due to how effective it is at generating decrypted PCAP files in combination with how easy it is to deploy. In this blog post we will show how to run PolarProxy in Docker.

Installation Instructions

Create a Dockerfile with the following contents:

FROM mcr.microsoft.com/dotnet/runtime:6.0
EXPOSE 10443
EXPOSE 10080
EXPOSE 57012
RUN groupadd -g 31337 polarproxy && useradd -m -u 31337 -g polarproxy polarproxy && mkdir -p /var/log/PolarProxy /opt/polarproxy && chown polarproxy:polarproxy /var/log/PolarProxy && apt-get update && apt-get install -y curl && curl -s https://www.netresec.com/?download=PolarProxy | tar -xzf - -C /opt/polarproxy
VOLUME ["/var/log/PolarProxy/", "/home/polarproxy/"]
USER polarproxy
WORKDIR /opt/polarproxy/
ENTRYPOINT ["dotnet", "PolarProxy.dll"]
CMD ["-v", "-p", "10443,80,443", "-o", "/var/log/PolarProxy/", "--certhttp", "10080", "--pcapoverip", "0.0.0.0:57012"]

Save the Docker file as "Dockerfile" (no extension) in an empty directory and start a shell in that directory with root privileges.


Update (2024-05-02): Additional dockerfiles can now be found in https://github.com/Netresec/PolarProxy/tree/main/dockerfiles

Build the PolarProxy Docker image with:

docker build -t polarproxy-image .

Next, create a Docker container named "polarproxy":

docker create -p 443:10443 -p 10443:10443 -p 10080:10080 --name polarproxy polarproxy-image
The "-p" switches in this command define three DNAT rules that will get activated when the polarproxy container is started. The first DNAT rule forwards incoming TCP port 443 traffic to the polarproxy Docker container's transparent TLS proxy service on TCP port 10443. The second one does the same thing, but for incoming traffic to TCP 10443. The last one forwards TCP port 10080 traffic to a web server that delivers the public X.509 certificate of the proxy.

It is now time to start the polarproxy container:

docker start polarproxy

Verify that PolarProxy is running:

docker ps
docker logs polarproxy

Try fetching PolarProxy's public root CA certificate with curl and then connect to a website over HTTPS through the proxy:

curl -sL http://localhost:10080 | openssl x509 -inform DER -issuer -noout -dates
curl --insecure --connect-to www.netresec.com:443:127.0.0.1:10443 https://www.netresec.com/
curl --insecure --resolve www.netresec.com:443:127.0.0.1 https://www.netresec.com/

Redirect HTTPS and Trust the Root CA

You can now redirect outgoing TCP 443 traffic from your network to your Docker host. Review the "Routing HTTPS Traffic to the Proxy" section on the PolarProxy page for recommendations on how to redirect outgoing traffic to PolarProxy.

Finally, configure the operating system, browsers and other applications that will get their TLS traffic proxied by PolarProxy to trust the root CA of the PolarProxy service running in your Docker container. Follow the steps in the "Trusting the PolarProxy root CA" section of the PolarProxy documentation in order to install the root cert.

Docker Volumes

The Docker file we used in this blog post defines two volumes. The first volume is mounted on "/var/log/PolarProxy" in the container, which is where the decrypted network traffic will be stored as hourly rotated PCAP files. The second volume is the polarproxy home directory, under which PolarProxy will store its private root CA certificate.

The volumes are typically located under "/var/lib/docker/volumes" on the Docker host's file system. You can find the exact path by running:

docker volume ls
docker volume inspect <VOLUME_NAME>

Or use find to list *.pcap files in the Docker volumes directory:

find /var/lib/docker/volumes/ -name *.pcap
/var/lib/docker/volumes/7ebb3f56fd4ceab96[...]/_data/​proxy-201006-095937.pcap/var/lib/docker/volumes/7ebb3f56fd4ceab96[...]/_data/​proxy-201006-105937.pcap/var/lib/docker/volumes/7ebb3f56fd4ceab96[...]/_data/​proxy-201006-115937.pcap

The full path of your private PolarProxy Root CA certificate, which is located under "/home/polarproxy/" in the Docker container, can also be located using find:

find /var/lib/docker/volumes/ -name *.p12
/var/lib/docker/volumes/dcabbbac10e1b1461[...]/_data/​.local/share/PolarProxy/​e249f9c497d7b5c41339f153a31eda1c.p12

We recommend reusing the "/home/polarproxy/" volume, when deploying new PolarProxy instances or upgrading to a new version of PolarProxy, in order to avoid having to re-configure clients to trust a new root CA every time a new PolarProxy container is created.

PolarProxy in Docker on ARM Linux

PolarProxy can also run on ARM Linux installations, such as a Raspberry Pi. However, the Dockerfile must be modified slightly in order to do so.

ARM 32-bit / AArch32 / ARMv7 If you're running an "arm32" Linux OS, then change the download link in the "RUN" instruction to the following URL:
https://www.netresec.com/?download=PolarProxy_linux-arm

ARM 64-bit / AArch64 / ARMv8 If you're running an "arm64" Linux OS, then change the download link in the "RUN" instruction to the following URL:
https://www.netresec.com/?download=PolarProxy_linux-arm64

Don't know if you're running a 32-bit or 64-bit OS? Run "uname -m" and check if the output says "armv7*" (arm32), "armv8*" (arm64) or "aarch64" (arm64).

See our blog post "Raspberry PI WiFi Access Point with TLS Inspection" for more details about deploying PolarProxy on a Raspberry Pi (without Docker).

Credits

We'd like to thank Jonas Lejon for contacting us back in February about the work he had done to get PolarProxy running in Docker. We used Jonas' work as a starting point when building the installation instructions in this how-to guide.

We also want to thank Erik Ahlström for providing valuable feedback on the instructions in this guide.

ʕ•ᴥ•ʔ + 🐳 = 💜

Posted by Erik Hjelmvik on Wednesday, 07 October 2020 08:09:00 (UTC/GMT)

Tags: #PolarProxy#Docker#TLS#HTTPS#Proxy#TLSI#Dockerfile#curl#x509#X.509#PCAP#DNAT#container#DNAT#arm32#arm64#AArch64#PCAP-over-IP#pcapoverip

Short URL: https://netresec.com/?b=20Accbd


Installing a Fake Internet with INetSim and PolarProxy

INetSim + PolarProxy

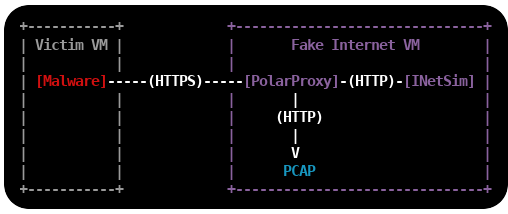
This is a tutorial on how to set up an environment for dynamic malware analysis, which can be used to analyze otherwise encrypted HTTPS and SMTPS traffic without allowing the malware to connect to the Internet. Dynamic malware analysis (or behavioral analysis) is performed by observing the behavior of a malware while it is running. The victim machine, which executes the malware, is usually a virtual machine that can be rolled back to a clean state when the analysis is complete. The safest way to prevent the malware from infecting other machines, or doing other bad things like sending SPAM or taking part in DDoS attacks, is to run the victim machine in an offline environment. However, network traffic analysis of malware is a central part of dynamic malware analysis, which is is why a “fake Internet” is needed in most malware labs.

INetSim and PolarProxy

INetSim is a software suite that simulates common internet services like HTTP, DNS and SMTP, which useful when analyzing the network behavior of malware samples without connecting them to the Internet. INetSim also has basic support for TLS encrypted protocols, like HTTPS, SMTPS, POP3S and FTPS, but requires a pre-defined X.509-certificate to be loaded at startup. This can cause malware to terminate because the Common Names (CN) in the presented certificates don’t match the requested server names. The victim machine will actually get the exact same certificate regardless of which web site it visits. INetSim’s TLS encryption also inhibits analysis of the network traffic captured in the malware lab, such as C2 traffic or SPAM runs, because the application layer traffic is encrypted. PolarProxy can solve both these issues because it generates certificates on the fly, where the CN value is dynamically set to the requested host name, and saves the network traffic in decrypted form to PCAP files. It is therefore a good idea to replace the TLS services in INetSim with PolarProxy, which will be used as a TLS termination proxy that forwards the decrypted traffic to INetSim’s cleartext services.

Malware Lab Setup

Install Linux

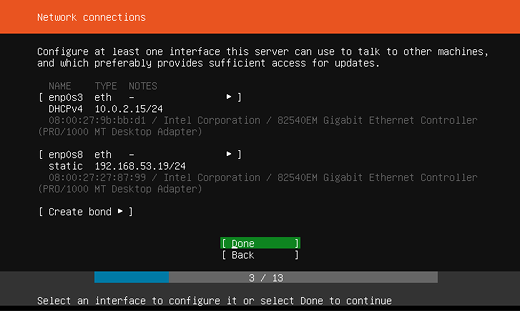
The first step is to install a Linux VM, which will act as a fake Internet to the victim machine(s). I'm using Ubuntu Server 18.04.3 LTS in this tutorial, but you can use any 64-bit linux distro. I'm adding two network interfaces to the Linux VM, one interface with Internet access and one that connects to an isolated offline network to which the victim VM's will be connected. The offline interface is configured to use the static IP 192.168.53.19.

Important: Do not bridge, bond or enable IP forwarding between the two interfaces!

Network connection config Ubuntu Server 18.04

Install INetSim

INetSim is available in Ubuntu's repo, so it is possible to install it with "apt install inetsim". However, I recommend installing INetSim as described in the official documentation to get the latest packaged version of INetSim.

sudo -s

echo "deb http://www.inetsim.org/debian/ binary/" > /etc/apt/sources.list.d/inetsim.list

curl https://www.inetsim.org/inetsim-archive-signing-key.asc | apt-key add -

apt update

apt install inetsim

exit

INetSim listens on 127.0.0.1 by default, change this to INetSim's offline IP address by un-commenting and editing the service_bind_address variable in /etc/inetsim/inetsim.conf.

service_bind_address    192.168.53.19

Also configure INetSim's fake DNS server to resolve all domain names to the IP of INetSim with the dns_default_ip setting:

dns_default_ip    192.168.53.19

Finally, disable the "start_service https" and "start_service smtps" lines, because these services will be replaced with PolarProxy:

start_service dns
start_service http
#start_service https
start_service smtp
#start_service smtps

Restart the INetSim service after changing the config.

sudo systemctl restart inetsim.service

Verify that you can access INetSim's HTTP server with curl:

curl http://192.168.53.19

<html>
  <head>
    <title>INetSim default HTML page</title>
  </head>
  <body>
    <p></p>
    <p align="center">This is the default HTML page for INetSim HTTP server fake mode.</p>
    <p align="center">This file is an HTML document.</p>
  </body>
</html>

It looks like INetSim's web server can be accessed alright.

Install PolarProxy

Next step is to install PolarProxy as a systemd service (as instructed here):

sudo adduser --system --shell /bin/bash proxyuser

sudo mkdir /var/log/PolarProxy

sudo chown proxyuser:root /var/log/PolarProxy/

sudo chmod 0775 /var/log/PolarProxy/

sudo su - proxyuser

mkdir ~/PolarProxy

cd ~/PolarProxy/

curl https://www.netresec.com/?download=PolarProxy | tar -xzvf -

exit

sudo cp /home/proxyuser/PolarProxy/PolarProxy.service /etc/systemd/system/PolarProxy.service

We will need to modify the PolarProxy service config file a bit before we start it. Edit the ExecStart setting in /etc/systemd/system/PolarProxy.service to configure PolarProxy to terminate the TLS encryption for HTTPS and SMTPS (implicitly encrypted email submission). The HTTPS traffic should be redirected to INetSim's web server on tcp/80 and the SMTPS to tcp/25.

ExecStart=/home/proxyuser/PolarProxy/PolarProxy -v -p 10443,80,80 -p 10465,25,25 -x /var/log/PolarProxy/polarproxy.cer -f /var/log/PolarProxy/proxyflows.log -o /var/log/PolarProxy/ --certhttp 10080 --terminate --connect 192.168.53.19 --nosni nosni.inetsim.org

Here's a break-down of the arguments sent to PolarProxy through the ExecStart setting above:

  • -v : verbose output in syslog (not required)
  • -p 10443,80,80 : listen for TLS connections on tcp/10443, save decrypted traffic in PCAP as tcp/80, forward traffic to tcp/80
  • -p 10465,25,25 : listen for TLS connections on tcp/10465, save decrypted traffic in PCAP as tcp/25, forward traffic to tcp/25
  • -x /var/log/PolarProxy/polarproxy.cer : Save certificate to be imported to clients in /var/log/PolarProxy/polarproxy.cer (not required)
  • -f /var/log/PolarProxy/proxyflows.log : Log flow meta data in /var/log/PolarProxy/proxyflows.log (not required)
  • -o /var/log/PolarProxy/ : Save PCAP files with decrypted traffic in /var/log/PolarProxy/
  • --certhttp 10080 : Make the X.509 certificate available to clients over http on tcp/10080
  • --terminate : Run PolarProxy as a TLS termination proxy, i.e. data forwarded from the proxy is decrypted
  • --connect 192.168.53.19 : forward all connections to the IP of INetSim
  • --nosni nosni.inetsim.org : Accept incoming TLS connections without SNI, behave as if server name was "nosni.inetsim.org".

Finally, start the PolarProxy systemd service:

sudo systemctl enable PolarProxy.service

sudo systemctl start PolarProxy.service

Verify that you can reach INetSim through PolarProxy's TLS termination proxy using curl:

curl --insecure --connect-to example.com:443:192.168.53.19:10443 https://example.com

<html>
  <head>
    <title>INetSim default HTML page</title>
  </head>
  <body>
    <p></p>
    <p align="center">This is the default HTML page for INetSim HTTP server fake mode.</p>
    <p align="center">This file is an HTML document.</p>
  </body>
</html>

Yay, it is working! Do the same thing again, but also verify the certificate against PolarProxy's root CA this time. The root certificate is downloaded from PolarProxy via the HTTP service running on tcp/10080 and then converted from DER to PEM format using openssl, so that it can be used with curl's "--cacert" option.

curl http://192.168.53.19:10080/polarproxy.cer > polarproxy.cer

openssl x509 -inform DER -in polarproxy.cer -out polarproxy-pem.crt

curl --cacert polarproxy-pem.crt --connect-to example.com:443:192.168.53.19:10443 https://example.com

<html>
  <head>
    <title>INetSim default HTML page</title>
  </head>
  <body>
    <p></p>
    <p align="center">This is the default HTML page for INetSim HTTP server fake mode.</p>
    <p align="center">This file is an HTML document.</p>
  </body>
</html>

Yay #2!

Now let's set up routing to forward all HTTPS traffic to PolarProxy's service on tcp/10443 and SMTPS traffic to tcp/10465. I'm also adding a firewall rule to redirect ALL other incoming traffic to INetSim, regardless of which IP it is destined to, with the final REDIRECT rule. Make sure to replace "enp0s8" with the name of your interface.

sudo iptables -t nat -A PREROUTING -i enp0s8 -p tcp --dport 443 -j REDIRECT --to 10443

sudo iptables -t nat -A PREROUTING -i enp0s8 -p tcp --dport 465 -j REDIRECT --to 10465

sudo iptables -t nat -A PREROUTING -i enp0s8 -j REDIRECT

Verify that the iptables port redirection rule is working from another machine connected to the offline 192.168.53.0/24 network:

curl --insecure --resolve example.com:443:192.168.53.19 https://example.com

<html>
  <head>
    <title>INetSim default HTML page</title>
  </head>
  <body>
    <p></p>
    <p align="center">This is the default HTML page for INetSim HTTP server fake mode.</p>
    <p align="center">This file is an HTML document.</p>
  </body>
</html>

Yay #3!

curl --insecure --resolve example.com:465:192.168.53.19 smtps://example.com

214-Commands supported:
214- HELO MAIL RCPT DATA
214- RSET NOOP QUIT EXPN
214- HELP VRFY EHLO AUTH
214- ETRN STARTTLS
214 For more info use "HELP <topic>".

Yay #4!

It is now time to save the firewall rules, so that they will survive reboots.

sudo apt-get install iptables-persistent

Install the Victim Windows PC

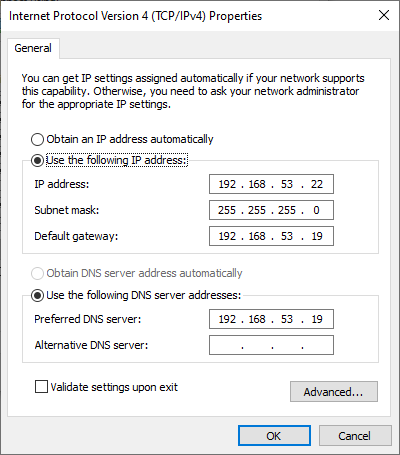
Configure a static IP address on the victim Windows host by manually setting the IP address. Set the INetSim machine (192.168.53.19) as the default gateway and DNS server.

Windows IPv4 Properties

Download the X.509 root CA certificate from your PolarProxy installation here:
http://192.168.53.19:10080/polarproxy.cer

  1. Double-click on "polarproxy.cer"
  2. Click [Install Certificate...]
  3. Select 🔘 Local Machine and press [Next]
  4. Select 🔘 Place all certificates in the following store and press [Browse...]
  5. Choose "Trusted Root Certification Authorities" and press [OK], then [Next]
  6. Press [Finish]

You might also want to install the PolarProxy certificate in your browser. This is how you install it to Firefox:

  1. Options / Preferences
  2. Press [Privacy & Security]
  3. Scroll down to "Certificates" and press [View Certificates...]
  4. In the "Authorities" tab, press [Import...]
  5. Open "polarproxy.cer"
  6. ☑ Trust this CA to identify websites. (check the box)
  7. Press [OK]

Now, open a browser and try visiting some websites over HTTP or HTTPS. If you get the following message regardless of what domain you try to visit, then you've managed to set everything up correctly:

This is the default HTML page for INetSim HTTP server fake mode.

This file is an HTML document.

Accessing the Decrypted Traffic

PCAP files with decrypted HTTPS and SMTPS traffic are now available in /var/log/PolarProxy/

PolarProxy will start writing to a new capture file every 60 minutes. However, the captured packets are not written to disk instantly because PolarProxy uses buffered file writing in order to improve performance. You can restart the proxy service if you wish to flush the buffered packets to disk and have PolarProxy rotate to a new capture file.

sudo systemctl restart PolarProxy

I also recommend capturing all network traffic sent to INetSim with a sniffer like netsniff-ng. This way you’ll get PCAP files with traffic from INetSim’s cleartext services (like DNS and HTTP) as well.

PCAP or it didn’t happen!

Credits

I'd like to thank Thomas Hungenberg and Patrick Desnoyers for providing valuable feedback for this blog post!

Posted by Erik Hjelmvik on Monday, 09 December 2019 08:40:00 (UTC/GMT)

Tags: #PolarProxy#HTTPS#SMTPS#HTTP#SMTP#DNS#Malware#Sandbox#TLS#PCAP#proxy#tutorial#ASCII-art

Short URL: https://netresec.com/?b=19Ce12f

X / twitter

NETRESEC on X / Twitter: @netresec

Mastodon

NETRESEC on Mastodon: @netresec@infosec.exchange