NETRESEC Network Security Blog - Tag : malware

rss Google News

Running NetworkMiner in Windows Sandbox

NetworkMiner can be run in a highly efficient Windows Sandbox in order to analyze malicious PCAP files in Windows without accidentally infecting your Windows PC. This blog post shows how to set up a Windows Sandbox that always boots up a fresh install of Windows 10 with the latest version of NetworkMiner installed.

I generally recommend analyzing Windows malware in Linux, or some other non-Windows environment, in order to avoid accidentally infecting yourself (NetworkMiner runs fine in Linux btw). Nevertheless, I still often find myself loading capture files containing malicious network traffic into CapLoader and NetworkMiner under Windows. I have previously demonstrated that this can be a quick and crude way to perform an anti virus scan of files contained in a pcap file.

Windows Sandbox

If you want to analyze malicious traffic in Windows with minimal risk of infecting yourself then you should definitely check out Microsoft’s Windows Sandbox (available in Windows 10 Pro and Enterprise editions). The Windows Sandbox is using Windows containers, so it’s very efficient compared to spinning up a full Windows VM. It also provides features like kernel isolation, so that the sandbox container doesn’t use the same kernel as the host, and ensures that a new Windows environment is created every time the sandbox is run. Windows Sandbox also doesn't run any anti-virus, so it won't interfere with the extraction of malicious contents from within the analyzed capture files.

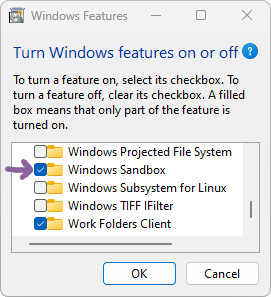
Optional Features, Windows Sandbox Follow these steps to install Windows Sandbox:

  1. Run OptionalFeatures.exe, aka “Turn Windows features on or off”
  2. Enable the “Windows Sandbox” feature (check the box)
  3. Reboot

Or run this PowerShell command as administrator and then reboot:

Enable-WindowsOptionalFeature -FeatureName "Containers-DisposableClientVM" -All -Online

Then create a sandbox config, which downloads and installs the latest version of NetworkMiner every time the sandbox is started, by creating a file called “NetworkMinerSandbox.wsb” with the following contents:

<Configuration>
  <MappedFolders>
    <MappedFolder>
      <!-- Replace path below with your PCAP dir -->
      <HostFolder>C:\Users\Erik\pcap</HostFolder>
      <ReadOnly>true</ReadOnly>
    </MappedFolder>
  </MappedFolders>
  <LogonCommand>
    <Command>cmd.exe /C "curl -L https://www.netresec.com/?download=NetworkMiner | tar -C C:\Users\WDAGUtilityAccount\Desktop\ -xf -"</Command>
  </LogonCommand>
</Configuration>

Note: Replace “C:\Users\Erik\pcap” with whatever location your capture files are at

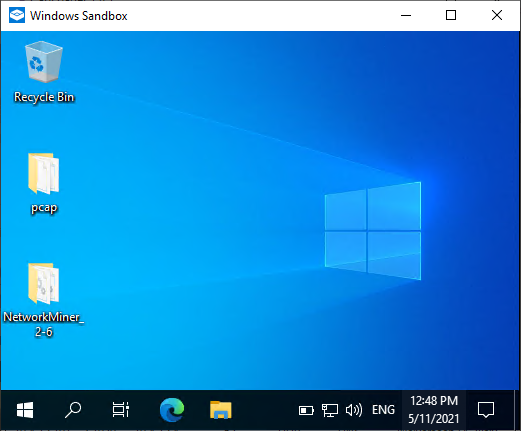
After starting NetworkMinerSandbox.wsb you’ll have a fresh Windows machine up and running within a couple of seconds. The latest version of NetworkMiner and your PCAP dir are both accessible from the sandbox’s desktop.

Windows Sandbox

Image: NetworkMiner 2.6 installed in a clean Windows Sandbox environment

Moving files in or out of the sandbox is just a matter of copy and paste (Ctrl+C / Ctrl+V).

VirtualBox and Windows Sandbox

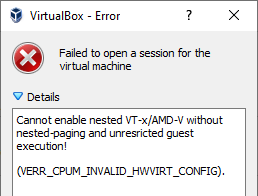
VirtualBox error message Cannot enable nested VT-x/AMD-V without nested-paging and unrestricted guest execution

Are you using VirtualBox to run virtual machines on your Windows host and getting an error message saying “Failed to open a session for the virtual machine”, with details such as “Failed to get device handle and/or partition ID” (VERR_NEM_VM_CREATE_FAILED) or “Cannot enable nested VT-x/AMD-V without nested-paging and unrestricted guest execution”, after enabling Windows Sandbox?

Even though Windows Sandbox doesn’t need Hyper-V it still requires a hypervisor, which unfortunately conflicts with VirtualBox. You can disable the hypervisor by running the following command as administrator:

bcdedit.exe /set hypervisorlaunchtype off

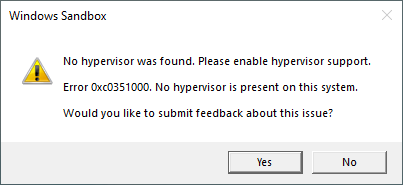
...and then restart the computer. Turning off the hypervisor will unfortunately prevent Windows Sandbox from running, giving an error message saying “No hypervisor was found. Please enable hypervisor support.” (Error 0xc0351000)

Windows Sandbox error message No hypervisor was found. Please enable hypervisor support. Error 0xc0351000. No hypervisor is present on this system

To re-enable the hypervisor, in order to run Windows Sandbox again, you’ll need to run

bcdedit.exe /set hypervisorlaunchtype auto

and restart the host.

Update May 26, 2021

We have now uploaded a simple Windows Sandbox config to our website here:

https://www.netresec.com/?download=NetworkMinerSandbox

This script runs on any Windows Pro machine that has the Sandbox feature active.

Posted by Erik Hjelmvik on Tuesday, 11 May 2021 13:39:00 (UTC/GMT)

Tags: #Netresec#NetworkMiner#PCAP#Windows#Sandbox#Windows Sandbox#Malware

Short URL: https://netresec.com/?b=215d5b5


Installing a Fake Internet with INetSim and PolarProxy

INetSim + PolarProxy

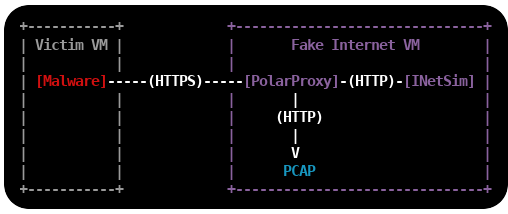
This is a tutorial on how to set up an environment for dynamic malware analysis, which can be used to analyze otherwise encrypted HTTPS and SMTPS traffic without allowing the malware to connect to the Internet. Dynamic malware analysis (or behavioral analysis) is performed by observing the behavior of a malware while it is running. The victim machine, which executes the malware, is usually a virtual machine that can be rolled back to a clean state when the analysis is complete. The safest way to prevent the malware from infecting other machines, or doing other bad things like sending SPAM or taking part in DDoS attacks, is to run the victim machine in an offline environment. However, network traffic analysis of malware is a central part of dynamic malware analysis, which is is why a “fake Internet” is needed in most malware labs.

INetSim and PolarProxy

INetSim is a software suite that simulates common internet services like HTTP, DNS and SMTP, which useful when analyzing the network behavior of malware samples without connecting them to the Internet. INetSim also has basic support for TLS encrypted protocols, like HTTPS, SMTPS, POP3S and FTPS, but requires a pre-defined X.509-certificate to be loaded at startup. This can cause malware to terminate because the Common Names (CN) in the presented certificates don’t match the requested server names. The victim machine will actually get the exact same certificate regardless of which web site it visits. INetSim’s TLS encryption also inhibits analysis of the network traffic captured in the malware lab, such as C2 traffic or SPAM runs, because the application layer traffic is encrypted. PolarProxy can solve both these issues because it generates certificates on the fly, where the CN value is dynamically set to the requested host name, and saves the network traffic in decrypted form to PCAP files. It is therefore a good idea to replace the TLS services in INetSim with PolarProxy, which will be used as a TLS termination proxy that forwards the decrypted traffic to INetSim’s cleartext services.

Malware Lab Setup

Install Linux

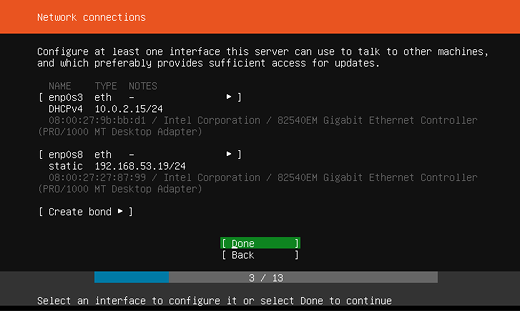
The first step is to install a Linux VM, which will act as a fake Internet to the victim machine(s). I'm using Ubuntu Server 18.04.3 LTS in this tutorial, but you can use any 64-bit linux distro. I'm adding two network interfaces to the Linux VM, one interface with Internet access and one that connects to an isolated offline network to which the victim VM's will be connected. The offline interface is configured to use the static IP 192.168.53.19.

Important: Do not bridge, bond or enable IP forwarding between the two interfaces!

Network connection config Ubuntu Server 18.04

Install INetSim

INetSim is available in Ubuntu's repo, so it is possible to install it with "apt install inetsim". However, I recommend installing INetSim as described in the official documentation to get the latest packaged version of INetSim.

sudo -s

echo "deb http://www.inetsim.org/debian/ binary/" > /etc/apt/sources.list.d/inetsim.list

curl https://www.inetsim.org/inetsim-archive-signing-key.asc | apt-key add -

apt update

apt install inetsim

exit

INetSim listens on 127.0.0.1 by default, change this to INetSim's offline IP address by un-commenting and editing the service_bind_address variable in /etc/inetsim/inetsim.conf.

service_bind_address    192.168.53.19

Also configure INetSim's fake DNS server to resolve all domain names to the IP of INetSim with the dns_default_ip setting:

dns_default_ip    192.168.53.19

Finally, disable the "start_service https" and "start_service smtps" lines, because these services will be replaced with PolarProxy:

start_service dns
start_service http
#start_service https
start_service smtp
#start_service smtps

Restart the INetSim service after changing the config.

sudo systemctl restart inetsim.service

Verify that you can access INetSim's HTTP server with curl:

curl http://192.168.53.19

<html>
  <head>
    <title>INetSim default HTML page</title>
  </head>
  <body>
    <p></p>
    <p align="center">This is the default HTML page for INetSim HTTP server fake mode.</p>
    <p align="center">This file is an HTML document.</p>
  </body>
</html>

It looks like INetSim's web server can be accessed alright.

Install PolarProxy

Next step is to install PolarProxy as a systemd service (as instructed here):

sudo adduser --system --shell /bin/bash proxyuser

sudo mkdir /var/log/PolarProxy

sudo chown proxyuser:root /var/log/PolarProxy/

sudo chmod 0775 /var/log/PolarProxy/

sudo su - proxyuser

mkdir ~/PolarProxy

cd ~/PolarProxy/

curl https://www.netresec.com/?download=PolarProxy | tar -xzvf -

exit

sudo cp /home/proxyuser/PolarProxy/PolarProxy.service /etc/systemd/system/PolarProxy.service

We will need to modify the PolarProxy service config file a bit before we start it. Edit the ExecStart setting in /etc/systemd/system/PolarProxy.service to configure PolarProxy to terminate the TLS encryption for HTTPS and SMTPS (implicitly encrypted email submission). The HTTPS traffic should be redirected to INetSim's web server on tcp/80 and the SMTPS to tcp/25.

ExecStart=/home/proxyuser/PolarProxy/PolarProxy -v -p 10443,80,80 -p 10465,25,25 -x /var/log/PolarProxy/polarproxy.cer -f /var/log/PolarProxy/proxyflows.log -o /var/log/PolarProxy/ --certhttp 10080 --terminate --connect 192.168.53.19 --nosni nosni.inetsim.org

Here's a break-down of the arguments sent to PolarProxy through the ExecStart setting above:

  • -v : verbose output in syslog (not required)
  • -p 10443,80,80 : listen for TLS connections on tcp/10443, save decrypted traffic in PCAP as tcp/80, forward traffic to tcp/80
  • -p 10465,25,25 : listen for TLS connections on tcp/10465, save decrypted traffic in PCAP as tcp/25, forward traffic to tcp/25
  • -x /var/log/PolarProxy/polarproxy.cer : Save certificate to be imported to clients in /var/log/PolarProxy/polarproxy.cer (not required)
  • -f /var/log/PolarProxy/proxyflows.log : Log flow meta data in /var/log/PolarProxy/proxyflows.log (not required)
  • -o /var/log/PolarProxy/ : Save PCAP files with decrypted traffic in /var/log/PolarProxy/
  • --certhttp 10080 : Make the X.509 certificate available to clients over http on tcp/10080
  • --terminate : Run PolarProxy as a TLS termination proxy, i.e. data forwarded from the proxy is decrypted
  • --connect 192.168.53.19 : forward all connections to the IP of INetSim
  • --nosni nosni.inetsim.org : Accept incoming TLS connections without SNI, behave as if server name was "nosni.inetsim.org".

Finally, start the PolarProxy systemd service:

sudo systemctl enable PolarProxy.service

sudo systemctl start PolarProxy.service

Verify that you can reach INetSim through PolarProxy's TLS termination proxy using curl:

curl --insecure --connect-to example.com:443:192.168.53.19:10443 https://example.com

<html>
  <head>
    <title>INetSim default HTML page</title>
  </head>
  <body>
    <p></p>
    <p align="center">This is the default HTML page for INetSim HTTP server fake mode.</p>
    <p align="center">This file is an HTML document.</p>
  </body>
</html>

Yay, it is working! Do the same thing again, but also verify the certificate against PolarProxy's root CA this time. The root certificate is downloaded from PolarProxy via the HTTP service running on tcp/10080 and then converted from DER to PEM format using openssl, so that it can be used with curl's "--cacert" option.

curl http://192.168.53.19:10080/polarproxy.cer > polarproxy.cer

openssl x509 -inform DER -in polarproxy.cer -out polarproxy-pem.crt

curl --cacert polarproxy-pem.crt --connect-to example.com:443:192.168.53.19:10443 https://example.com

<html>
  <head>
    <title>INetSim default HTML page</title>
  </head>
  <body>
    <p></p>
    <p align="center">This is the default HTML page for INetSim HTTP server fake mode.</p>
    <p align="center">This file is an HTML document.</p>
  </body>
</html>

Yay #2!

Now let's set up routing to forward all HTTPS traffic to PolarProxy's service on tcp/10443 and SMTPS traffic to tcp/10465. I'm also adding a firewall rule to redirect ALL other incoming traffic to INetSim, regardless of which IP it is destined to, with the final REDIRECT rule. Make sure to replace "enp0s8" with the name of your interface.

sudo iptables -t nat -A PREROUTING -i enp0s8 -p tcp --dport 443 -j REDIRECT --to 10443

sudo iptables -t nat -A PREROUTING -i enp0s8 -p tcp --dport 465 -j REDIRECT --to 10465

sudo iptables -t nat -A PREROUTING -i enp0s8 -j REDIRECT

Verify that the iptables port redirection rule is working from another machine connected to the offline 192.168.53.0/24 network:

curl --insecure --resolve example.com:443:192.168.53.19 https://example.com

<html>
  <head>
    <title>INetSim default HTML page</title>
  </head>
  <body>
    <p></p>
    <p align="center">This is the default HTML page for INetSim HTTP server fake mode.</p>
    <p align="center">This file is an HTML document.</p>
  </body>
</html>

Yay #3!

curl --insecure --resolve example.com:465:192.168.53.19 smtps://example.com

214-Commands supported:
214- HELO MAIL RCPT DATA
214- RSET NOOP QUIT EXPN
214- HELP VRFY EHLO AUTH
214- ETRN STARTTLS
214 For more info use "HELP <topic>".

Yay #4!

It is now time to save the firewall rules, so that they will survive reboots.

sudo apt-get install iptables-persistent

Install the Victim Windows PC

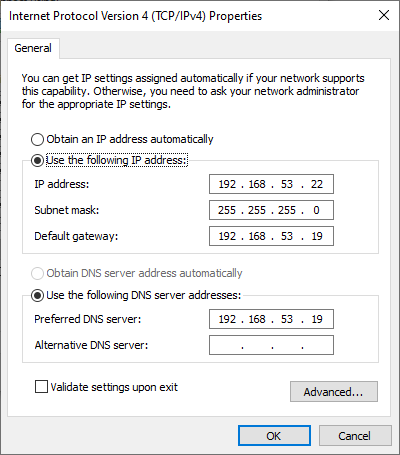
Configure a static IP address on the victim Windows host by manually setting the IP address. Set the INetSim machine (192.168.53.19) as the default gateway and DNS server.

Windows IPv4 Properties

Download the X.509 root CA certificate from your PolarProxy installation here:
http://192.168.53.19:10080/polarproxy.cer

  1. Double-click on "polarproxy.cer"
  2. Click [Install Certificate...]
  3. Select 🔘 Local Machine and press [Next]
  4. Select 🔘 Place all certificates in the following store and press [Browse...]
  5. Choose "Trusted Root Certification Authorities" and press [OK], then [Next]
  6. Press [Finish]

You might also want to install the PolarProxy certificate in your browser. This is how you install it to Firefox:

  1. Options / Preferences
  2. Press [Privacy & Security]
  3. Scroll down to "Certificates" and press [View Certificates...]
  4. In the "Authorities" tab, press [Import...]
  5. Open "polarproxy.cer"
  6. ☑ Trust this CA to identify websites. (check the box)
  7. Press [OK]

Now, open a browser and try visiting some websites over HTTP or HTTPS. If you get the following message regardless of what domain you try to visit, then you've managed to set everything up correctly:

This is the default HTML page for INetSim HTTP server fake mode.

This file is an HTML document.

Accessing the Decrypted Traffic

PCAP files with decrypted HTTPS and SMTPS traffic are now available in /var/log/PolarProxy/

PolarProxy will start writing to a new capture file every 60 minutes. However, the captured packets are not written to disk instantly because PolarProxy uses buffered file writing in order to improve performance. You can restart the proxy service if you wish to flush the buffered packets to disk and have PolarProxy rotate to a new capture file.

sudo systemctl restart PolarProxy

I also recommend capturing all network traffic sent to INetSim with a sniffer like netsniff-ng. This way you’ll get PCAP files with traffic from INetSim’s cleartext services (like DNS and HTTP) as well.

PCAP or it didn’t happen!

Credits

I'd like to thank Thomas Hungenberg and Patrick Desnoyers for providing valuable feedback for this blog post!

Posted by Erik Hjelmvik on Monday, 09 December 2019 08:40:00 (UTC/GMT)

Tags: #PolarProxy#HTTPS#SMTPS#HTTP#SMTP#DNS#Malware#Sandbox#TLS#PCAP#proxy#tutorial#ASCII-art

Short URL: https://netresec.com/?b=19Ce12f


Detecting the Pony Trojan with RegEx using CapLoader

This short video demonstrates how you can search through PCAP files with regular expressions (regex) using CapLoader and how this can be leveraged in order to improve IDS signatures.

The EmergingThreats snort/suricata rule mentioned in the video is SID 2014411 “ET TROJAN Fareit/Pony Downloader Checkin 2”.

The header accept-encoding header with quality factor 0 used by the Pony malware is:
Accept-Encoding: identity, *;q=0

And here is the regular expression used to search for that exact header: \r\nAccept-Encoding: identity, \*;q=0\r\n

After recording the video I noticed that the leaked source code for Pony 2.0 actually contains this accept-encoding header as a hard-coded string. Have a look in the redirect.php file, where they set curl’s CURLOPT_HTTPHEADER to this specific string.

Pony using curl to set: Accept-Encoding: identity, *;q=0

Wanna learn more about the intended use of quality factors in HTTP accept headers? Then have a look at section 14.1 of RFC 2616section 5.3.4 of RFC 7231, which defines how to use qvalues (i.e. quality factors) in the Accept-Encoding header.

Finally, I'd like to thank Brad Duncan for running the malware-traffic-analysis.net website, your PCAP files often come in handy!

Update 2018-07-05

I submitted a snort/suricata signature to the Emerging-Sigs mailinglist after publishing this blog post, which resulted in the Emerging Threats signature 2014411 being updated on that same day to include:

content:"|0d 0a|Accept-Encoding|3a 20|identity,|20 2a 3b|q=0|0d 0a|"; http_header;

Thank you @EmergingThreats for the fast turnaround!

Posted by Erik Hjelmvik on Wednesday, 04 July 2018 07:39:00 (UTC/GMT)

Tags: #video#regex#malware#IDS#curl#malware-traffic-analysis.net#videotutorial

Short URL: https://netresec.com/?b=187e291


Examining Malware Redirects with NetworkMiner Professional

This network forensics video tutorial covers analysis of a malware redirect chain, where a PC is infected through the RIG Exploit Kit. A PCAP file, from Brad Duncan's malware-traffic-analysis.net website, is opened in NetworkMiner Professional in order to follow a redirect chain via a couple of hacked websites before delivering malware to the PC.

Resources
https://www.malware-traffic-analysis.net/2014/11/16/index.html
Meadgive on VirusTotal
CVE-2014-0569 Flash Exploit on VirusTotal
CVE-2012-0507 Java Exploit on VirusTotal
NetworkMiner Professional

IOCs
www.ciniholland.nl
24corp-shop.com
stand.trustandprobaterealty.com
793b698a82d999f1eb75525d050ebe16
f8482f5c4632fe237d062451b42393498a8d628ed9dee27147251f484e837a42
7b3baa7d6bb3720f369219789e38d6ab
e2e33b802a0d939d07bd8291f23484c2f68ccc33dc0655eb4493e5d3aebc0747
1e34fdebbf655cebea78b45e43520ddf
178be0ed83a7a9020121dee1c305fd6ca3b74d15836835cfb1684da0b44190d3

Check out our series of network forensic video tutorials for more tips and tricks on how to analyze captured network traffic.

Posted by Erik Hjelmvik on Monday, 26 February 2018 11:19:00 (UTC/GMT)

Tags: #Netresec#Professional#NetworkMiner#NetworkMiner Professional#malware_traffic#malware#NSM#PCAP#videotutorial#video#tutorial

Short URL: https://netresec.com/?b=1829909


Antivirus Scanning of a PCAP File

This second video in our series of network forensic video tutorials covers a quick and crude way to scan a PCAP file for malware. It's all done locally without having to run the PCAP through an IDS. Kudos to Lenny Hanson for showing me this little trick!

Antivirus Scanning of a PCAP File

Resources

IOCs
178.62.142.240
soquumaihi.co.vu
9fd51fb05cb0ea89185fc1355ebf047cC
8cf7b281a0db4029456e416dbe05d21d17af0cad86f67e054268f5e2c46c43ed
119.238.10.9
96b430041aed13413ec2b5ae91954f39
e79ef634265b9686f90241be0e05940354dc2c2b43d087e09bb846eec34dad35

Posted by Erik Hjelmvik on Monday, 12 February 2018 08:00:00 (UTC/GMT)

Tags: #Netresec#PCAP#video#tutorial#videotutorial#NetworkMiner#malware#malware_traffic

Short URL: https://netresec.com/?b=1820d24


Examining an x509 Covert Channel

Jason Reaves gave a talk titled “Malware C2 over x509 certificate exchange” at BSides Springfield 2017, where he demonstrated that the SSL handshake can be abused by malware as a covert command-and-control (C2) channel.

Jason Reaves presenting at BSides Springfield 2017

He got the idea while analyzing the Vawtrak malware after discovering that it read multiple fields in the X.509 certificate provided by the server before proceeding. Jason initially thought these fields were used as a C2 channel, but then realized that Vawtrak performed a variant of certificate pinning in order to discover SSL man-in-the-middle attempts.

Nevertheless, Jason decided to actually implement a proof-of-concept (PoC) that uses the X.509 certificate as a C2 channel. Jason’s code is now available on GitHub along with a PCAP file demonstrating this covert C2 channel. Of course I couldn’t resist having a little look at this PCAP file in NetworkMiner.

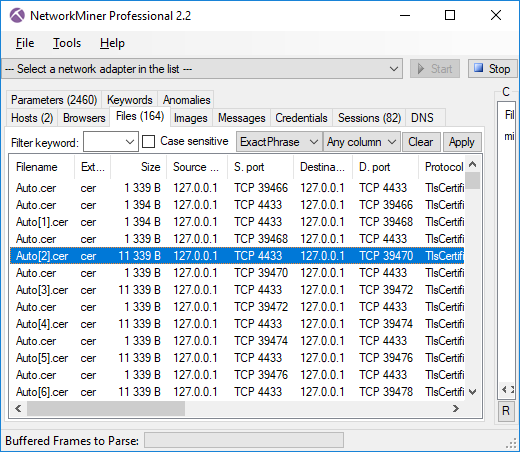
The first thing I noticed was that the proof-of-concept PCAP ran the SSL session on TCP 4433, which prevented NetworkMiner from parsing the traffic as SSL. However, I was able to parse the SSL traffic with NetworkMiner Professional just fine thanks to the port-independent-protocol-identification feature (a.k.a Dynamic Port Detection), which made the Pro-version parse TCP 4433 as SSL/TLS.

X.509 certificates extracted from PCAP with NetworkMiner
Image: X.509 certificates extracted from PCAP with NetworkMiner

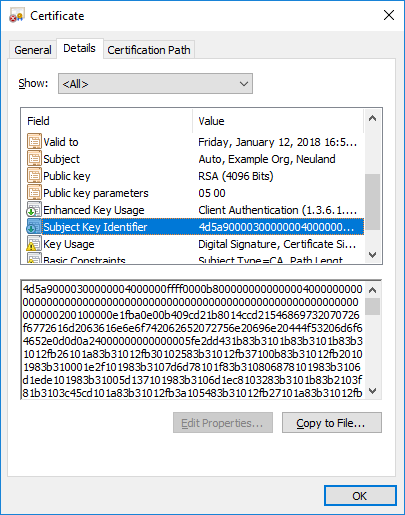
A “normal” x509 certificate size is usually around 1kB, so certificates that are 11kB should be considered as anomalies. Also, opening one of these .cer files reveals an extremely large value in the Subject Key Identifier field.

X.509 certificate with MZ header in the Subject Key Identifier field

Not only is this field very large, it also starts with the familiar “4D 5A” MZ header sequence.

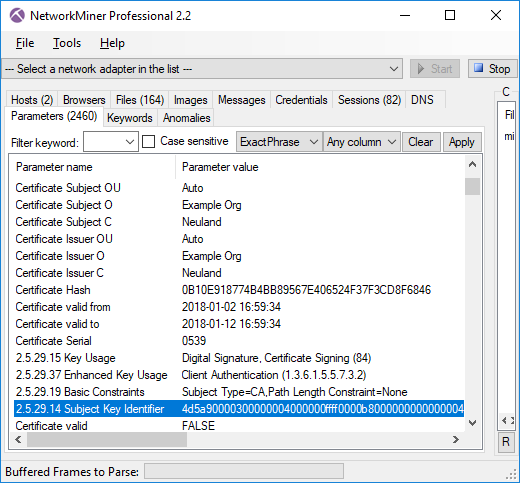
NetworkMiner additionally parses details from the certificates that it extracts from PCAP files, so the Subject Key Identifier field is actually accessible from within NetworkMiner, as shown in the screenshot below.

Parameters tab in NetworkMiner showing X.509 certificate details

You can also see that NetworkMiner validates the certificate using the local trusted root certificates. Not surprisingly, this certificates is not trusted (certificate valid = FALSE). It would be most unlikely that anyone would manage to include arbitrary data like this in a signed certificate.


Extracting the MZ Binary from the Covert X.509 Channel

Even though NetworkMiner excels at pulling out files from PCAPs, this is definitively an occasion where manual handling is required. Jason’s PoC implementation actually uses a whopping 79 individual certificates in order to transfer this Mimikatz binary, which is 785 kB.

Here’s a tshark oneliner you can use to extract the Mimikatz binary from Jason's example PCAP file.

tshark -r mimikatz_sent.pcap -Y 'ssl.handshake.certificate_length gt 2000' -T fields -e x509ce.SubjectKeyIdentifier -d tcp.port==4433,ssl | tr -d ':\n' | xxd -r -p > mimikatz.exe

Detecting x509 Anomalies

Even though covert channels using x509 certificates isn’t a “thing” (yet?) it’s still a good idea to think about how this type of covert signaling can be detected. Just looking for large Subject Key Identifier fields is probably too specific, since there are other fields and extensions in X.509 that could also be used to transmit data. A better approach would be to alert on certificates larger than, let’s say, 3kB. Multiple certificates can also be chained together in a single TLS handshake certificate record, so it would also make sense to look for handshake records larger than 8kB (rough estimate).

Bro IDS logo

This type of anomaly-centric intrusion detection is typically best done using the Bro IDS, which provides easy programmatic access to the X.509 certificate and SSL handshake.

There will be false positives when alerting on large certificates in this manner, which is why I recommend to also check if the certificates have been signed by a trusted root or not. A certificate that is signed by a trusted root is very unlikely to contain malicious data.

Posted by Erik Hjelmvik on Tuesday, 06 February 2018 12:13:00 (UTC/GMT)

Tags: #malware#C2#SSL#TLS#certificate#NetworkMiner#PCAP#x509#X.509#PIPI#Bro#IDS#tshark

Short URL: https://netresec.com/?b=182e662


Zyklon Malware Network Forensics Video Tutorial

We are releasing a series of network forensics video tutorials throughout the next few weeks. First up is this analysis of a PCAP file containing network traffic from the "Zyklon H.T.T.P." malware.

Analyzing a Zyklon Trojan with Suricata and NetworkMiner

Resources
https://www.malware-traffic-analysis.net/2017/07/22/index.html
https://github.com/Security-Onion-Solutions/security-onion
https://www.arbornetworks.com/blog/asert/wp-content/uploads/2017/05/zyklon_season.pdf
http://doc.emergingthreats.net/2017930

IOCs
service.tellepizza.com
104.18.40.172
104.18.41.172
Mozilla/5.0 (Windows; U; Windows NT 5.1; en-US; rv:1.8.1.3pre) Gecko/20070302 BonEcho/2.0.0.3pre
gate.php
.onion
98:1F:D2:FF:DC:16:B2:30:1F:11:70:82:3D:2E:A5:DC
65:8A:5C:76:98:A9:1D:66:B4:CB:9D:43:5C:DE:AD:22:38:37:F3:9C
E2:50:35:81:9F:D5:30:E1:CE:09:5D:9F:64:75:15:0F:91:16:12:02:2F:AF:DE:08:4A:A3:5F:E6:5B:88:37:D6

Posted by Erik Hjelmvik on Monday, 05 February 2018 07:30:00 (UTC/GMT)

Tags: #Netresec#PCAP#Trojan#video#tutorial#videotutorial#NetworkMiner#SecurityOnion#Suricata#malware#network#forensics#NSM#malware_traffic

Short URL: https://netresec.com/?b=182b4ac


Domain Whitelist Benchmark: Alexa vs Umbrella

Alexa vs Umbrella

In November last year Alexa admitted in a tweet that they had stopped releasing their CSV file with the one million most popular domains.

Yes, the top 1m sites file has been retired

Members of the Internet measurement and infosec research communities were outraged, surprised and disappointed since this domain list had become the de-facto tool for evaluating the popularity of a domain. As a result of this Cisco Umbrella (previously OpenDNS) released a free top 1 million list of their own in December the same year. However, by then Alexa had already announced that their “top-1m.csv” file was back up again.

The file is back for now. We'll post an update before it changes again.

The Alexa list was unavailable for just about a week but this was enough for many researchers, developers and security professionals to make the move to alternative lists, such as the one from Umbrella. This move was perhaps fueled by Alexa saying that the “file is back for now”, which hints that they might decide to remove it again later on.

We’ve been leveraging the Alexa list for quite some time in NetworkMiner and CapLoader in order to do DNS whitelisting, for example when doing threat hunting with Rinse-Repeat. But we haven’t made the move from Alexa to Umbrella, at least not yet.


Malware Domains in the Top 1 Million Lists

Threat hunting expert Veronica Valeros recently pointed out that there are a great deal of malicious domains in the Alexa top one million list.

Researchers using Alexa top 1M as legit, you may want to think twice about that. You'd be surprised how many malicious domains end there.

I often recommend analysts to use the Alexa list as a whitelist to remove “normal” web surfing from their PCAP dataset when doing threat hunting or network forensics. And, as previously mentioned, both NetworkMiner and CapLoader make use of the Alexa list in order to simplify domain whitelisting. I therefore decided to evaluate just how many malicious domains there are in the Alexa and Umbrella lists.

hpHosts EMD (by Malwarebytes)

Alexa Umbrella
Whitelisted malicious domains: 1365 1458
Percent of malicious domains whitelisted: 0.89% 0.95%

Malware Domain Blocklist

Alexa Umbrella
Whitelisted malicious domains: 84 63
Percent of malicious domains whitelisted: 0.46% 0.34%

CyberCrime Tracker

Alexa Umbrella
Whitelisted malicious domains: 15 10
Percent of malicious domains whitelisted: 0.19% 0.13%

The results presented above indicate that Alexa and Umbrella both contain roughly the same number of malicious domains. The percentages also reveal that using Alexa or Umbrella as a whitelist, i.e. ignore all traffic to the top one million domains, might result in ignoring up to 1% of the traffic going to malicious domains. I guess this is an acceptable number of false negatives since techniques like Rinse-Repeat Intrusion Detection isn’t intended to replace traditional intrusion detection systems, instead it is meant to be use as a complement in order to hunt down the intrusions that your IDS failed to detect. Working on a reduced dataset containing 99% of the malicious traffic is an acceptable price to pay for having removed all the “normal” traffic going to the one million most popular domains.


Sub Domains

One significat difference between the two lists is that the Umbrella list contains subdomains (such as www.google.com, safebrowsing.google.com and accounts.google.com) while the Alexa list only contains main domains (like “google.com”). In fact, the Umbrella list contains over 1800 subdomains for google.com alone! This means that the Umbrella list in practice contains fewer main domains compared to the one million main domains in the Alexa list. We estimate that roughly half of the domains in the Umbrella list are redundant if you only are interested in main domains. However, having sub domains can be an asset if you need to match the full domain name rather than just the main domain name.


Data Sources used to Compile the Lists

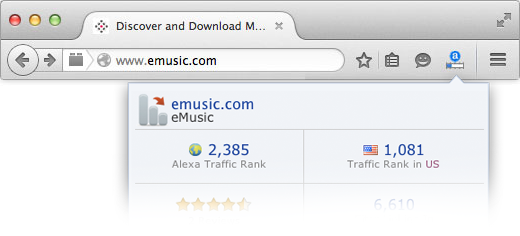
The Alexa Extension for Firefox
Image: The Alexa Extension for Firefox

The two lists are compiled in different ways, which can be important to be aware of depending on what type of traffic you are analyzing. Alexa primarily receives web browsing data from users who have installed one of Alexa’s many browser extensions (such as the Alexa browser toolbar shown above). They also gather additional data from users visiting web sites that include Alexa’s tracker script.

Cisco Umbrella, on the other hand, compile their data from “the actual world-wide usage of domains by Umbrella global network users”. We’re guessing this means building statistics from DNS queries sent through the OpenDNS service that was recently acquired by Cisco.

This means that the Alexa list might be better suited if you are only analyzing HTTP traffic from web browsers, while the Umbrella list probably is the best choice if you are analyzing non-HTTP traffic or HTTP traffic that isn’t generated by browsers (for example HTTP API communication).


Other Quirks

As noted by Greg Ferro, the Umbrella list contains test domains like “www.example.com”. These domains are not present in the Alexa list.

We have also noticed that the Umbrella list contains several domains with non-authorized gTLDs, such as “.home”, “.mail” and “.corp”. The Alexa list, on the other hand, only seem to contain real domain names.


Resources and Raw Data

Both the Alexa and Cisco Umbrella top one million lists are CSV files named “top-1m.csv”. The CSV files can be downloaded from these URL’s:

The analysis results presented in this blog post are based on top-1m.csv files downloaded from Alexa and Umbrella on March 31, 2017. The malware domain lists were also downloaded from the three respective sources on that same day.

We have decided to share the “false negatives” (malware domains that were present in the Alexa and Umbrella lists) for transparency. You can download the lists with all false negatives from here:
https://www.netresec.com/files/alexa-umbrella-malware-domains_170331.zip


Hands-on Practice and Training

If you wanna learn more about how a list of common domains can be used to hunt down intrusions in your network, then please register for one of our network forensic trainings. The next training will be a pre-conference training at 44CON in London.

Posted by Erik Hjelmvik on Monday, 03 April 2017 14:47:00 (UTC/GMT)

Tags: #Alexa#Umbrella#domain#Threat Hunting#DNS#malware

Short URL: https://netresec.com/?b=1743fae

2016 February

Analyzing Web Browsing Activity

2015 September

CapLoader 1.3 Released

X / twitter

NETRESEC on X / Twitter: @netresec

Mastodon

NETRESEC on Mastodon: @netresec@infosec.exchange