Erik Hjelmvik
,
Monday, 09 December 2019 08:40:00 (UTC/GMT)

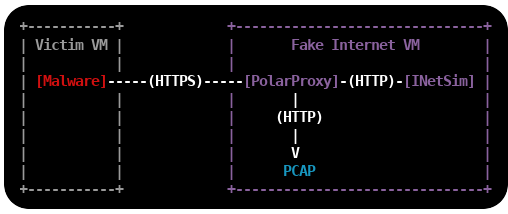
This is a tutorial on how to set up an environment for dynamic malware analysis,
which can be used to analyze otherwise encrypted HTTPS and SMTPS traffic without allowing the malware to connect
to the Internet.
Dynamic malware analysis (or behavioral analysis) is performed by observing the behavior of a malware while it is running.
The victim machine, which executes the malware,
is usually a virtual machine that can be rolled back to a clean state when the analysis is complete.
The safest way to prevent the malware from infecting other machines, or doing other bad things like sending SPAM
or taking part in DDoS attacks, is to run the victim machine in an offline environment.
However, network traffic analysis of malware is a central part of dynamic malware analysis,
which is is why a “fake Internet” is needed in most malware labs.
INetSim and PolarProxy
INetSim is a software suite that simulates common internet services like HTTP, DNS and SMTP,
which useful when analyzing the network behavior of malware samples without connecting them to the Internet.
INetSim also has basic support for TLS encrypted protocols, like HTTPS, SMTPS, POP3S and FTPS,
but requires a pre-defined X.509-certificate to be loaded at startup. This can cause malware to terminate because the
Common Names (CN)
in the presented certificates don’t match the requested server names.
The victim machine will actually get the exact same certificate regardless of which web site it visits.
INetSim’s TLS encryption also inhibits analysis of the network traffic captured in the malware lab,
such as C2 traffic or SPAM runs, because the application layer traffic is encrypted.
PolarProxy can solve both these issues because it generates certificates on the fly,
where the CN value is dynamically set to the requested host name, and saves the network traffic
in decrypted form to PCAP files. It is therefore a good idea to replace the TLS services in INetSim with PolarProxy,
which will be used as a
TLS termination proxy that forwards the decrypted traffic
to INetSim’s cleartext services.
Install Linux
The first step is to install a Linux VM, which will act as a fake Internet to the victim machine(s).
I'm using Ubuntu Server 18.04.3 LTS in this tutorial,
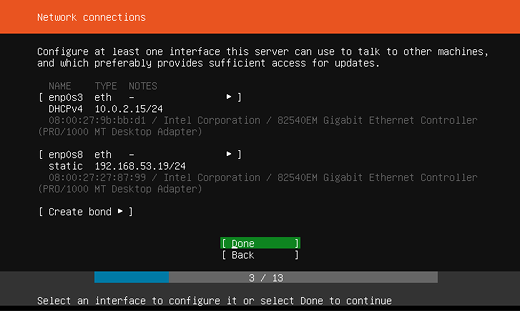
but you can use any 64-bit linux distro. I'm adding two network interfaces to the Linux VM,
one interface with Internet access and one that connects to an isolated offline network to which the victim VM's will be connected.
The offline interface is configured to use the static IP 192.168.53.19.
Important: Do not bridge, bond or enable IP forwarding between the two interfaces!
Install INetSim
INetSim is available in Ubuntu's repo, so it is possible to install it with "apt install inetsim".
However, I recommend installing INetSim as described in the official documentation to get the latest packaged version of INetSim.
sudo -s
echo "deb http://www.inetsim.org/debian/ binary/" > /etc/apt/sources.list.d/inetsim.list
curl https://www.inetsim.org/inetsim-archive-signing-key.asc | apt-key add -
apt update
apt install inetsim
exit
INetSim listens on 127.0.0.1 by default,
change this to INetSim's offline IP address by un-commenting and editing the
service_bind_address variable in /etc/inetsim/inetsim.conf.
service_bind_address 192.168.53.19
Also configure INetSim's fake DNS server to resolve all domain names to the IP of INetSim with the dns_default_ip setting:
dns_default_ip 192.168.53.19
Finally, disable the "start_service https" and "start_service smtps" lines,
because these services will be replaced with PolarProxy:
start_service dns
start_service http
#start_service https
start_service smtp
#start_service smtps
Restart the INetSim service after changing the config.
sudo systemctl restart inetsim.service
Verify that you can access INetSim's HTTP server with curl:
curl http://192.168.53.19
<html>
<head>
<title>INetSim default HTML page</title>
</head>
<body>
<p></p>
<p align="center">This is the default HTML page for INetSim HTTP server fake mode.</p>
<p align="center">This file is an HTML document.</p>
</body>
</html>
It looks like INetSim's web server can be accessed alright.
Install PolarProxy
Next step is to install PolarProxy as a systemd service (as instructed here):
sudo adduser --system --shell /bin/bash proxyuser
sudo mkdir /var/log/PolarProxy
sudo chown proxyuser:root /var/log/PolarProxy/
sudo chmod 0775 /var/log/PolarProxy/
sudo su - proxyuser
mkdir ~/PolarProxy
cd ~/PolarProxy/
curl https://www.netresec.com/?download=PolarProxy | tar -xzvf -
exit
sudo cp /home/proxyuser/PolarProxy/PolarProxy.service /etc/systemd/system/PolarProxy.service
We will need to modify the PolarProxy service config file a bit before we start it.
Edit the ExecStart setting in /etc/systemd/system/PolarProxy.service to configure PolarProxy to terminate the TLS encryption for HTTPS and SMTPS (implicitly encrypted email submission).
The HTTPS traffic should be redirected to INetSim's web server on tcp/80 and the SMTPS to tcp/25.
ExecStart=/home/proxyuser/PolarProxy/PolarProxy -v -p 10443,80,80 -p 10465,25,25 -x /var/log/PolarProxy/polarproxy.cer -f /var/log/PolarProxy/proxyflows.log -o /var/log/PolarProxy/ --certhttp 10080 --terminate --connect 192.168.53.19 --nosni nosni.inetsim.org
Here's a break-down of the arguments sent to PolarProxy through the ExecStart setting above:
- -v : verbose output in syslog (not required)
- -p 10443,80,80 : listen for TLS connections on tcp/10443, save decrypted traffic in PCAP as tcp/80, forward traffic to tcp/80
- -p 10465,25,25 : listen for TLS connections on tcp/10465, save decrypted traffic in PCAP as tcp/25, forward traffic to tcp/25
- -x /var/log/PolarProxy/polarproxy.cer : Save certificate to be imported to clients in /var/log/PolarProxy/polarproxy.cer (not required)
- -f /var/log/PolarProxy/proxyflows.log : Log flow meta data in /var/log/PolarProxy/proxyflows.log (not required)
- -o /var/log/PolarProxy/ : Save PCAP files with decrypted traffic in /var/log/PolarProxy/
- --certhttp 10080 : Make the X.509 certificate available to clients over http on tcp/10080
- --terminate : Run PolarProxy as a TLS termination proxy, i.e. data forwarded from the proxy is decrypted
- --connect 192.168.53.19 : forward all connections to the IP of INetSim
- --nosni nosni.inetsim.org : Accept incoming TLS connections without SNI,
behave as if server name was "nosni.inetsim.org".
Finally, start the PolarProxy systemd service:
sudo systemctl enable PolarProxy.service
sudo systemctl start PolarProxy.service
Verify that you can reach INetSim through PolarProxy's TLS termination proxy using curl:
curl --insecure --connect-to example.com:443:192.168.53.19:10443 https://example.com
<html>
<head>
<title>INetSim default HTML page</title>
</head>
<body>
<p></p>
<p align="center">This is the default HTML page for INetSim HTTP server fake mode.</p>
<p align="center">This file is an HTML document.</p>
</body>
</html>
Yay, it is working!
Do the same thing again, but also verify the certificate against PolarProxy's root CA this time.
The root certificate is downloaded from PolarProxy via the HTTP service running on tcp/10080 and then converted from DER to PEM format using openssl, so that it can be used with curl's "--cacert" option.
curl http://192.168.53.19:10080/polarproxy.cer > polarproxy.cer
openssl x509 -inform DER -in polarproxy.cer -out polarproxy-pem.crt
curl --cacert polarproxy-pem.crt --connect-to example.com:443:192.168.53.19:10443 https://example.com
<html>
<head>
<title>INetSim default HTML page</title>
</head>
<body>
<p></p>
<p align="center">This is the default HTML page for INetSim HTTP server fake mode.</p>
<p align="center">This file is an HTML document.</p>
</body>
</html>
Yay #2!
Now let's set up routing to forward all HTTPS traffic to PolarProxy's service on tcp/10443 and SMTPS traffic to tcp/10465.
I'm also adding a firewall rule to redirect ALL other incoming traffic to INetSim, regardless of which IP it is destined to, with the final REDIRECT rule.
Make sure to replace "enp0s8" with the name of your interface.
sudo iptables -t nat -A PREROUTING -i enp0s8 -p tcp --dport 443 -j REDIRECT --to 10443
sudo iptables -t nat -A PREROUTING -i enp0s8 -p tcp --dport 465 -j REDIRECT --to 10465
sudo iptables -t nat -A PREROUTING -i enp0s8 -j REDIRECT
Verify that the iptables port redirection rule is working from another machine connected to the offline 192.168.53.0/24 network:
curl --insecure --resolve example.com:443:192.168.53.19 https://example.com
<html>
<head>
<title>INetSim default HTML page</title>
</head>
<body>
<p></p>
<p align="center">This is the default HTML page for INetSim HTTP server fake mode.</p>
<p align="center">This file is an HTML document.</p>
</body>
</html>
Yay #3!
curl --insecure --resolve example.com:465:192.168.53.19 smtps://example.com
214-Commands supported:
214- HELO MAIL RCPT DATA
214- RSET NOOP QUIT EXPN
214- HELP VRFY EHLO AUTH
214- ETRN STARTTLS
214 For more info use "HELP <topic>".
Yay #4!
It is now time to save the firewall rules, so that they will survive reboots.
sudo apt-get install iptables-persistent
Install the Victim Windows PC
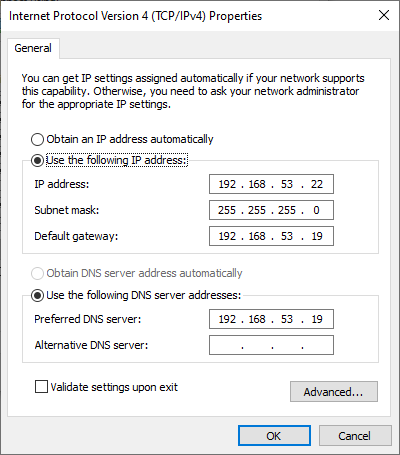
Configure a static IP address on the victim Windows host by manually setting the IP address.
Set the INetSim machine (192.168.53.19) as the default gateway and DNS server.
Download the X.509 root CA certificate from your PolarProxy installation here:
http://192.168.53.19:10080/polarproxy.cer
- Double-click on "polarproxy.cer"
- Click [Install Certificate...]
-
Select 🔘 Local Machine and press [Next]
-
Select 🔘 Place all certificates in the following store and press [Browse...]
- Choose "Trusted Root Certification Authorities" and press [OK], then [Next]
- Press [Finish]
You might also want to install the PolarProxy certificate in your browser.
This is how you install it to Firefox:
- Options / Preferences
- Press [Privacy & Security]
- Scroll down to "Certificates" and press [View Certificates...]
- In the "Authorities" tab, press [Import...]
- Open "polarproxy.cer"
- ☑ Trust this CA to identify websites. (check the box)
- Press [OK]
Now, open a browser and try visiting some websites over HTTP or HTTPS.
If you get the following message regardless of what domain you try to visit, then you've managed to set everything up correctly:
This is the default HTML page for INetSim HTTP server fake mode.
This file is an HTML document.
Accessing the Decrypted Traffic
PCAP files with decrypted HTTPS and SMTPS traffic are now available in /var/log/PolarProxy/
PolarProxy will start writing to a new capture file every 60 minutes.
However, the captured packets are not written to disk instantly because PolarProxy uses buffered file writing in order to improve performance.
You can restart the proxy service if you wish to flush the buffered packets to disk and have PolarProxy rotate to a new capture file.
sudo systemctl restart PolarProxy
I also recommend capturing all network traffic sent to INetSim with a sniffer like
netsniff-ng.
This way you’ll get PCAP files with traffic from INetSim’s cleartext services (like DNS and HTTP) as well.
PCAP or it didn’t happen!
Credits
I'd like to thank Thomas Hungenberg and Patrick Desnoyers for providing valuable feedback for this blog post!
Posted by Erik Hjelmvik on Monday, 09 December 2019 08:40:00 (UTC/GMT)
Tags: #PolarProxy
#HTTPS
#SMTPS
#HTTP
#SMTP
#DNS
#Malware
#Sandbox
#TLS
#PCAP
#proxy
#tutorial
#ASCII-art


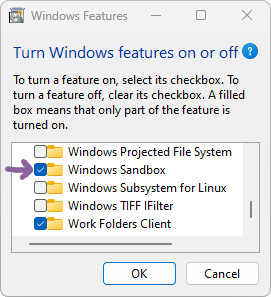 Follow these steps to install Windows Sandbox: