Showing blog posts from 2025

rss Google News

How to set PCAP as default save file format in Wireshark

Did you know that there is a setting in Wireshark for changing the default save file format from pcapng to pcap?

In Wireshark, click Edit, Preferences. Then select Advanced and look for the capture.pcap_ng setting. Change the value to FALSE if you want Wireshark to save packets in the pcap file format. You have to double-click the “TRUE” text to change it into “FALSE”.

capture.pcap_ng in Wireshark Preferences

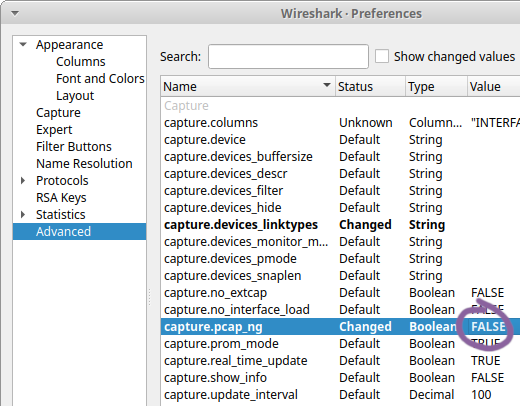
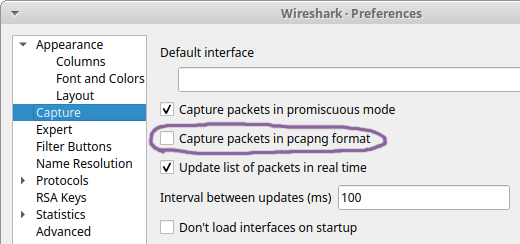
This setting can also be accessed from the Capture tab in Preferences.

Disable pcapng in Wireshark Preferences

I recently learned about this setting from Sake Blok when he commented on my feature request to have Wireshark use pcap as default savefile format instead of pcapng. I have a feeling that this feature request will not be accepted though, since it has received several downvotes. That’s why I’m trying to spread the word about this setting instead, so that everyone who prefers the pcap file format over pcapng can change the default behavior in their own Wireshark installation.

This setting doesn’t affect command line tools, like dumpcap, tshark, mergecap etc. So if you want to capture packets with dumpcap to a pcap file then you need to use the -P switch like this:

dumpcap -P -i eth0 -w dump.pcap

Other command line tools in the Wireshark suite, like tshark and mergecap, require that you instead specify -F pcap like this:

mergecap -F pcap -w out.pcap in1.pcap in2.pcap

What’s Wrong with PCAP-NG?

Why all this fuss about using PCAP instead of PCAP-NG? Well, it turns out that most Wireshark users are happily unaware of just how much metadata there is in the pcapng files they share online. This metadata typically contains information about the CPU of their computer, the exact version and build of their operating system as well as the name of the network interface on which the capture was performed. For Windows users the network interface details even contain a GUID that usually is a world-unique identifier.

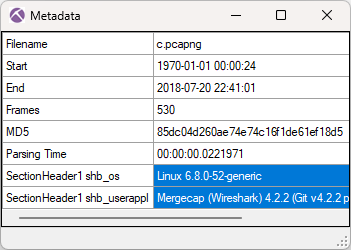
I was once even able to identify a person, who had anonymously shared a pcapng file online, by inspecting metadata in the shared capture file github.pcapng. Here's the metadata in that capture file:

Metadata in a PcapNG file showed in NetworkMiner Professional's capture file properties

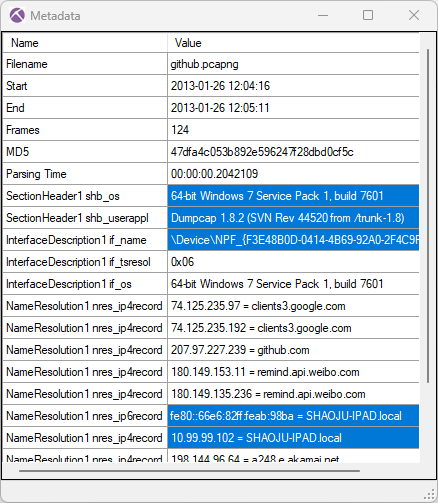
This screenshot shows the output from the “Show Metadata” functionality in NetworkMiner Professional. There's also a great way to show pcapng metadata in Wireshark: Open the pcapng file, click View, Reload as File Format/Capture (Ctrl+Shift+F).

Mergecap

The previously mentioned command line tool mergecap, which joins multiple capture files into one, outputs pcapng files by default. In fact, if it is tasked to merge two pcap files (having no metadata), it then creates a pcapng file containing the packets from the two input pcap files enriched with metadata about the computer running mergecap. This metadata is typically information about the operating system as well as the version of mergecap that was used.

Mergecap ASCII flowchart Metadata in PcapNG file created with mergecap

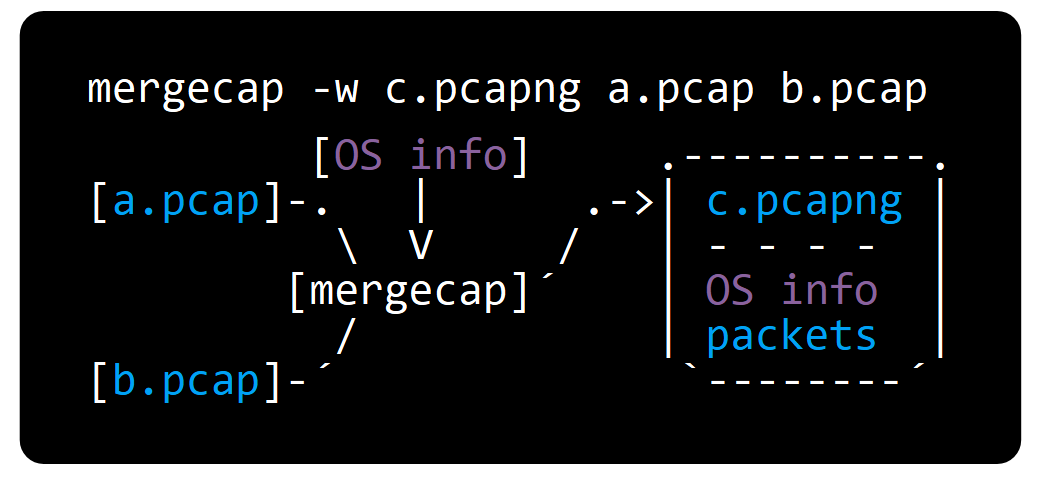
Providing an output file with the “.pcap” suffix to mergecap will not help, mergecap still generates a pcapng file. You have to use the -F pcap switch to have it generate a pcap file without metadata about your operating system.

What do Wireshark Users Want?

I recently conducted two unscientificpolls, where I asked which savefile format Wireshark should use as default.

Poll results from X and Mastodon: 51 voted for pcap and 35 voted for pcapng

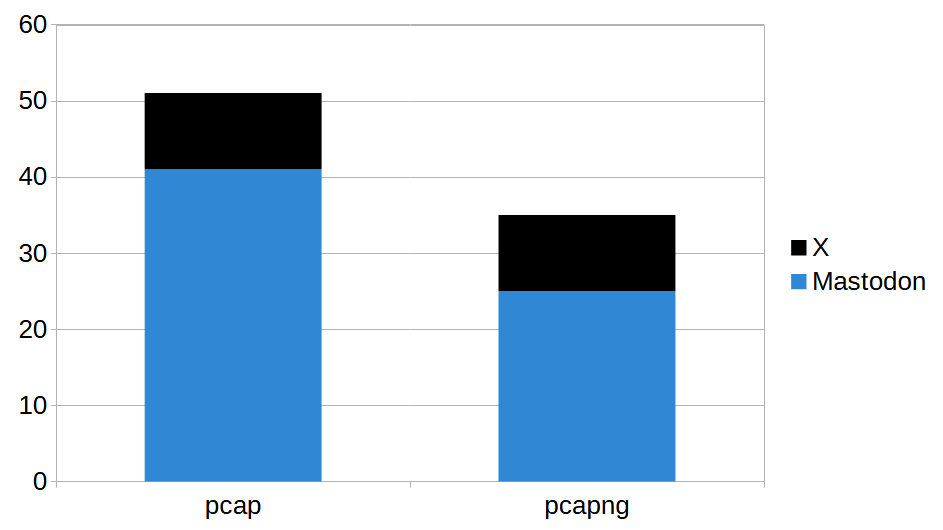
In total the polls got 86 votes, where 51 voted for pcap and 35 preferred pcapng. I don't want to draw any real conclusions from these results though, primarily due to the low number of participants but also because there might be a bias among the people who were reached by these polls.

Looking Ahead

I reach out to people I know every now and then when I notice that they are sharing pcapng files containing potentially sensitive metadata. They then have to decide if they are okay with this or if they want to go through the process of replacing the pcapng files with pcap files. In many cases they choose the latter, which can be quite tricky if that involves removing files from GitHub.

I eventually got tired of doing this, especially when I realized that even very skilled Wireshark users often don’t know that pcapng files store metadata about their computers. Reminding people to select the “pcap” format every time they save a capture file doesn’t seem to be the solution. I therefore hope that this blog post can help Wireshark users avoid accidentally sharing unnecessary metadata in the future.

For more information about the pcapng format, please visit pcapng.com.

Posted by Erik Hjelmvik on Tuesday, 25 February 2025 10:33:00 (UTC/GMT)

Tags: #PCAP#pcap-ng#dumpcap#ASCII-art

Short URL: https://netresec.com/?b=2523d40


PolarProxy 1.0.1 Released

PolarProxy 1.0.1

The new release of PolarProxy generates JA4 fingerprints and enables ruleset to match on specific decryption errors, for example to enable fail-open in case the TLS traffic cannot be decrypted and inspected.

JA4 Fingerprints

JA4 fingerprints provide several improvements over its JA3 predecessor. One advantage is that JA4 fingerprints have a human readable segment that allow humans (as well as computers) to instantly see important features in a client handshake, such as the TLS version and whether or not the SNI and ALPN extensions are used. JA4 is also resilient against TLS extension order randomization.

JA4 hash explained. Breakdown of Remcos JA4 hash t13i010400_0f2cb44170f4_5c4c70b73fa0

We added support for rule based matching of JA4 fingerprints in the previous release of PolarProxy. Such a JA4 rule can be used to have PolarProxy take different actions (block, intercept, bypass etc.) based on the JA4 fingerprint of the client’s TLS handshake.

This release additionally includes JA4 fingerprints in the flow metadata that PolarProxy writes to disk when the -f <file> argument is provided.

Flexible Handling of TLS Auth Failures

PolarProxy’s firewall rules now support using TLS authentication error codes as triggers. As an example, the ruleset fail-open.json attempts to inspect (decrypt and re-encrypt) all TLS traffic, except when the client has rejected the server’s certificate at least once during the past 60 seconds. More specifically, it only bypasses decryption if the reason for the rejection was either “bad certificate” or “unknown CA”.

{
  "name": "Inspect TLS with fail open for OpenSSL alerts", "version": "1.0.1", "rules": [
    {
      "active": true,
      "match": { "type": "nontls" },
      "action": { "type": "block" },
      "description": "Block non-TLS traffic"
    },
    {
      "active": true,
      "match": { "type": "decrypt_fail_errorcode", "expression": "0x0A000412", "period": 60, "count": 1 },
      "action": { "type": "bypass" },
      "description": "bad certificate"
    },
    {
      "active": true,
      "match": { "type": "decrypt_fail_errorcode", "expression": "0x0A000418", "period": 60, "count": 1 },
      "action": { "type": "bypass" },
      "description": "unknown CA"
    }
    ],
  "default": {
    "action": { "type": "inspect" },
    "description": "Attempt to inspect TLS traffic"
  }
}
Figure: PolarProxy fail-open.json ruleset

The specific error codes (here 0x0A000412 for “bad certificate” and 0x0A000418 for “unknown CA”) might differ between deployments, since they depend on the underlying TLS library of the PolarProxy machine. The specific values in this example are from a Linux deployment with OpenSSL 3.0.13 installed. Look for the “decrypt_fail_errorcode” messages that PolarProxy prints to stderr to find out what error codes your system is using. You can also run PolarProxy with -v (verbose) or -d (debug) to get even more information about the error codes.

Ruleset Reload on SIGHUP

A PolarProxy ruleset can now be updated on the fly without having to restart PolarProxy. Simply send a SIGHUP signal to PolarProxy, for example pkill -HUP PolarProxy, to have it reload the updated ruleset without affecting sessions that PolarProxy is currently proxying.

If PolarProxy is running as a systemd service, then adding

ExecReload=/bin/kill -HUP $MAINPID
to the unit file allows PolarProxy’s ruleset to be reloaded with:

sudo systemctl reload PolarProxy.service

.NET 8

The .NET version has been bumped from 6 to 8 in the 1.0.1 release, which provides better performance as well as long-term support. We've also bumped the System.Security.Cryptography.Xml library from version 4.5 to 9.0.

Posted by Erik Hjelmvik on Friday, 07 February 2025 10:10:00 (UTC/GMT)

Tags: #PolarProxy#JA4#fail-open

Short URL: https://netresec.com/?b=2523c96


Blocking Malicious sites with a TLS Firewall

Over 90 percent of all web traffic is encrypted nowadays, which is great of course. However, as HTTP and DNS traffic gets encrypted, defenders have a more difficult time blocking malicious network traffic. One solution to this problem is to use a TLS firewall, which effectively blocks encrypted connections to known bad websites.

DNS Firewalls and Sinkholes

DNS firewalls and DNS sinkholes, like pihole and RPZ firewalls, are simple yet effective solutions that can prevent users from connecting to malicious websites. They work by acting as recursive name servers that deny clients from resolving known-bad domain names. However, more and more DNS traffic is becoming encrypted with DNS-over-TLS (DoT) and DNS-over-HTTPS (DoH), where clients send DNS queries inside an end-to-end encrypted connection directly to a DNS provider. This prevents many DNS based security solutions, like DNS firewalls, from inspecting the queried hostnames.

One way around this problem is to block the actual connections to known-bad domains instead of preventing clients from resolving them. For outgoing TLS connections, such as HTTPS, this can be done with a TLS Firewall.

TLS Firewalls

A TLS firewall inspects client TLS handshakes and extracts the requested server name from the Server Name Indication (SNI) extension. This hostname is generally sent unencrypted in HTTPS traffic (even if you use TLS 1.3), which allows the hostname to be inspected without having to break the TLS encryption. The TLS firewall then checks if the hostname is a known bad or malicious website, in which case the connection is either closed or the user gets redirected to a warning page.

Blocklists

There are several blocklists with malicious domain names, including commercial services as well as freely available lists from ThretFox, CERT Polska and others. These blocklists are often created for DNS firewalls and sinkholes, but they can also be leveraged by TLS firewalls to identify and block traffic to malicious websites.

PolarProxy

PolarProxy can be used as a TLS firewall simply by loading a ruleset that blocks connections to malicious domains.

PolarProxy block/inspect/bypass ASCII

PolarProxy has the capability to decrypt and inspect what’s inside the TLS encryption, but this feature is not needed when acting as a TLS firewall. The hostname the client wants to connect to is generally provided in the SNI without encryption, so PolarProxy doesn’t have to use the “inspect” action when acting as a TLS firewall. When running in “firewall mode” PolarProxy performs the “block” action for connections to known malicious domains and the “bypass” action for all other TLS traffic. Because of this there is no need for configuring clients to trust PolarProxy’s root certificate in TLS firewall deployments, unless you add a custom rule that decrypts and inspects certain traffic. In fact, if PolarProxy is deployed as a transparent forward proxy in this TLS firewall mode, then zero client configuration is required. This means that managed as well as unmanaged devices, including BYOD, embedded devices, appliances etc., will be protected!

Transparent TLS Firewall (Linux)

Network ASCII drawing

If your network has a Linux based firewall that uses iptables, then you’ll be able to run PolarProxy as a transparent TLS firewall directly on your Linux firewall with this command:

./PolarProxy -p 10443,80,443 --ruleset https://raw.githubusercontent.com/Netresec/PolarProxy/main/rulesets/ruleset-block-malicious.json

You then need to configure the iptables firewall to redirect HTTPS traffic from your network to PolarProxy (see "Routing Option #1" in the PolarProxy documentation for more details).

  • sudo iptables -I INPUT -i eth1 -p tcp --dport 10443 -m state --state NEW -j ACCEPT
  • sudo iptables -t nat -A PREROUTING -i eth1 -p tcp --dport 443 -j REDIRECT --to 10443

Congratulations, your firewall now blocks outgoing HTTPS connections from local clients to known malicious websites!

PolarProxy can also be run in a container using Docker or Podman.

HTTPS Proxy TLS Firewall (Windows)

It’s even possible to run PolarProxy directly on a Windows PC and configure the local proxy settings to send outgoing traffic through PolarProxy. Use the following command to start PolarProxy as a HTTP CONNECT proxy server on port 8080 with a TLS firewall ruleset:

PolarProxy.exe --httpconnect 127.0.0.1:8080 --ruleset https://raw.githubusercontent.com/Netresec/PolarProxy/main/rulesets/ruleset-block-malicious.json

Then configure the Windows PC to use a proxy server on 127.0.0.1 on port 8080.

Windows proxy server exceptions

Add the following exceptions to the Windows proxy settings to ensure that PolarProxy can download the ruleset and blocklists:

raw.githubusercontent.com;*.abuse.ch;hole.cert.pl;zonefiles.io;github.com

Click “Save”.

One side effect of running PolarProxy as an HTTP connect proxy (with --httpconnect) is that this mode only allows TLS encrypted traffic to pass through the proxy. This means that plaintext HTTP traffic that Windows forwards to PolarProxy on port 8080 will be blocked. You’ll see error messages like “Request method "GET" is not supported by HTTP CONNECT proxy” in PolarProxy’s output if it is started with the “-v” argument.

A workaround for this side effect is to run inetcpl.cpl (Window’s old school Internet Properties), select “Connections” tab and click the “LAN settings” button.

Windows inetcpl.cpl connections

Then click the “Advanced” button in the Proxy server section of the LAN Settings window to configure which protocols that should run through the proxy.

Windows LAN settings

Uncheck “Use the same proxy server for all protocols” and remove the proxy settings for everything except “Secure”, which is HTTPS traffic and clock “OK”.

Windows proxy settings: only https

The Windows PC should now only forward HTTPS traffic to PolarProxy’s TLS firewall.

Pro Tip

Enter the following value as “Proxy IP address” directly in the modern “Edit proxy server” settings in Windows 10/11 to only proxy HTTPS traffic without using the legacy inetcpl.cpl settings:

http://https=127.0.0.1

Finally, I’d like to point out that the Windows proxy settings only affect outgoing traffic from applications that respect the proxy settings configured on the operating system. Pretty much every legitimate application will respect these settings and connect through PolarProxy, but there is no guarantee that malware will. This is why a transparent proxy deployment is recommended, such as the one described for the Linux deployment using iptables.

For more information about using PolarProxy as a TLS Firewall and the ruleset JSON format, please visit our TLS Firewall page.

Posted by Erik Hjelmvik on Monday, 27 January 2025 10:45:00 (UTC/GMT)

Tags: #PolarProxy#ThreatFox#ASCII-art

Short URL: https://netresec.com/?b=2515cf0

X / twitter

X / Twitter: @netresec


Bluesky

Bluesky: @netresec.com


Mastodon

Mastodon: @netresec@infosec.exchange