Showing blog posts from 2019

rss Google News

Installing a Fake Internet with INetSim and PolarProxy

INetSim + PolarProxy

This is a tutorial on how to set up an environment for dynamic malware analysis, which can be used to analyze otherwise encrypted HTTPS and SMTPS traffic without allowing the malware to connect to the Internet. Dynamic malware analysis (or behavioral analysis) is performed by observing the behavior of a malware while it is running. The victim machine, which executes the malware, is usually a virtual machine that can be rolled back to a clean state when the analysis is complete. The safest way to prevent the malware from infecting other machines, or doing other bad things like sending SPAM or taking part in DDoS attacks, is to run the victim machine in an offline environment. However, network traffic analysis of malware is a central part of dynamic malware analysis, which is is why a “fake Internet” is needed in most malware labs.

INetSim and PolarProxy

INetSim is a software suite that simulates common internet services like HTTP, DNS and SMTP, which useful when analyzing the network behavior of malware samples without connecting them to the Internet. INetSim also has basic support for TLS encrypted protocols, like HTTPS, SMTPS, POP3S and FTPS, but requires a pre-defined X.509-certificate to be loaded at startup. This can cause malware to terminate because the Common Names (CN) in the presented certificates don’t match the requested server names. The victim machine will actually get the exact same certificate regardless of which web site it visits. INetSim’s TLS encryption also inhibits analysis of the network traffic captured in the malware lab, such as C2 traffic or SPAM runs, because the application layer traffic is encrypted. PolarProxy can solve both these issues because it generates certificates on the fly, where the CN value is dynamically set to the requested host name, and saves the network traffic in decrypted form to PCAP files. It is therefore a good idea to replace the TLS services in INetSim with PolarProxy, which will be used as a TLS termination proxy that forwards the decrypted traffic to INetSim’s cleartext services.
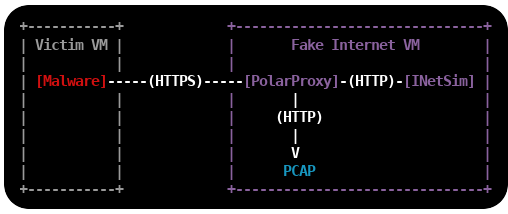
Malware Lab Setup

Install Linux

The first step is to install a Linux VM, which will act as a fake Internet to the victim machine(s). I'm using Ubuntu Server 18.04.3 LTS in this tutorial, but you can use any 64-bit linux distro. I'm adding two network interfaces to the Linux VM, one interface with Internet access and one that connects to an isolated offline network to which the victim VM's will be connected. The offline interface is configured to use the static IP 192.168.53.19.

Important: Do not bridge, bond or enable IP forwarding between the two interfaces!
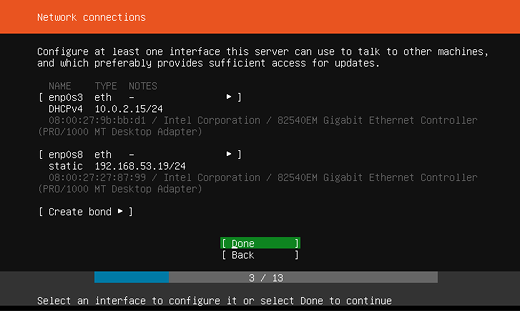
Network connection config Ubuntu Server 18.04

Install INetSim

INetSim is available in Ubuntu's repo, so it is possible to install it with "apt install inetsim". However, I recommend installing INetSim as described in the official documentation to get the latest packaged version of INetSim.

sudo -s

echo "deb http://www.inetsim.org/debian/ binary/" > /etc/apt/sources.list.d/inetsim.list

curl https://www.inetsim.org/inetsim-archive-signing-key.asc | apt-key add -

apt update

apt install inetsim

exit

INetSim listens on 127.0.0.1 by default, change this to INetSim's offline IP address by un-commenting and editing the service_bind_address variable in /etc/inetsim/inetsim.conf.

service_bind_address    192.168.53.19

Also configure INetSim's fake DNS server to resolve all domain names to the IP of INetSim with the dns_default_ip setting:

dns_default_ip    192.168.53.19

Finally, disable the "start_service https" and "start_service smtps" lines, because these services will be replaced with PolarProxy:

start_service dns
start_service http
#start_service https
start_service smtp
#start_service smtps

Restart the INetSim service after changing the config.

sudo systemctl restart inetsim.service

Verify that you can access INetSim's HTTP server with curl:

curl http://192.168.53.19

<html>
  <head>
    <title>INetSim default HTML page</title>
  </head>
  <body>
    <p></p>
    <p align="center">This is the default HTML page for INetSim HTTP server fake mode.</p>
    <p align="center">This file is an HTML document.</p>
  </body>
</html>

It looks like INetSim's web server can be accessed alright.

Install PolarProxy

Next step is to install PolarProxy as a systemd service (as instructed here):

sudo adduser --system --shell /bin/bash proxyuser

sudo mkdir /var/log/PolarProxy

sudo chown proxyuser:root /var/log/PolarProxy/

sudo chmod 0775 /var/log/PolarProxy/

sudo su - proxyuser

mkdir ~/PolarProxy

cd ~/PolarProxy/

curl https://www.netresec.com/?download=PolarProxy | tar -xzvf -

exit

sudo cp /home/proxyuser/PolarProxy/PolarProxy.service /etc/systemd/system/PolarProxy.service

We will need to modify the PolarProxy service config file a bit before we start it. Edit the ExecStart setting in /etc/systemd/system/PolarProxy.service to configure PolarProxy to terminate the TLS encryption for HTTPS and SMTPS (implicitly encrypted email submission). The HTTPS traffic should be redirected to INetSim's web server on tcp/80 and the SMTPS to tcp/25.

ExecStart=/home/proxyuser/PolarProxy/PolarProxy -v -p 10443,80,80 -p 10465,25,25 -x /var/log/PolarProxy/polarproxy.cer -f /var/log/PolarProxy/proxyflows.log -o /var/log/PolarProxy/ --certhttp 10080 --terminate --connect 192.168.53.19 --nosni nosni.inetsim.org

Here's a break-down of the arguments sent to PolarProxy through the ExecStart setting above:

  • -v : verbose output in syslog (not required)
  • -p 10443,80,80 : listen for TLS connections on tcp/10443, save decrypted traffic in PCAP as tcp/80, forward traffic to tcp/80
  • -p 10465,25,25 : listen for TLS connections on tcp/10465, save decrypted traffic in PCAP as tcp/25, forward traffic to tcp/25
  • -x /var/log/PolarProxy/polarproxy.cer : Save certificate to be imported to clients in /var/log/PolarProxy/polarproxy.cer (not required)
  • -f /var/log/PolarProxy/proxyflows.log : Log flow meta data in /var/log/PolarProxy/proxyflows.log (not required)
  • -o /var/log/PolarProxy/ : Save PCAP files with decrypted traffic in /var/log/PolarProxy/
  • --certhttp 10080 : Make the X.509 certificate available to clients over http on tcp/10080
  • --terminate : Run PolarProxy as a TLS termination proxy, i.e. data forwarded from the proxy is decrypted
  • --connect 192.168.53.19 : forward all connections to the IP of INetSim
  • --nosni nosni.inetsim.org : Accept incoming TLS connections without SNI, behave as if server name was "nosni.inetsim.org".

Finally, start the PolarProxy systemd service:

sudo systemctl enable PolarProxy.service

sudo systemctl start PolarProxy.service

Verify that you can reach INetSim through PolarProxy's TLS termination proxy using curl:

curl --insecure --connect-to example.com:443:192.168.53.19:10443 https://example.com

<html>
  <head>
    <title>INetSim default HTML page</title>
  </head>
  <body>
    <p></p>
    <p align="center">This is the default HTML page for INetSim HTTP server fake mode.</p>
    <p align="center">This file is an HTML document.</p>
  </body>
</html>

Yay, it is working! Do the same thing again, but also verify the certificate against PolarProxy's root CA this time. The root certificate is downloaded from PolarProxy via the HTTP service running on tcp/10080 and then converted from DER to PEM format using openssl, so that it can be used with curl's "--cacert" option.

curl http://192.168.53.19:10080/polarproxy.cer > polarproxy.cer

openssl x509 -inform DER -in polarproxy.cer -out polarproxy-pem.crt

curl --cacert polarproxy-pem.crt --connect-to example.com:443:192.168.53.19:10443 https://example.com

<html>
  <head>
    <title>INetSim default HTML page</title>
  </head>
  <body>
    <p></p>
    <p align="center">This is the default HTML page for INetSim HTTP server fake mode.</p>
    <p align="center">This file is an HTML document.</p>
  </body>
</html>

Yay #2!

Now let's set up routing to forward all HTTPS traffic to PolarProxy's service on tcp/10443 and SMTPS traffic to tcp/10465. I'm also adding a firewall rule to redirect ALL other incoming traffic to INetSim, regardless of which IP it is destined to, with the final REDIRECT rule. Make sure to replace "enp0s8" with the name of your interface.

sudo iptables -t nat -A PREROUTING -i enp0s8 -p tcp --dport 443 -j REDIRECT --to 10443

sudo iptables -t nat -A PREROUTING -i enp0s8 -p tcp --dport 465 -j REDIRECT --to 10465

sudo iptables -t nat -A PREROUTING -i enp0s8 -j REDIRECT

Verify that the iptables port redirection rule is working from another machine connected to the offline 192.168.53.0/24 network:

curl --insecure --resolve example.com:443:192.168.53.19 https://example.com

<html>
  <head>
    <title>INetSim default HTML page</title>
  </head>
  <body>
    <p></p>
    <p align="center">This is the default HTML page for INetSim HTTP server fake mode.</p>
    <p align="center">This file is an HTML document.</p>
  </body>
</html>

Yay #3!

curl --insecure --resolve example.com:465:192.168.53.19 smtps://example.com

214-Commands supported:
214- HELO MAIL RCPT DATA
214- RSET NOOP QUIT EXPN
214- HELP VRFY EHLO AUTH
214- ETRN STARTTLS
214 For more info use "HELP <topic>".

Yay #4!

It is now time to save the firewall rules, so that they will survive reboots.

sudo apt-get install iptables-persistent

Install the Victim Windows PC

Configure a static IP address on the victim Windows host by manually setting the IP address. Set the INetSim machine (192.168.53.19) as the default gateway and DNS server.
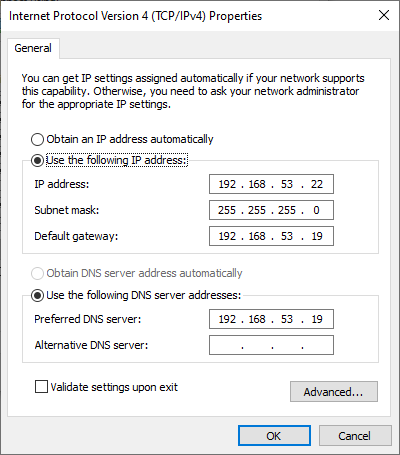
Windows IPv4 Properties

Download the X.509 root CA certificate from your PolarProxy installation here:
http://192.168.53.19:10080/polarproxy.cer

  1. Double-click on "polarproxy.cer"
  2. Click [Install Certificate...]
  3. Select 🔘 Local Machine and press [Next]
  4. Select 🔘 Place all certificates in the following store and press [Browse...]
  5. Choose "Trusted Root Certification Authorities" and press [OK], then [Next]
  6. Press [Finish]

You might also want to install the PolarProxy certificate in your browser. This is how you install it to Firefox:

  1. Options / Preferences
  2. Press [Privacy & Security]
  3. Scroll down to "Certificates" and press [View Certificates...]
  4. In the "Authorities" tab, press [Import...]
  5. Open "polarproxy.cer"
  6. ☑ Trust this CA to identify websites. (check the box)
  7. Press [OK]

Now, open a browser and try visiting some websites over HTTP or HTTPS. If you get the following message regardless of what domain you try to visit, then you've managed to set everything up correctly:

This is the default HTML page for INetSim HTTP server fake mode.

This file is an HTML document.

Accessing the Decrypted Traffic

PCAP files with decrypted HTTPS and SMTPS traffic are now available in /var/log/PolarProxy/

PolarProxy will start writing to a new capture file every 60 minutes. However, the captured packets are not written to disk instantly because PolarProxy uses buffered file writing in order to improve performance. You can restart the proxy service if you wish to flush the buffered packets to disk and have PolarProxy rotate to a new capture file.

sudo systemctl restart PolarProxy

I also recommend capturing all network traffic sent to INetSim with a sniffer like netsniff-ng. This way you’ll get PCAP files with traffic from INetSim’s cleartext services (like DNS and HTTP) as well.

PCAP or it didn’t happen!

Credits

I'd like to thank Thomas Hungenberg and Patrick Desnoyers for providing valuable feedback for this blog post!

Posted by Erik Hjelmvik on Monday, 09 December 2019 08:40:00 (UTC/GMT)

Tags: #PolarProxy#HTTPS#SMTPS#HTTP#SMTP#DNS#Malware#Sandbox#TLS#PCAP#proxy#tutorial#ASCII-art

Short URL: https://netresec.com/?b=19Ce12f


The NSA HSTS Security Feature Mystery

NSA TLSI advisory header

I recently stumbled across an NSA Cyber Advisory titled Managing Risk from Transport Layer Security Inspection (U/OO/212028-19) after first learning about it through Jonas Lejon’s blog post NSA varnar för TLS-inspektion (Swedish). I read the NSA report with great interest since I wanted to see how our own TLS interception tool PolarProxy stands up to the risks identified in the advisory.

I highly respect the NSA’s knowledge in the fields of cryptography and security, which is why I read the advisory as if it was the definite guide on how to perform TLS inspection in a secure manner. However, towards the end of the advisory I got stuck on this paragraph, which I was unable to understand:

HTTP Strict Transport Security (HSTS) includes a security feature that binds the HTTP session to the specific TLS session used. TLSI systems that ignore the underlying HTTP headers will cause HSTS sessions to be rejected by the client application, the server, or both.

WUT?!?! HSTS (RFC 6797) is designed to protect against attacks like Moxie Marlinspike’s 10 year old sslstrip, which fools the client into using unencrypted HTTP instead of HTTPS. As far as I know, HSTS does not support binding an HTTP session to a specific TLS session.

What is HSTS?

HSTS is a simple HTTP header sent by the web server to inform the browser that it should only load the site using HTTPS. The header can look like this:

strict-transport-security: max-age=47111337; includeSubDomains; preload

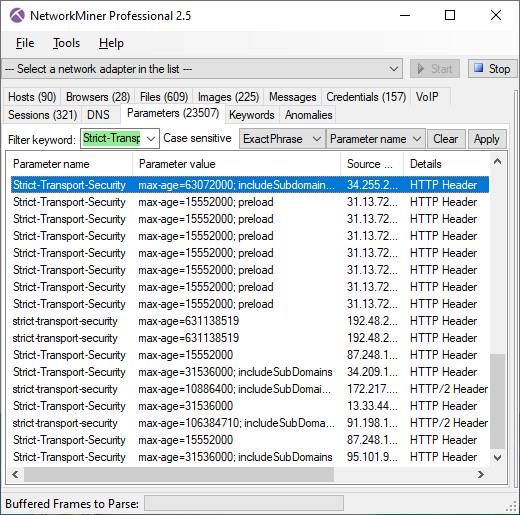
NetworkMiner 2.5 showing HSTS headers from HTTP/1.1 and HTTP/2 traffic

Image: NetworkMiner 2.5 showing HSTS headers from HTTP/1.1 and HTTP/2 traffic

The PCAP file loaded into NetworkMiner in screenshot above contains HTTPS traffic that has been decrypted by PolarProxy. You can also use Wireshark or tshark to find HSTS headers by using the following display filter:

http.response.line matches "Strict-Transport-Security" or http2.header.name matches "Strict-Transport-Security"

Notice the use of “matches” to get case insensitive matching of “Strict-Transport-Security” and the duplicated statements required to get the filter to match headers in both HTTP/1.1 and HTTP/2.

Back to the NSA Advisory

I simply couldn’t understand NSA’s statement about the HSTS “security feature” that binds the HTTP session to the specific TLS session used, because I’m not aware of any such feature in HSTS and my google-fu was to weak to find any such feature. I therefore resorted to asking folks on Twitter if they knew about this feature.

Nick Sullivan (Head of Research and Cryptography at Cloudflare) kindly replied on twitter that they probably mean “Token Binding” (RFC 8471). Peter Wu (Wireshark core developer and TLS expert) additionally replied that the NSA perhaps were referring to the Sec-Token-Binding header name in RFC 8473 (which has nothing to do with HSTS).

Backed by these two experts in TLS and HTTPS I can confidently conclude that the authors of the NSA’s Transport Layer Security Inspection (TLSI) advisory have either misunderstood what HSTS is or made some form of typo. I have reported this error to the NSA, but have not yet received any response.

Other Issues in NSA’s TLSI Advisory

This experience dented my faith in the TLS expertise of the NSA in general and in particular the authors of this advisory. I therefore decided to re-read the TLSI advisory, but this time without the “NSA knows this stuff” glasses I had on before. This time I found several additional claims and statements, which I didn’t agree with, in the four page advisory.

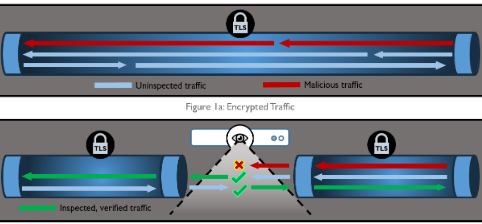
To start with, the first figure in the document depicts two setups where one is allowing end-to-end encryption between the client and server, while the other is using TLS inspection.

Encrypted Traffic (top) and TLS Inspection (bottom) as shown in NSA’s TLSI advisory

Image: Encrypted Traffic (top) and TLS Inspection (bottom) as shown in NSA’s TLSI advisory

In the end-to-end setup we see the malicious traffic passing straight to the client, while in the second setup the malicious traffic is blocked by the TLSI device. This image is accompanied by the following text:

A TLSI capability implemented within a forward proxy between the edge of the enterprise network and an external network such as the Internet protects enterprise clients from the high risk environment outside the forward proxy.

My experience is that blocking traffic in this way is more likely to provide a false sense of security than improved protection against malware. It is better to use TLSI to detect intrusions than to try to block them.

This probably sounds counter-intuitive, as you might reason that “if you can detect it, why can't you prevent it?”. I’m not going to go into a lengthy explanation of the “Prevention Eventually Fails” paradigm here, instead I’d recommend reading Richard Bejtlichs book “The Tao of Network Security Monitoring” or his more recent book “The Practice of Network Security Monitoring”. You can also read Richards blog post about ”The Problem with Automated Defenses” or Phil Hagen’s “What to Do When Threat Prevention Fails”.

TLSI products should primarily be used to provide visibility in order to detect and respond to malware and intrusions. Many TLSI products can block some attacks, but they don’t really provide perimeter security. Unfortunately the NSA advisory might further strengthen this false sense of security with the mentioned image and accompanying text.

DO IT WELL, DO IT ONCE

The NSA advisory states:

To minimize the risks described above, breaking and inspecting TLS traffic should only be conducted once within the enterprise network. Redundant TLSI, wherein a client-server traffic flow is decrypted, inspected, and re-encrypted by one forward proxy and is then forwarded to a second forward proxy for more of the same, should not be performed.

In general, I agree with this statement. Unfortunately many TLSI products do not “do it well”, which is why “do it once” is not always enough. One such situation is when a PC is believed to be infected with malware, but further investigation is required to know for sure. Many TLSI products apply lock-in techniques that prevent incident responders from analyzing the decrypted traffic with external tools. This forces IR teams to add an extra TLS proxy when their enterprise TLSI product does not provide sufficient visibility. PolarProxy is, in fact, designed to support that type of agile TLSI deployment, in order to enable decryption and inspection of TLS traffic from a particular machine during an incident.

Final Words about the Advisory and TLS Inspection

Even through this blog post criticizes parts of the NSA TLSI advisory, I’d still like to end with saying that it also brings a lot of good stuff to the table. The issues mentioned in this blog post are actually just minor ones, which hopefully won’t have any negative impact on future TLSI deployments. In fact, the positive aspects of the advisory by far outweighs the negative ones. I also hope this blog post can help get more discussions going about TLS inspection, such as if we need it, what problems it can solve and what risks we take by deploying it.

UPDATE, 16 December 2019

The NSA released an updated version of the advisory today (1U/OO/212028-19). The advisory now says:

  • TLS Token Binding binds security tokens to the specific TLS session used. TLSI systems can cause the sessions or tokens to be rejected by the client application, the server, or both.
  • Hypertext Transfer Protocol Strict Transport Security (HSTS) requires that Hypertext Transfer Protocol over TLS (HTTPS) is used in the future with trusted certificates and that all content is received via HTTPS as well. If a TLS client application attempts to follow the HSTS requirements but does not trust the separate TLSI CA, the client will reject the TLSI sessions and prevent users from clicking-through browser warnings.

Thanks for updating!

Posted by Erik Hjelmvik on Tuesday, 26 November 2019 19:18:00 (UTC/GMT)

Tags: #TLSI#TLS Inspection#TLS Interception#inspect#PolarProxy#TLS#NetworkMiner#Wireshark

Short URL: https://netresec.com/?b=19B5cbd


Extracting Kerberos Credentials from PCAP

NetworkMiner + Cerberos

NetworkMiner is one of the best tools around for extracting credentials, such as usernames and passwords, from PCAP files. The credential extraction feature is primarily designed for defenders, in order to analyze credential theft and lateral movement by adversaries inside your networks. But the credential extraction feature is also popular among penetration testers. In this blog post I will demo how Kerberos hashes can be extracted from captured network traffic with NetworkMiner, and how these hashes can be cracked in order to retrieve the clear text passwords.

Installing NetworkMiner in Kali Linux

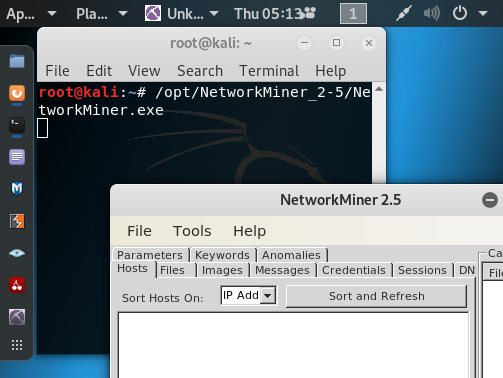
I’m using a clean install of Kali Linux 2019.3, on which I have installed NetworkMiner by following the step-by-step instructions in our guide for installing NetworkMiner in Ubuntu, Fedora and Arch Linux.

NetworkMiner 2.5 in Kali Linux

Extracting Kerberos Hashes from PCAP

There is a capture file in Wireshark’s sample captures called krb-816.cap. This capture file contains Kerberos traffic from a Windows XP machine, as two user accounts perform a domain logon. Let’s download that PCAP file and open it in NetworkMiner.

wget 'https://wiki.wireshark.org/SampleCaptures?action=AttachFile&do=get&target=krb-816.zip' -O krb-816.zip
unzip krb-816.zip
/opt/NetworkMiner_2-5/NetworkMiner.exe krb-816.cap

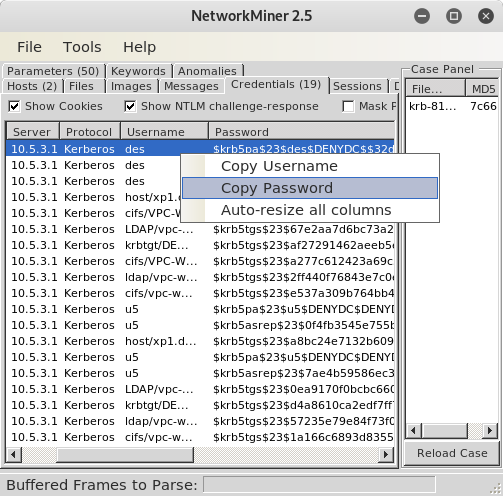
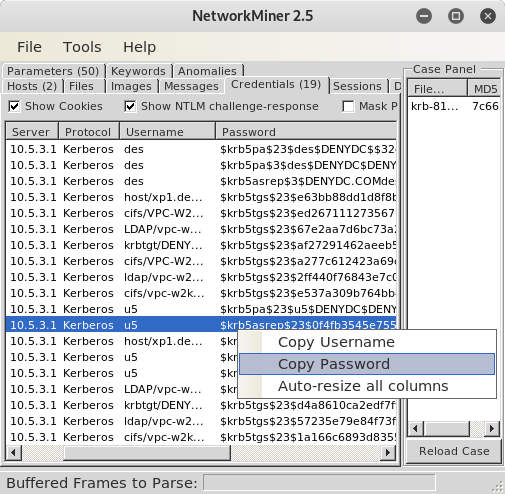
The “Credentials” tab contains the extracted Kerberos hashes. Right-click on the first $krb5pa$23$ hash and select “Copy Password” to put the password into the system clipboard.

Copy Kerberos hash to system clipboard in Linux

Paste the password to a text file, either using a text editor or directly from a shell.

Note: You'll need to do press Ctrl+Shift+Insert in GNOME Terminal to paste from the system clipboard, which is where NetworkMiner has put the password.

echo '$krb5pa$23$des$DENYDC$$32d396a914a4d0a78e979ba75d4ff53c1db7294141760fee05e434c12ecf8d5b9aa5839e09a2244893aff5f384f79c37883f154a' > krb5pa.hash

You can now try to crack the hash, for example by running John the Ripper (JtR) or hashcat.

john krb5pa.hash
Using default input encoding: UTF-8
Loaded 1 password hash (krb5pa-md5, Kerberos 5 AS-REQ Pre-Auth etype 23 [32/64])
[...]
Use the "--show" option to display all of the cracked passwords reliably
Session completed
john krb5pa.hash --show
?:123

1 password hash cracked, 0 left

Yay! We now know that the password of user “des” was “123”. Let’s try to recover the password of the user “u5” as well, but this time we’ll use the $krb5asrep$23$ hash.

Copying the krb5asrep hash from NetworkMiner
john krb5asrep.hash
[...]
john krb5asrep.hash --show
?:123

1 password hash cracked, 0 left

Apparently the password for user u5 was “123” as well.

If you wanna replace JtR with hashcat, then make sure to use the following hash modes:

  • $krb5pa$23$: hashcat -m 7500
  • $krb5tgs$23$: hashcat -m 13100
  • $krb5asrep$23$: hashcat -m 18200
For other hash types, please see the hashcat example hashes.

Running the Command Line version of NetworkMiner

The commercial version of NetworkMiner comes with a command line tool called NetworkMinerCLI. You can extract the Kerberos hashes from a PCAP file and save them to a CSV file using NetworkMinerCLI like this:

/opt/NetworkMinerProfessional_2-5/NetworkMinerCLI.exe -r krb-816.cap -f CSV_NoNewlines
Closing file handles...
32 frames parsed in 0.1337 seconds.

NetworkMinerCLI has now created a set of CSV files, one for each type/class of information found in the capture file. In this case we want the krb-816.cap.Credentials.csv file, in which the hashes and passwords are in column 5:

cut -d, -f5 krb-816.cap.Credentials.csv
"Password"
"$krb5pa$23$des$DENYDC$$32d396a914a4d0a78e979ba75d4ff53c1db7294141760fee05e434c12ecf8d5b9aa5839e09a2244893aff5f384f79c37883f154a"
"$krb5pa$3$des$DENYDC$DENYDC.COMdes$233b4272aa93727221facfdbdcc9d1d9a0c43a2798c810600310c0daf48fb969c26cb47d69f575a65e00163845f68811f9c5266271cc0f91"
"$krb5asrep$3$DENYDC.COMdes$edbcc0d67f3a645254f086e6$e2bfe2b7bbac72b346ad05abb8326f6d684dcb52b6c2f446921417579e038103eb2e9039aa3a2db85c8e1afc2ed56130b4855834725096edb74d1582920b3b1b7e30ef51b14c8977487147b868c3e0f7c3e8c5d5618b9dfa0fd90e62c35f8bd41ab283d87155cd51a01b8ced6411f1f0e060d9b4a78de2afc281756a0030453418d263784f91725387d7469820904b646ac519384f24d6ff769b7af8594c8a02c0cf691d38bf115b588848ed7acf5ac7fae159a13590094fc199d85522a97c4213cc68845023c7f12f7da9e7623e4ed0241ad1145418b3cc373dc59c71b6cafec370557816f949c736497f12313fd76d4eeffc9ded11605fe52e8171fa6026d68f1ade93"
[...]

Posted by Erik Hjelmvik on Thursday, 14 November 2019 12:25:00 (UTC/GMT)

Tags: #PCAP#Kerberos#Linux#hashcat#John#JtR#NetworkMinerCLI

Short URL: https://netresec.com/?b=19B60ac


NetworkMiner 2.5 Released

NetworkMiner 2.5

I am happy to announce the release of NetworkMiner 2.5 today! This new version includes new features like JA3 and parsers for the HTTP/2 and DoH protocols. We have also added support for a few older protocols that are still widely used, such as Kerberos and the CIFS browser protocol. Additionally, NetworkMiner can now parse PCAP files up to twice as fast as before!

Improving Passive TLS Analysis with JA3

Almost all web traffic is TLS encrypted nowadays, which prevents incident responders, analysts and investigators from inspecting otherwise unencrypted HTTP traffic for clues about malicious behavior or criminal intent. This requires analysts to use alternative approaches, such as looking at hostnames and X.509 certificates. This type of analysis is supported by NetworkMiner, since it parses Server Name Indication fields in client TLS handshakes and extracts X.509 certificates automatically when PCAP files are loaded.

In this release we’ve also added support for another passive TLS analysis technique called JA3, which is a method for fingerprinting TLS client implementations.

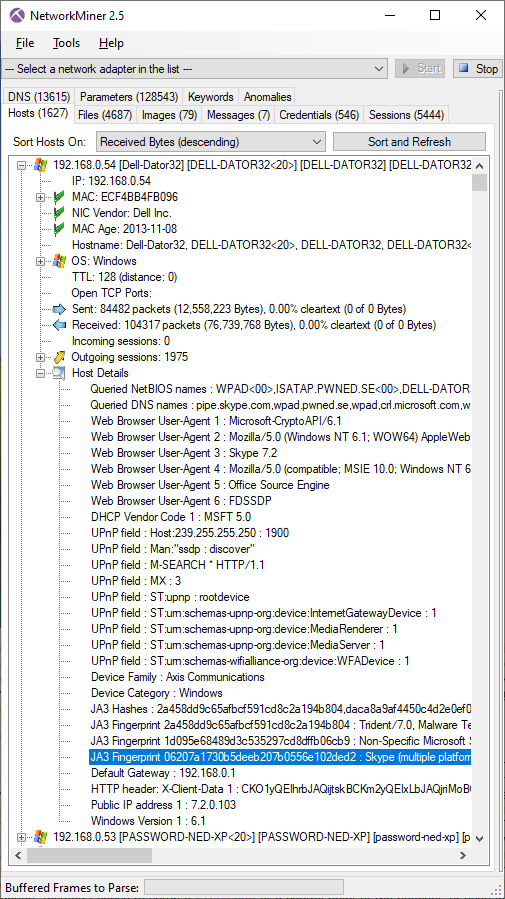
NetworkMiner leverages the JA3 fingerprint database from Trisul Network Analytics in order to match observed JA3 hashes to hashes of known malware and “normal” applications. This is what it looks like when the capture file “snort.log.1428364808”, from the FIRST 2015 “Hands-on Network Forensics” training (available here), has been loaded into NetworkMiner 2.5:

JA3 fingerprint of a Skype client

Image: JA3 fingerprint of a Skype client in NetworkMiner 2.5

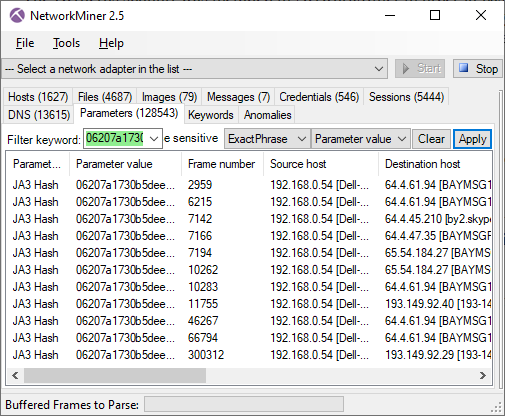
The JA3 hash is also available in the “Parameters” tab, which is useful in order to find out what hosts that particular TLS implementation was reaching out to.

Filtering on JA3 hash 06207a1730b5deeb207b0556e102ded2 in NetworkMiner 2.5

Image: Filtering on JA3 hash 06207a1730b5deeb207b0556e102ded2

HTTP/2 and DoH Support

Passive analysis of TLS traffic, such as HTTPS, often doesn’t give sufficient visibility. Many organizations therefore use TLS proxies in order to decrypt the traffic going in and out from their networks. However, more than half of all HTTPS traffic is actually http2 (RFC 7540) nowadays. This has previously been an issue for users who wanted to analyze decrypted http2 traffic from their TLS intercepting proxies with NetworkMiner. We’re happy to announce that NetworkMiner now can parse http2 traffic, that has been decrypted by a TLS proxy, and extract files from the http2 transfers.

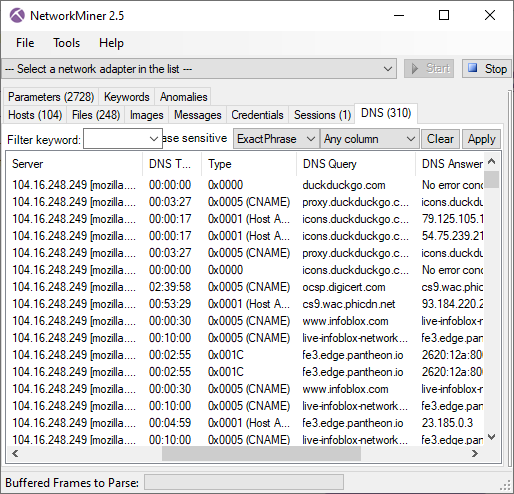
NetworkMiner 2.5 also supports the DNS over HTTPS (DoH) protocol (RFC 8484), which is a technique for sending DNS queries as http2 POST requests and parsing the returned data as DNS responses. We’ve incorporated the DoH data into NetworkMiner’s DNS tab, so that you can analyze it just like normal DNS traffic.

DoH traffic to mozilla.cloudflare-dns.com in NetworkMiner’s DNS tab

Image: DoH traffic to mozilla.cloudflare-dns.com in NetworkMiner’s DNS tab

Please note that NetworkMiner 2.5 does not perform TLS decryption. This means that NetworkMiner can only parse the contents of a TLS stream if it has been decrypted by a TLS proxy, such as PolarProxy.

Extracting Kerberos Hashes from PCAP

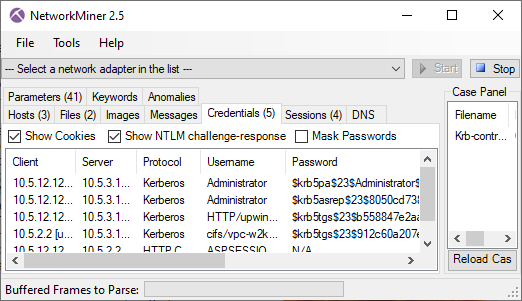
NetworkMiner’s support for the Kerberos protocol allows you to passively track which user accounts that are authenticating to what services, simply by monitoring network traffic. This is a feature is essential in order to track credential theft and lateral movement by adversaries inside your networks. After implementing kerberos username and hash extraction we realized that this feature could also be valuable for penetration testers. We therefore decided to present extracted Kerberos credentials in a format that is compatible with tools like hashcat and John the Ripper.

Kerberos krb5pa, krb5asrep and krb5tgs credentials extracted from the Wireshark sample capture file

Image: Kerberos krb5pa, krb5asrep and krb5tgs credentials extracted from the Wireshark sample capture file Krb-contrained-delegation.cap

For more information about Kerberos hashes, please see our Extracting Kerberos Credentials from PCAP blog post.

Even more NetBIOS and CIFS Artifacts!

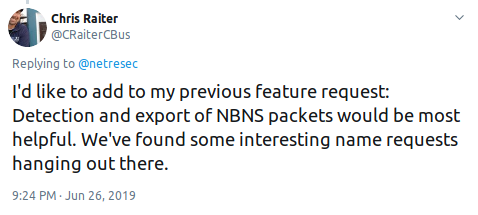
NetworkMiner is a popular tool for extracting files transferred over SMB and SMB2 from capture files. It can also extract a great deal of information about the communicating hosts from protocols like NetBIOS and SMB/CIFS, but earlier this year Chris Raiter notified us about an important piece of information that was missing in NetworkMiner: NetBIOS Name Service (NBNS) lookups and responses!

Detection and export of NBNS packets request on twitter

A couple of months later Dan Gunter sent us another great feature request for another protocol that runs on top of NetBIOS: the CIFS Browser Protocol (aka MS-BRWS).

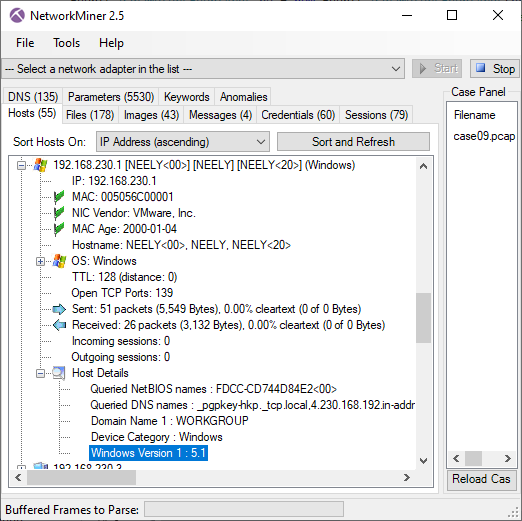
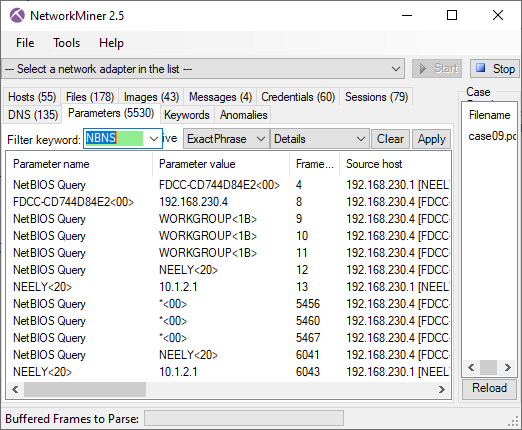
We’re happy to announce that NBNS queries and responses are now shown in NetworkMiner’s Parameters tab, and details like hostnames, domain names, Windows versions and uptime us extracted from the MS-BRWS protocol. See the screenshots below, which were created by loading the capture file “case09.pcap” from Richard Bejtlich’s TCP/IP Weapons School 2.0 Sample Lab into NetworkMiner 2.5. Thanks for sharing Richard!

Hostname, domain and Windows version extracted from MS-BRWS traffic

Image: Hostname, domain and Windows version extracted from MS-BRWS traffic

NBNS queries and responses in NetworkMiner’s Parameters tab

Image: NBNS queries and responses in NetworkMiner’s Parameters tab

Mono 5 Required for Linux and MacOS

Linux and MacOS users, who run NetworkMiner with help of Mono, will need to ensure they have Mono 5 (or later) installed in order to run NetworkMiner 2.5. We recommend using at least Mono 5.18.

Instructions for installing NetworkMiner on Linux can be found in our blog post ”HowTo install NetworkMiner in Ubuntu Fedora and Arch Linux”.

MacOS users can refer to our “Running NetworkMiner on Mac OS X” blog post.

Users who are unable to install Mono 5 are recommended to use the old NetworkMiner 2.4 release, which can be downloaded here:
https://www.netresec.com/?download=NetworkMiner_2-4

NetworkMiner Professional

Apart from the features mentioned so far, our commercial tool NetworkMiner Professional now comes with a few additional new features. One of these features is port independent identification of RDP traffic, so that mstshash credentials can be extracted from RDP sessions even if the service doesn’t run on port 3389. The OSINT lookup context menus in NetworkMiner Professional have also been enriched with the following online services:

Several new features have also been included in the command line tool NetworkMinerCLI, including:

  • Recursive loading of PCAP files with the "-R” switch.
  • Configurable export types (hosts, files, DNS etc) with the “-x” switch.
  • Relative paths in CSV, XML and JSON/CASE exports unless the “-- absolutePaths” switch is used.

Credits

I’d like to thank Dan Gunter, Chris Raiter, Chris Sistrunk and a few more (who I cannot mention here) for contributing with feature requests and bug reports that have helped improve NetworkMiner.

Upgrading to Version 2.5

Users who have purchased a license for NetworkMiner Professional 2.x can download a free update to version 2.5 from our customer portal, or use the “Help > Check for Updates” feature. Those who instead prefer to use the free and open source version can grab the latest version of NetworkMiner from the official NetworkMiner page.

Posted by Erik Hjelmvik on Thursday, 07 November 2019 11:45:00 (UTC/GMT)

Tags: #NetworkMiner#JA3#HTTP/2#http2#DoH#Kerberos#NetBIOS#PCAP#hashcat#John#NetworkMinerCLI#OSINT

Short URL: https://netresec.com/?b=19B4a1a


Raspberry PI WiFi Access Point with TLS Inspection

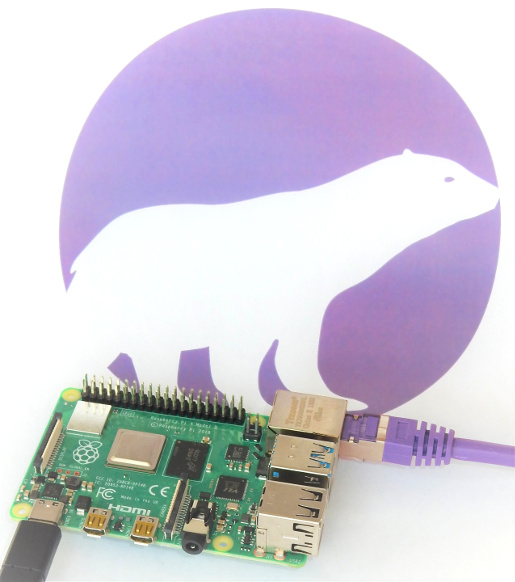
This is a how-to guide for setting up a Raspberry Pi as a WiFi Access Point, which acts as a transparent TLS proxy and saves the decrypted traffic in PCAP files.

Raspberry Pi 4 Model B running PolarProxy
Image: Raspberry Pi 4 Model B running PolarProxy

Step 1: Install PolarProxy for Linux ARM

We will start with installing PolarProxy, which will be used for the TLS decryption and re-encryption. The steps are almost identical to those in the official PolarProxy installation guide, except here we will download the "linux-arm" build of PolarProxy instead of the x64 version.

sudo adduser --system --shell /bin/bash proxyuser
sudo mkdir /var/log/PolarProxy
sudo chown proxyuser:root /var/log/PolarProxy/
sudo chmod 0775 /var/log/PolarProxy/
sudo su - proxyuser
mkdir ~/PolarProxy
cd ~/PolarProxy/
curl https://www.netresec.com/?download=PolarProxy_linux-arm | tar -xzf -
exit
sudo cp /home/proxyuser/PolarProxy/PolarProxy.service /etc/systemd/system/PolarProxy.service
sudo systemctl enable PolarProxy.service
sudo systemctl start PolarProxy.service

Note: The installation instructions above will fail on 64-bit ARM Linux OS's since the downloaded PolarProxy tarball is compiled for 32-bit ARM Linux. Luckily, we do have a linux-arm64 build as well, which is available here:
https://www.netresec.com/?download=PolarProxy_linux-arm64

Verify that the PolarProxy service is running as expected with these commands:

systemctl status PolarProxy.service
journalctl -t PolarProxy

Step 2: Set up your Pi as a WiFi AP

The Raspberry Pi Foundation have a great guide for "Setting up a Raspberry Pi as a Wireless Access Point". Follow the instructions in their guide for the NAT mode setup (first section), but replace the iptables config with this:

sudo iptables -t nat -A POSTROUTING -o eth0 -j MASQUERADE
sudo iptables -A INPUT -i wlan0 -p tcp --dport 10443 -m state --state NEW -j ACCEPT
sudo iptables -t nat -A PREROUTING -i wlan0 -p tcp --dport 443 -j REDIRECT --to 10443
Then save the iptables rules with:
sudo sh -c "iptables-save > /etc/iptables.ipv4.nat"
Finally, edit /etc/rc.local and add this iptables-restore command just above "exit 0" to install the rules on boot.
iptables-restore < /etc/iptables.ipv4.nat

Step 3: Configure the Clients

The final step is to connect the clients (phones, tablets or computers) to the Raspberry Pi WiFi Access Point and install the root CA from PolarProxy.

Follow the instructions for "Trusting the PolarProxy root CA" in the official PolarProxy setup guide to install the public certificate from the TLS proxy in your clients. The certificate can be downloaded from the Raspberry Pi by browsing to http://192.168.4.1:10080/polarproxy.cer.

PCAP PCAP PCAP

Your Raspberry Pi WiFi AP will now intercept all HTTPS traffic going to tcp/443 and save the decrypted traffic in PCAP files, one per hour. The PCAP files with decrypted TLS traffic can be found in the /var/log/PolarProxy/ directory of your Raspberry Pi.

pi@raspberrypi:/var/log/PolarProxy $ ls *.pcap
proxy-190925-075704.pcap proxy-190925-152902.pcap
proxy-190925-085704.pcap proxy-190925-162902.pcap
proxy-190925-095704.pcap proxy-190925-172902.pcap
proxy-190925-105704.pcap proxy-190925-182902.pcap
proxy-190925-115704.pcap proxy-190926-062902.pcap
proxy-190925-125704.pcap proxy-190926-072902.pcap
proxy-190925-132704.pcap proxy-190926-082902.pcap
proxy-190925-132902.pcap proxy-190926-092902.pcap
proxy-190925-142902.pcap proxy-190926-102902.pcap

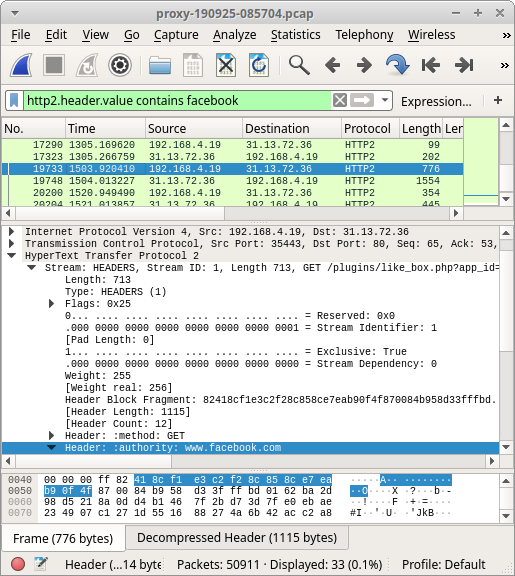
HTTP/2 traffic to Facebook opened in Wireshark
Image: Decrypted HTTP/2 traffic to Facebook opened in Wireshark

Posted by Erik Hjelmvik on Thursday, 26 September 2019 11:37:00 (UTC/GMT)

Tags: #PolarProxy#PCAP#WiFi#TLS#SSL#HTTPS#Wireshark#http2

Short URL: https://netresec.com/?b=199dc9a


PolarProxy Released

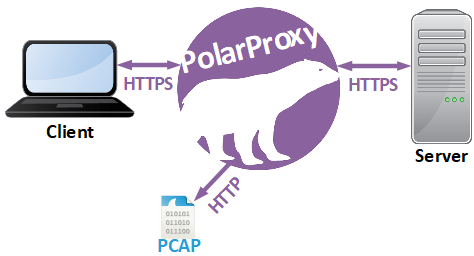
I’m very proud to announce the release of PolarProxy today! PolarProxy is a transparent TLS proxy that decrypts and re-encrypts TLS traffic while also generating a PCAP file containing the decrypted traffic.

PolarProxy flow chart

PolarProxy enables you to do lots of things that have previously been impossible, or at least very complex, such as:

  • Analyzing HTTP/2 traffic without an SSLKEYLOGFILE
  • Viewing decrypted HTTPS traffic in real-time using Wireshark
    PolarProxy -p 10443,80,443 -w - | wireshark -i - -k
  • Replaying decrypted traffic to an internal or external interface using tcpreplay
    PolarProxy -p 10443,80,443 -w - | tcpreplay -i eth1 -
  • Forwarding of decrypted traffic to a NIDS (see tcpreplay command above)
  • Extracting DNS queries and replies from DNS-over-TLS (DoT) or DNS-over-HTTPS (DoH) traffic
    PolarProxy -p 853,53 -p 443,80 -w dns.pcap
  • Extracting email traffic from SMTPS, POP3S or IMAPS
    PolarProxy -p 465,25 -p 995,110 -p 993,143 -w emails.pcap

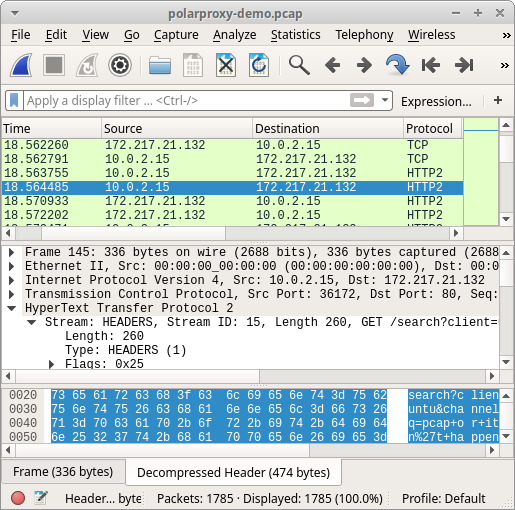
Here is an example PCAP file generated by PolarProxy:
https://media.netresec.com/pcap/polarproxy-demo.pcap

This capture files contains HTTP, WebSocket and HTTP/2 packets to Mozilla, Google and Twitter that would otherwise have been encrypted with TLS.

 HTTP/2 traffic from PolarProxy opened in Wireshark
Image: HTTP/2 traffic from PolarProxy opened in Wireshark

Now, head over to our PolarProxy page and try it for yourself (it’s free)!

Posted by Erik Hjelmvik on Friday, 21 June 2019 06:00:00 (UTC/GMT)

Tags: #PolarProxy#PCAP#NIDS#IDS#http2#HTTP/2#SSLKEYLOGFILE#Wireshark#tcpreplay#DoH#SMTPS#IMAPS#TLS#SSL

Short URL: https://netresec.com/?b=196571b


CapLoader 1.8 Released

CapLoader 1.8

We are happy to announce the release of CapLoader 1.8 today!

CapLoader is primarily used to filter, slice and dice large PCAP datasets into smaller ones. This new version contains several new features that improves this filtering functionality even further. To start with, the “Keyword Filter” can now be used to filter the rows in the Flows, Services or Hosts tabs using regular expressions. This enables the use of matching expressions like this:

  • amazon|akamai|cdn
    Show only rows containing any of the strings “amazon” “akamai” or “cdn”.
  • microsoft\.com\b|windowsupdate\.com\b
    Show only servers with domain names ending in “microsoft.com” or “windowsupdate.com”.
  • ^SMB2?$
    Show only SMB and SMB2 flows.
  • \d{1,3}\.\d{1,3}\.\d{1,3}\.255$
    Show only IPv4 address ending with “.255”.

For a reference on the full regular expression syntax available in CapLoader, please see Microsoft’s regex “Quick Reference”.

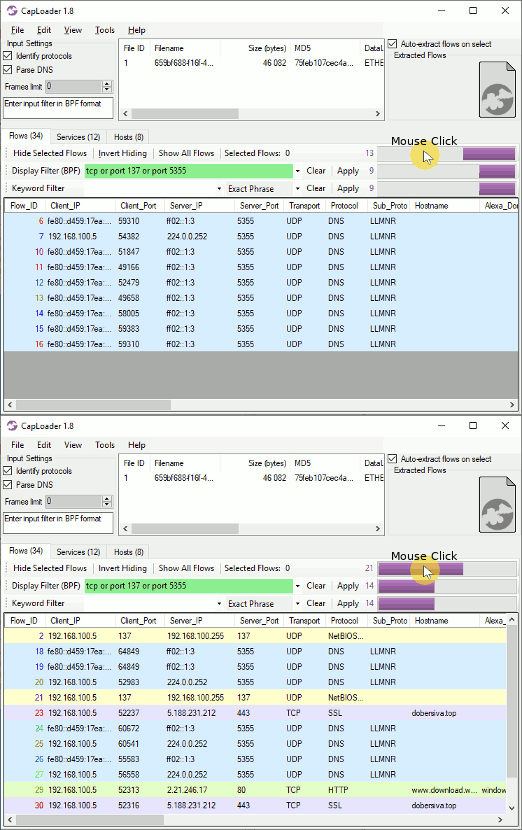
One popular workflow supported by CapLoader is to divide all flows (or hosts) into two separate datasets, for example one “normal” and one “malicious” set. The user can move rows between these two sets, where only one set is visible while the rows in the other set are hidden. To switch which dataset that is visible versus hidden the user needs to click the [Invert Hiding] button (or use the [Ctrl]+[Tab] key combination). With this new release we’ve also made the “Invert Hiding” functionality available by clicking the purple bar, which shows the number of rows present in the currently viewed set.

CapLoader Invert Hiding GIF

Readers with a keen eye might also notice that the purple bar charts are now also accompanied by a number, indicating how many rows that are visible after each filter is applied. The available filters are: Set Selection, BPF and Keyword Filter.

NetFlow + DNS = Great Success!

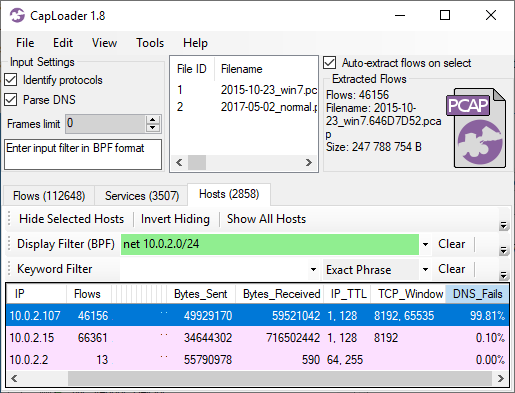
CapLoader’s main view presents the contents of the loaded PCAP files as a list of netflow records. Since the full PCAP is available, CapLoader also parses the DNS packets in the capture files in order to enrich the netflow view with hostnames. Recently PaC shared a great idea with us, why not show how many failed DNS lookups each client does? This would enable generic detection of DGA botnets without using blacklists. I’m happy to announce that this great idea made it directly into this new release! The rightmost column in CapLoader’s hosts tab, called “DNS_Fails”, shows how many percent of a client’s DNS requests that have resulted in an NXRESPONSE or SRVFAIL response.

CapLoader 1.8

Two packet capture files are loaded into CapLoader in the screenshot above; one PCAP file from a PC infected with the Shifu malware and one PCAP file with “normal traffic” (thanks @StratosphereIPS for sharing these capture files). As you can see, one of the clients (10.0.2.107) has a really high DNS failure ratio (99.81%). Unsurprisingly, this is also the host that was infected with the Shifu, which uses a domain generation algorithm (DGA) to locate its C2 servers.

Apart from parsing A and CNAME records from DNS responses CapLoader now also parses AAAA DNS records (IPv6 addresses). This enables CapLoader to map public domain names to hosts with IPv6 addresses.

Additional Updates

The new CapLoader release also comes with several other new features and updates, such as:

  • Added urlscan.io service for domain and IP lookups (right-click a flow or host to bring up the lookup menu).
  • Flow ID coloring based on 5-tuple, and clearer colors in timeline Gantt chart.
  • Extended default flow-timeout from 10 minutes to 2 hours for TCP flows.
  • Changed flow-timout for non-TCP flows to 60 seconds.
  • Upgraded to .NET Framework 4.7.2.

Updating to the Latest Release

Users who have previously purchased a license for CapLoader can download a free update to version 1.8 from our customer portal. All others can download a free 30 day trial from the CapLoader product page (no registration required).

Credits

We’d like to thank Mikael Harmark, Mandy van Oosterhout and Ulf Holmström for reporting bugs that have been fixed in this release. We’d also like to thank PaC for the DNS failure rate feature request mentioned in this blog post.

Posted by Erik Hjelmvik on Tuesday, 28 May 2019 10:45:00 (UTC/GMT)

Tags: #CapLoader#NetFlow#regex#DNS#DGA#Stratosphere

Short URL: https://netresec.com/?b=1950482


Video: TrickBot and ETERNALCHAMPION

This video tutorial is a walkthrough of how you can analyze the PCAP file UISGCON-traffic-analysis-task-pcap-2-of-2.pcap (created by Brad Duncan). The capture file contains a malicious Word Document (macro downloader), Emotet (banking trojan), TrickBot/Trickster (banking trojan) and an EternalChampion (CVE-2017-0146) exploit used to perform lateral movement.

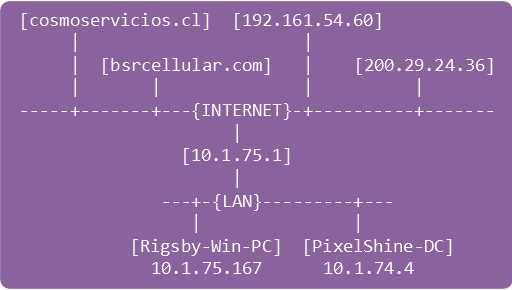
Network Diagram

Network Diagram

Timeline of Events

Frame Time (UTC) Event
825 18:55:32 Malicious Word doc [cosmoservicios.cl]
1099 18:56:04 Emotet download [bsrcellular.com]
5024 19:00:41 Trickbot "radiance.png" download
9604 19:01:34 Client credentials exfiltrated [200.29.24.36:8082]
9915 19:01:36 ETERNALCHAMPION exploit from client to DC
10424 19:01:51 Client sends .EXE files to \\10.1.75.4\C$\WINDOWS\
11078 19:01:51 Client infects DC with Trickbot via rogue service
14314 19:07:03 DC credentials exfiltrated [200.29.24.36:8082]

OSINT Links Opened

Tools Used

Network Forensics Training

Wanna improve your network forensics skills? Take a look at our trainings, the next scheduled class is on March 18-19 at the TROOPERS conference in Germany.

Posted by Erik Hjelmvik on Wednesday, 23 January 2019 14:00:00 (UTC/GMT)

Tags: #TrickBot#Wireshark#CapLoader#NetworkMiner#videotutorial#video#Emotet#pcap#Network Forensics#ASCII-art

Short URL: https://netresec.com/?b=1916dfe

2019 January

NetworkMiner 2.4 Released

X / twitter

NETRESEC on X / Twitter: @netresec

Mastodon

NETRESEC on Mastodon: @netresec@infosec.exchange