NETRESEC Network Security Blog - Tag : x509

rss Google News

PolarProxy in Docker

PolarProxy + Docker

Our transparent TLS proxy PolarProxy is gaining lots of popularity due to how effective it is at generating decrypted PCAP files in combination with how easy it is to deploy. In this blog post we will show how to run PolarProxy in Docker.

Installation Instructions

Create a Dockerfile with the following contents:

FROM mcr.microsoft.com/dotnet/runtime:6.0
EXPOSE 10443
EXPOSE 10080
EXPOSE 57012
RUN groupadd -g 31337 polarproxy && useradd -m -u 31337 -g polarproxy polarproxy && mkdir -p /var/log/PolarProxy /opt/polarproxy && chown polarproxy:polarproxy /var/log/PolarProxy && apt-get update && apt-get install -y curl && curl -s https://www.netresec.com/?download=PolarProxy | tar -xzf - -C /opt/polarproxy
VOLUME ["/var/log/PolarProxy/", "/home/polarproxy/"]
USER polarproxy
WORKDIR /opt/polarproxy/
ENTRYPOINT ["dotnet", "PolarProxy.dll"]
CMD ["-v", "-p", "10443,80,443", "-o", "/var/log/PolarProxy/", "--certhttp", "10080", "--pcapoverip", "0.0.0.0:57012"]

Save the Docker file as "Dockerfile" (no extension) in an empty directory and start a shell in that directory with root privileges.


Update (2024-05-02): Additional dockerfiles can now be found in https://github.com/Netresec/PolarProxy/tree/main/dockerfiles

Build the PolarProxy Docker image with:

docker build -t polarproxy-image .

Next, create a Docker container named "polarproxy":

docker create -p 443:10443 -p 10443:10443 -p 10080:10080 --name polarproxy polarproxy-image
The "-p" switches in this command define three DNAT rules that will get activated when the polarproxy container is started. The first DNAT rule forwards incoming TCP port 443 traffic to the polarproxy Docker container's transparent TLS proxy service on TCP port 10443. The second one does the same thing, but for incoming traffic to TCP 10443. The last one forwards TCP port 10080 traffic to a web server that delivers the public X.509 certificate of the proxy.

It is now time to start the polarproxy container:

docker start polarproxy

Verify that PolarProxy is running:

docker ps
docker logs polarproxy

Try fetching PolarProxy's public root CA certificate with curl and then connect to a website over HTTPS through the proxy:

curl -sL http://localhost:10080 | openssl x509 -inform DER -issuer -noout -dates
curl --insecure --connect-to www.netresec.com:443:127.0.0.1:10443 https://www.netresec.com/
curl --insecure --resolve www.netresec.com:443:127.0.0.1 https://www.netresec.com/

Redirect HTTPS and Trust the Root CA

You can now redirect outgoing TCP 443 traffic from your network to your Docker host. Review the "Routing HTTPS Traffic to the Proxy" section on the PolarProxy page for recommendations on how to redirect outgoing traffic to PolarProxy.

Finally, configure the operating system, browsers and other applications that will get their TLS traffic proxied by PolarProxy to trust the root CA of the PolarProxy service running in your Docker container. Follow the steps in the "Trusting the PolarProxy root CA" section of the PolarProxy documentation in order to install the root cert.

Docker Volumes

The Docker file we used in this blog post defines two volumes. The first volume is mounted on "/var/log/PolarProxy" in the container, which is where the decrypted network traffic will be stored as hourly rotated PCAP files. The second volume is the polarproxy home directory, under which PolarProxy will store its private root CA certificate.

The volumes are typically located under "/var/lib/docker/volumes" on the Docker host's file system. You can find the exact path by running:

docker volume ls
docker volume inspect <VOLUME_NAME>

Or use find to list *.pcap files in the Docker volumes directory:

find /var/lib/docker/volumes/ -name *.pcap
/var/lib/docker/volumes/7ebb3f56fd4ceab96[...]/_data/​proxy-201006-095937.pcap/var/lib/docker/volumes/7ebb3f56fd4ceab96[...]/_data/​proxy-201006-105937.pcap/var/lib/docker/volumes/7ebb3f56fd4ceab96[...]/_data/​proxy-201006-115937.pcap

The full path of your private PolarProxy Root CA certificate, which is located under "/home/polarproxy/" in the Docker container, can also be located using find:

find /var/lib/docker/volumes/ -name *.p12
/var/lib/docker/volumes/dcabbbac10e1b1461[...]/_data/​.local/share/PolarProxy/​e249f9c497d7b5c41339f153a31eda1c.p12

We recommend reusing the "/home/polarproxy/" volume, when deploying new PolarProxy instances or upgrading to a new version of PolarProxy, in order to avoid having to re-configure clients to trust a new root CA every time a new PolarProxy container is created.

PolarProxy in Docker on ARM Linux

PolarProxy can also run on ARM Linux installations, such as a Raspberry Pi. However, the Dockerfile must be modified slightly in order to do so.

ARM 32-bit / AArch32 / ARMv7 If you're running an "arm32" Linux OS, then change the download link in the "RUN" instruction to the following URL:
https://www.netresec.com/?download=PolarProxy_linux-arm

ARM 64-bit / AArch64 / ARMv8 If you're running an "arm64" Linux OS, then change the download link in the "RUN" instruction to the following URL:
https://www.netresec.com/?download=PolarProxy_linux-arm64

Don't know if you're running a 32-bit or 64-bit OS? Run "uname -m" and check if the output says "armv7*" (arm32), "armv8*" (arm64) or "aarch64" (arm64).

See our blog post "Raspberry PI WiFi Access Point with TLS Inspection" for more details about deploying PolarProxy on a Raspberry Pi (without Docker).

Credits

We'd like to thank Jonas Lejon for contacting us back in February about the work he had done to get PolarProxy running in Docker. We used Jonas' work as a starting point when building the installation instructions in this how-to guide.

We also want to thank Erik Ahlström for providing valuable feedback on the instructions in this guide.

ʕ•ᴥ•ʔ + 🐳 = 💜

Posted by Erik Hjelmvik on Wednesday, 07 October 2020 08:09:00 (UTC/GMT)

Tags: #PolarProxy#Docker#TLS#HTTPS#Proxy#TLSI#Dockerfile#curl#x509#X.509#PCAP#DNAT#container#DNAT#arm32#arm64#AArch64#PCAP-over-IP#pcapoverip

Short URL: https://netresec.com/?b=20Accbd


Examining an x509 Covert Channel

Jason Reaves gave a talk titled “Malware C2 over x509 certificate exchange” at BSides Springfield 2017, where he demonstrated that the SSL handshake can be abused by malware as a covert command-and-control (C2) channel.

Jason Reaves presenting at BSides Springfield 2017

He got the idea while analyzing the Vawtrak malware after discovering that it read multiple fields in the X.509 certificate provided by the server before proceeding. Jason initially thought these fields were used as a C2 channel, but then realized that Vawtrak performed a variant of certificate pinning in order to discover SSL man-in-the-middle attempts.

Nevertheless, Jason decided to actually implement a proof-of-concept (PoC) that uses the X.509 certificate as a C2 channel. Jason’s code is now available on GitHub along with a PCAP file demonstrating this covert C2 channel. Of course I couldn’t resist having a little look at this PCAP file in NetworkMiner.

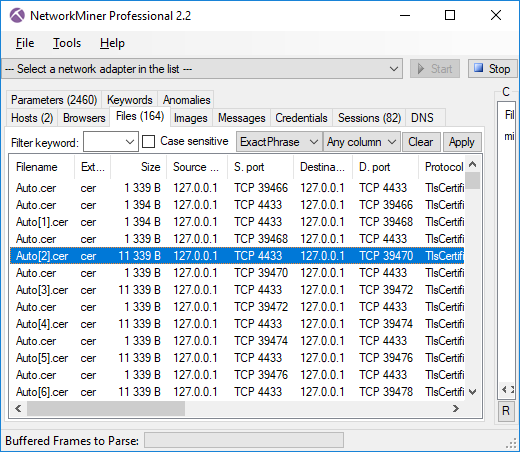
The first thing I noticed was that the proof-of-concept PCAP ran the SSL session on TCP 4433, which prevented NetworkMiner from parsing the traffic as SSL. However, I was able to parse the SSL traffic with NetworkMiner Professional just fine thanks to the port-independent-protocol-identification feature (a.k.a Dynamic Port Detection), which made the Pro-version parse TCP 4433 as SSL/TLS.

X.509 certificates extracted from PCAP with NetworkMiner
Image: X.509 certificates extracted from PCAP with NetworkMiner

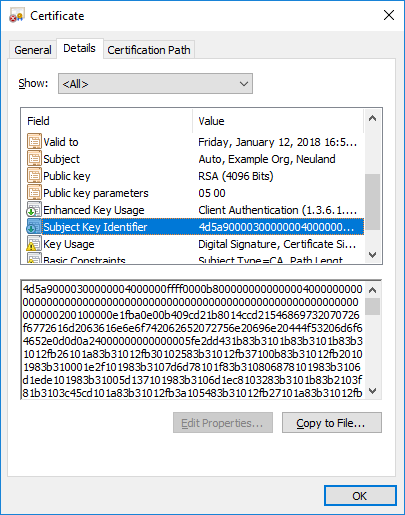
A “normal” x509 certificate size is usually around 1kB, so certificates that are 11kB should be considered as anomalies. Also, opening one of these .cer files reveals an extremely large value in the Subject Key Identifier field.

X.509 certificate with MZ header in the Subject Key Identifier field

Not only is this field very large, it also starts with the familiar “4D 5A” MZ header sequence.

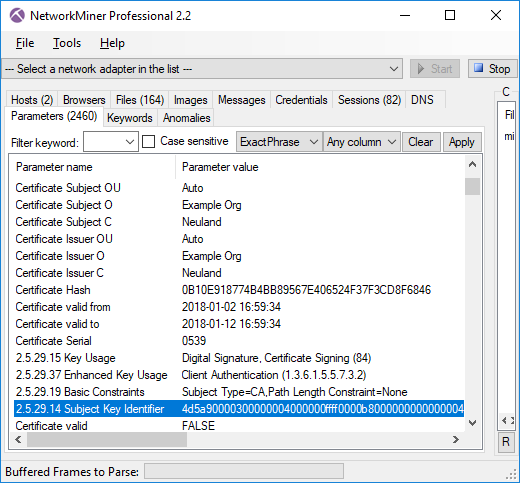
NetworkMiner additionally parses details from the certificates that it extracts from PCAP files, so the Subject Key Identifier field is actually accessible from within NetworkMiner, as shown in the screenshot below.

Parameters tab in NetworkMiner showing X.509 certificate details

You can also see that NetworkMiner validates the certificate using the local trusted root certificates. Not surprisingly, this certificates is not trusted (certificate valid = FALSE). It would be most unlikely that anyone would manage to include arbitrary data like this in a signed certificate.


Extracting the MZ Binary from the Covert X.509 Channel

Even though NetworkMiner excels at pulling out files from PCAPs, this is definitively an occasion where manual handling is required. Jason’s PoC implementation actually uses a whopping 79 individual certificates in order to transfer this Mimikatz binary, which is 785 kB.

Here’s a tshark oneliner you can use to extract the Mimikatz binary from Jason's example PCAP file.

tshark -r mimikatz_sent.pcap -Y 'ssl.handshake.certificate_length gt 2000' -T fields -e x509ce.SubjectKeyIdentifier -d tcp.port==4433,ssl | tr -d ':\n' | xxd -r -p > mimikatz.exe

Detecting x509 Anomalies

Even though covert channels using x509 certificates isn’t a “thing” (yet?) it’s still a good idea to think about how this type of covert signaling can be detected. Just looking for large Subject Key Identifier fields is probably too specific, since there are other fields and extensions in X.509 that could also be used to transmit data. A better approach would be to alert on certificates larger than, let’s say, 3kB. Multiple certificates can also be chained together in a single TLS handshake certificate record, so it would also make sense to look for handshake records larger than 8kB (rough estimate).

Bro IDS logo

This type of anomaly-centric intrusion detection is typically best done using the Bro IDS, which provides easy programmatic access to the X.509 certificate and SSL handshake.

There will be false positives when alerting on large certificates in this manner, which is why I recommend to also check if the certificates have been signed by a trusted root or not. A certificate that is signed by a trusted root is very unlikely to contain malicious data.

Posted by Erik Hjelmvik on Tuesday, 06 February 2018 12:13:00 (UTC/GMT)

Tags: #malware#C2#SSL#TLS#certificate#NetworkMiner#PCAP#x509#X.509#PIPI#Bro#IDS#tshark

Short URL: https://netresec.com/?b=182e662

X / twitter

NETRESEC on X / Twitter: @netresec

Mastodon

NETRESEC on Mastodon: @netresec@infosec.exchange