NETRESEC Network Security Blog - Tag : tcpdump

rss Google News

What is a PCAP file?

A PCAP file is a container for packets captured on a computer network, such as a WiFi or Ethernet network. Each packet in a PCAP file is tagged with a timestamp indicating when it was captured.

The term PCAP is short for Packet CAPture. Other common names are capture file, trace file, packet trace, packet dump, dumpfile and pcap savefile. The PCAP file format was created by Van Jacobson, Craig Leres and Steven McCanne around 1987 as part of the work they did on tcpdump and libpcap at the Lawrence Berkeley Laboratory.

File endings: .pcap .cap .dmp .trc
Media type: application/vnd.tcpdump.pcap

PCAP File Header Format

A PCAP file always starts with a 24 byte header, referred to as pcap_file_header in the libpcap source code, which contains the following fields:

  • Magic Number (4 bytes) = d4 c3 b2 a1
  • Version Major (2 bytes) = 02 00
  • Version Minor (2 bytes) = 04 00
  • Timezone (4 bytes) = 00 00 00 00
  • Timestamp Accuracy (4 bytes) = 00 00 00 00
  • Snap Length (4 bytes)
  • Link-Layer Type (4 bytes)

As shown above, the first 16 bytes in the PCAP header have fixed values. There is one common exception though, which is when the field values are encoded as big endian rather than little endian. A big endian capture file typically starts with these 8 bytes:

  • Magic Number (4 bytes) = a1 b2 c3 d4
  • Version Major (2 bytes) = 00 02
  • Version Minor (2 bytes) = 00 04

There are a few additional magic number variants, such as “4d 3c b2 a1” used to indicate nanosecond timestamps and FRITZ!Box’s “34 cd b2 a1”, as well as big endian versions of those magic numbers.

The timezone and accuracy fields aren’t used in practice, they should therefore be all zeroes.

The snap length value is a 32 bit number indicating the maximum packet size that can be stored in the PCAP without truncating the packet data. This value is often “00 00 04 00” (256 kB) or “ff ff 00 00” (65535 bytes), but can in theory be any value except zero.

The link layer type defines which type of packets the capture file contains. As an example, if the link-layer field is “01 00 00 00” in a little endian PCAP file, then all packets in that file should be parsed as Ethernet packets.

Some of the most common link-layer type values are:

  • 01 00 00 00 = IEEE 802.3 Ethernet
  • 65 00 00 00 = Raw IP packets (no layer 2 header)
  • 69 00 00 00 = IEEE 802.11 (WiFi)
  • 71 00 00 00 = SLL (Linux "cooked" capture encapsulation)
  • 77 00 00 00 = Prism header + IEEE 802.11 (WiFi)
  • 7f 00 00 00 = Radiotap header + IEEE 802.11 (WiFi)
  • c3 00 00 00 = IEEE 802.15.4 (Zigbee)
  • c5 00 00 00 = Endace ERF
  • e4 00 00 00 = Raw IPv4 (no layer 2 header)

A list of all link layer type values is available on the tcpdump website.

Packet Header Format

Each captured packet in a PCAP file is prefixed by a 16 byte header, referred to as pcap_sf_pkthdr in the libpcap source code, which contains the following fields:

  • Timestamp Seconds (4 bytes)
  • Timestamp Microseconds (4 bytes)
  • Captured Length (4 bytes)
  • Original Length (4 bytes)

The “timestamp seconds” field is a standard epoch or Unix time field, indicating the number of seconds that have elapsed since 1 January 1970. As you’ve probably guessed, the microsecond field indicates the microsecond fractions of the packet timestamp. However, PCAP files with the magic number “4d 3c b2 a1” in the file header use this field to represent nanosecond fractions instead. The nanosecond variant makes a lot of sense, since only 20 bits of this 32 bit field are used when representing microsecond fractions, but 30 bits are needed to represent nanosecond fractions.

The captured length field indicates the number of bytes of packet data that follows after the 16 byte packet header. This value should never be larger than the snap length value in the PCAP file header.

The original length field indicates the size of the actual packet on the network. This value is typically the same as the captured length, provided that a large enough snap length was used when capturing packets.

Packet Data

Following right after each packet header is the actual packet data that was being transferred over the network. This data is written to the PCAP file exactly as it was received, without caring about endianness or correctness of the data.

Now that I’ve covered all the different parts of a PCAP file, let’s have a look at the contents of an actual PCAP file.

Hex view of PCAP file

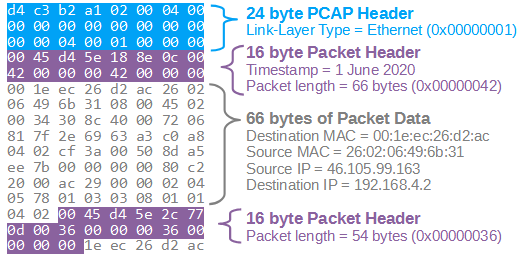
The data in the illustration above was cut off after the second packet header, but you get the idea. A PCAP file can contain an unlimited number of packet headers and packets, but there can only be one PCAP file header per file.

I’d also like to stress the fact that the endianness defined in the PCAP file header doesn’t affect how the packet data gets stored in the packet data. Most network protocols use big endian encoding, but most PCAP files — including the one in the illustration above — use little endian. That’s why the TCP destination port 80 is encoded as “00 50” in the packet data, even though the little endian “d4 c3 b2 a1” magic number is specified in the PCAP file header.

Other Packet Capture Formats

The PCAP file format is by far the most widely used one for storing packet data, but it's not the only one. Common alternative packet capture formats are PcapNG, ETL and Endace ERF.

Posted by Erik Hjelmvik on Thursday, 27 October 2022 06:50:00 (UTC/GMT)

Tags: #pcap#tcpdump#libpcap

Share: Facebook   Twitter   Reddit   Hacker News Short URL: https://netresec.com/?b=22A1c18


What is PCAP over IP?

PCAP over IP

PCAP-over-IP is a method for reading a PCAP stream, which contains captured network traffic, through a TCP socket instead of reading the packets from a PCAP file.

A simple way to create a PCAP-over-IP server is to simply read a PCAP file into a netcat listener, like this:

nc -l 57012 < sniffed.pcap

The packets in “sniffed.pcap” can then be read remotely using PCAP-over-IP, for example with tshark like this (replace 192.168.1.2 with the IP of the netcat listener):

nc 192.168.1.2 57012 | tshark -r -

But there’s an even simpler way to read PCAP-over-IP with Wireshark and tshark, which doesn’t require netcat.

wireshark -k -i TCP@192.168.1.2:57012
tshark -i TCP@192.168.1.2:57012

The Wireshark name for this input method is “TCP socket” pipe interface, which is available in Linux, Windows and macOS builds of Wireshark as well as tshark.

PCAP-over-IP in Wireshark's Pipe Interfaces

It is also possible to add a PCAP-over-IP interface from Wireshark's GUI. Open Capture/Options, Manage Interfaces, Pipes Tab and then enter a Local Pipe Path such as TCP@127.0.0.1:57012 and click OK. This setting will disappear when you close Wireshark though, since pipe settings don't get saved.

Live Remote Sniffing

Sniffed traffic can be read remotely over PCAP-over-IP in real-time simply by forwarding a PCAP stream with captured packets to netcat like this:

tcpdump -U -w - not tcp port 57012 | nc -l 57012
dumpcap -P -f "not tcp port 57012" -w - | nc -l 57012
PCAP-over-IP with tcpdump, netcat and tshark

Tcpdump is not available for Windows, but dumpcap is since it is included with Wireshark.

Note how TCP port 57012 is purposely filtered out using BPF when capturing in order to avoid a snowball effect, where the PCAP-over-IP traffic otherwise gets sniffed and re-transmitted through the PCAP-over-IP stream, which again gets sniffed etc.

A more sophisticated setup would be to let the service listening on TCP port 57012 spawn the sniffer process, like this:

nc.traditional -l -p 57012 -c "tcpdump -U -w - not port 57012"

Or even better, let the listening service reuse port 57012 to allow multiple incoming PCAP-over-IP connections.

socat TCP-LISTEN:57012,reuseaddr,fork EXEC:"tcpdump -U -w - not port 57012"

Reading PCAP-over-IP with NetworkMiner

We added PCAP-over-IP support to NetworkMiner in 2011 as part of NetworkMiner 1.1, which was actually one year before the TCP socket sniffing feature was included in Wireshark.

Live remote sniffing with NetworkMiner 2.7.3 using PCAP-over-IP

Image: Live remote sniffing with NetworkMiner 2.7.3 using PCAP-over-IP

NetworkMiner can also be configured to listen for incoming PCAP-over-IP connections, in which case the sniffer must connect to the machine running NetworkMiner like this:
tcpdump -U -w - not tcp port 57012 | nc 192.168.1.3 57012

This PCAP-over-IP feature is actually the recommended method for doing real-time analysis of live network traffic when running NetworkMiner in Linux or macOS, because NetworkMiner’s regular sniffing methods are not available on those platforms.

Reading Decrypted TLS Traffic from PolarProxy

PolarProxy

One of the most powerful use-cases for PCAP-over-IP is to read decrypted TLS traffic from PolarProxy. When PolarProxy is launched with the argument “--pcapoverip 57012” it starts a listener on TCP port 57012, which listens for incoming connections and pushes a real-time PCAP stream of decrypted TLS traffic to each client that connects. PolarProxy can also make active outgoing PCAP-over-IP connections to a specific IP address and port if the “--pcapoveripconnect <host>:<port>” argument is provided.

In the video PolarProxy in Windows Sandbox I demonstrate how decrypted TLS traffic can be viewed in NetworkMiner in real-time with help of PCAP-over-IP. PolarProxy’s PCAP-over-IP feature can also be used to read decrypted TLS traffic from PolarProxy with Wireshark as well as to send decrypted TLS traffic from PolarProxy to Arkime (aka Moloch).

Replaying PCAP-over-IP to an Interface

There are lots of great network monitoring products and intrusion detection systems that don’t come with a built-in PCAP-over-IP implementation, such as Suricata, Zeek, Security Onion and Packetbeat, just to mention a few. These products would greatly benefit from having access to the decrypted TLS traffic that PolarProxy can provide. Luckily we can use netcat and tcpreplay to replay packets from a PCAP-over-IP stream to a network interface like this:

nc localhost 57012 | tcpreplay -i eth0 -t -

But for permanent installations we recommend creating a dedicated dummy interface, to which the traffic gets replayed and sniffed, and then deploy a systemd service that performs the replay operation. See our blog post Sniffing Decrypted TLS Traffic with Security Onion for an example on how to deploy such a systemd service. In that blog post we show how decrypted TLS traffic from PolarProxy can be replayed to a local interface on a Security Onion machine, which is being monitored by Suricata and Zeek.

Nils Hanke has also compiled a detailed documentation on how decrypted TLS packets from PolarProxy can be replayed to Packetbeat and Suricata with help of tcpreplay.

In these setups netcat and tcpreplay act as a generic glue between a PCAP-over-IP service and tools that can sniff packets on a network interface, but there are a few drawbacks with this approach. One drawback is that tcpreplay requires root privileges in order to replay packets to an interface. Another drawback is that extra complexity is added to the solution and two additional single point of failures are introduced (i.e. netcat and tcpreplay). Finally, replaying packets to a network interface increases the risk of packet drops. We therefore hope to see built-in PCAP-over-IP implementations in more network monitoring solutions in the future!

FAQ for PCAP-over-IP

Q: Why is it called “PCAP-over-IP” and not “PCAP-over-TCP”?

Good question, we actually don’t know since we didn’t come up with the name. But in theory it would probably be feasible to read a PCAP stream over UDP or SCTP as well.

Q: What is the standard port for PCAP-over-IP?

There is no official port registered with IANA for PCAP-over-IP, but we’ve been using TCP 57012 as the default port for PCAP-over-IP since 2011. The Wireshark implementation, on the other hand, uses TCP port 19000 as the default value.

Q: Which software comes with built-in PCAP-over-IP servers or clients?

The ones we know of are: Arkime, NetworkMiner, PolarProxy, tshark and Wireshark. There is also a PCAP-over-IP plugin for Zeek (see update below).

Q: Is there some way to encrypt the PCAP-over-IP transmissions?

Yes, we recommend encrypting PCAP-over-IP sessions with TLS when they are transmitted across a non-trusted network. NetworkMiner’s PCAP-over-IP implementation comes with a “Use SSL” checkbox, which can be used to receive “PCAP-over-TLS”. You can replace netcat with socat or ncat in order to establish a TLS encrypted connection to NetworkMiner.

Q: Is there a tool that can aggregate multiple PCAP-over-IP streams into one?

No, none that we’re aware of. However, multiple PCAP-over-IP streams can be merged into one by specifying multiple PCAP-over-IP interfaces in dumpcap and then forwarding that output to a netcat listener, like this:

dumpcap -i TCP@10.1.2.3:57012 -i TCP@10.4.5.6:57012 -w - | editcap -F pcap - - | nc -l 57012

Update 2023-04-13

Erich Nahum has published zeek-pcapovertcp-plugin, which brings native PCAP-over-IP support to Zeek.

Erich's plugin can be installed as a zeek package through zkg.

zkg install zeek-pcapovertcp-plugin

After installing the plugin, a command like this reads a PCAP stream from a remote source:

zeek -i pcapovertcp::192.168.1.2:57012

Posted by Erik Hjelmvik on Monday, 15 August 2022 08:05:00 (UTC/GMT)

Tags: #PCAP-over-IP#PCAP#tcpdump#Wireshark#tshark#NetworkMiner#PolarProxy#Suricata#Zeek#Arkime#tcpreplay#netcat#ASCII-art

Share: Facebook   Twitter   Reddit   Hacker News Short URL: https://netresec.com/?b=228fddf


Running NetworkMiner on Mac OS X

Apple Logo

The following is a guest blog post written by Jonas Lejon from the Swedish IT security company Triop, which specialize in crypto, reverse engineering and penetration testing.

This guide describes how to get NetworkMiner running on Mac OS X Mavericks (version 10.9.3).

First of all, download NetworkMiner and then go to the Mono downloads page and get the latest version for Mac OS X


After the download of “Mono MRE installer” has completed, just run the installer:


Mono Framework Installer

Press “Continue” to proceed installing the Mono Framework using the guided installer.

When the Mono Framework has been installed you can extract the downloaded NetworkMiner zip archive. Then start NetworkMiner from the terminal like this:

$ mono --arch=32 NetworkMiner.exe
NetworkMiner 1.6 on Mac OS X - Click To Enlarge
 

Live sniffing with NetworkMiner on Mac OS X

Live sniffing with WinPcap or Raw Sockets is only available when running NetworkMiner in Windows. However, live sniffing can still be achieved on Mac OSX (as well as in Linux) by using the PCAP-over-IP functionality. Simply select [File > Receive PCAP over IP] or press [Ctrl]+R and select a TCP port to listen on (TCP 57012 is the default port).

Pcap-over-IP in NetworkMiner 1.6 on Mac OS X

Press the “Start Receiving” button and then use tcpdump to do live sniffing and forward all captured packets to NetworkMiner like this:

$ sudo tcpdump -i en0 -s0 -U -w - | nc localhost 57012

The preferred way to use NetworkMiner is, however, to load previously captured packets in a PCAP file and let NetworkMiner dig out all interesting details like transmitted files, images, messages, SSL certificates etc.

For more info on how to run NetworkMiner on other operating systems, please see our previous blog posts HowTo install NetworkMiner in Ubuntu Fedora and Arch Linux and No more Wine - NetworkMiner in Linux with Mono.


UPDATE

Microsoft .NET Windows.Forms GUI applications don't run on 64 bit macOS systems running Mono. This will cause the application to hang/freeze during startup when the GUI window is about to be rendered, throwing errors such as:

  • Unable to start NetworkMiner: An exception was thrown by the type initializer for System.Windows.Forms.WindowsFormsSynchronizationContext
  • Unhandled Exception: System.TypeInitializationException: An exception was thrown by the type initializer for System.Windows.Forms.ThemeEngine
Fortunately Mono can be configured to run using a 32-bit architecture with the --arch=32 argument like this:

$ mono --arch=32 /opt/NetworkMiner/NetworkMiner.exe

We'd like to thank Fredrik Pettai for reporting this issue and Joel Langill for suggesting the workaround.


UPDATE 190627

You can also use homebrew to install mono on macOS like this:

brew update && brew install mono

Posted by Jonas Lejon on Tuesday, 24 June 2014 21:25:00 (UTC/GMT)

Tags: #Mac#macOS#NetworkMiner#Mono#tcpdump#PCAP-over-IP

Share: Facebook   Twitter   Reddit   Hacker News Short URL: https://netresec.com/?b=146F525

X / twitter

NETRESEC on X / Twitter: @netresec

Mastodon

NETRESEC on Mastodon: @netresec@infosec.exchange