NETRESEC Network Security Blog - Tag : port

rss Google News

Hunting AdwindRAT with SSL Heuristics

An increasing number of malware families employ SSL/TLS encryption in order to evade detection by Network Intrusion Detection Systems (NIDS). In this blog post I’m gonna have a look at Adwind, which is a cross-platform Remote Access Trojan (RAT) that has been using SSL to conceal it’s traffic for several years. AdwindRAT typically connects SSL sessions to seemingly random TCP ports on the C2 servers. Hence, a heuristic that could potentially be used to hunt for Adwind RAT malware is to look for SSL traffic going to TCP ports that normally don’t use SSL. However, relying on ONLY that heuristic would generate way too many false positives.

Brad Duncan did an interesting writeup about Adwind RAT back in 2015, where he wrote:

I saw the same certificate information used last week, and it continues this week.
  • commonName = assylias
  • organizationName = assylias.Inc
  • countryName = FR
Currently, this may be the best way to identify Adwind-based post-infection traffic. Look for SSL traffic on a non-standard TCP port using that particular certificate.

Unfortunately, Adwind RAT has evolved to use other CN’s in their new certificates, so looking for “assylias.Inc” will not cut it anymore. However, looking for SSL traffic on non-standard TCP ports still holds on the latest Adwind RAT samples that we’ve analyzed.

The PT Research Attack Detection Team (ADT) sent an email with IDS signatures for detecting AdwindRAT to the Emerging-Sigs mailing list a few days ago, where they wrote:

“We offer one of the ways to detect malicious AdwindRAT software inside the encrypted traffic. Recently, the detection of this malicious program in network traffic is significantly reduced due to encryption. As a result of the research, a stable structure of data fragments was created.”

Not only is it awesome that they were able to detect static patterns in the encrypted data, they also provided 25 PCAP files containing AdwindRAT traffic. I loaded these PCAP files into NetworkMiner Professional in order to have a look at the X.509 certificates. NetworkMiner Professional supports Port-Independent Protocol Identification (PIPI), which means that it will automatically identify the C2 sessions as SSL, regardless of which port that is used. It will also automatically extract the X.509 certificates along with any other parameters that can be extracted from the SSL handshake before the session goes encrypted.
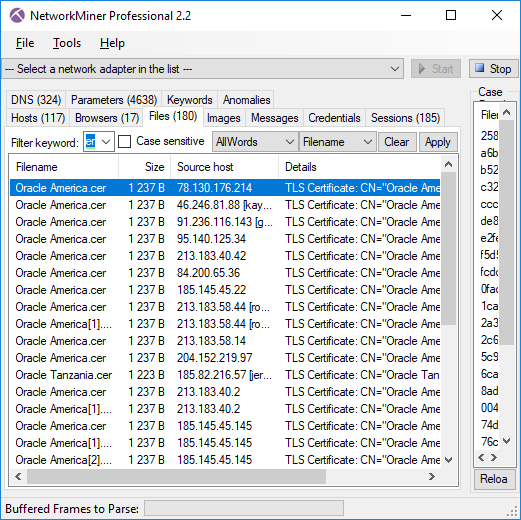
X.509 certificates extracted from AdwindRAT PCAP by NetworkMiner Image: Files extracted from ADT’s PCAP files that mach “Oracle” and “cer”.

In this recent campaign the attackers used X.509 certificates claiming to be from Oracle. The majory of the extracted certificates were exactly 1237 bytes long, so maybe they’re all identical? This is what the first extracted X.509 certificate looks like:
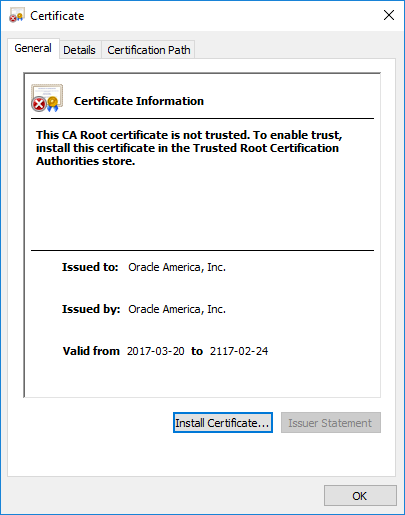
Self-signed Oracle America, Inc. X.509 certificate

The cert claims to be valid for a whopping 100 years!
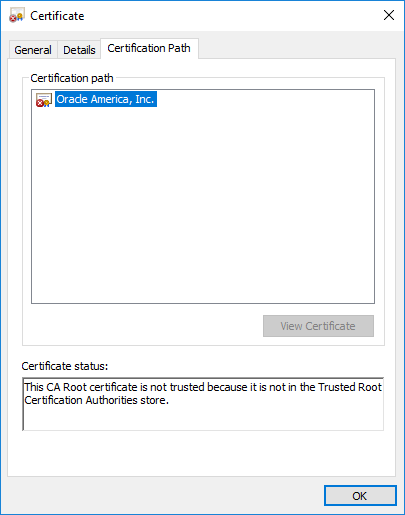
Self-signed Oracle America, Inc. X.509 certificate

Self-signed, not trusted.

However, after opening a few of the other certificates it's clear that each C2 server is using a unique X.509 certificate. This can be quickly confirmed by opening the parameters tab in NetworkMiner Pro and showing only the Certificate Hash or Subject Key Identifier values.
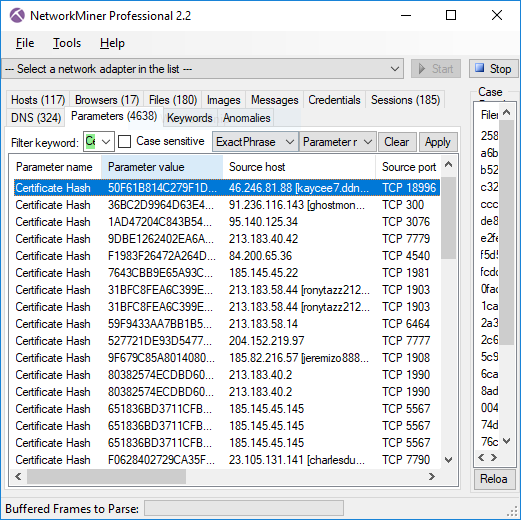
NetworkMiner Parameters tab showing Certificate Hash values Image: Certificate Hash values found in Adwind RAT’s SSL traffic

I also noted that the CN of the certificates isn’t constant either; these samples use CN’s such as “Oracle America”, “Oracle Tanzania”, “Oracle Arusha Inc.”, “Oracle Leonardo” and “Oracle Heaven”.

The CN field is normally used to specify which domain(s) the certificate is valid for, together with any additinoal Subject Alternative Name field. However, Adwind RAT’s certificates don’t contain any domain name in the CN field and they don’t have an Alternative Name record. This might very well change in future versions of this piece of malware though, but I don’t expect the malware authors to generate a certificate with a CN matching the domain name used by each C2 server. I can therefore use this assumption in order to better hunt for Adwind RAT traffic.

But how do I know what public domain name the C2 server has? One solution is to use passive DNS, i.e. to capture all DNS traffic in order to do passive lookups locally. Another solution is to leverage the fact that the Adwind RAT clients use the Server Name Indication (SNI) when connecting to the C2 servers.
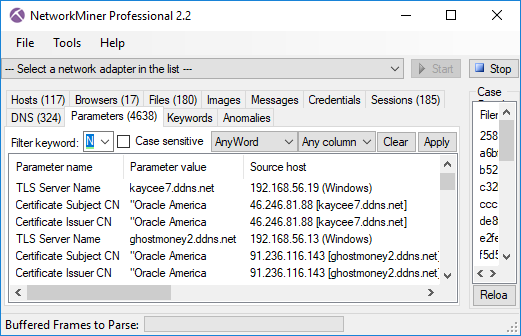
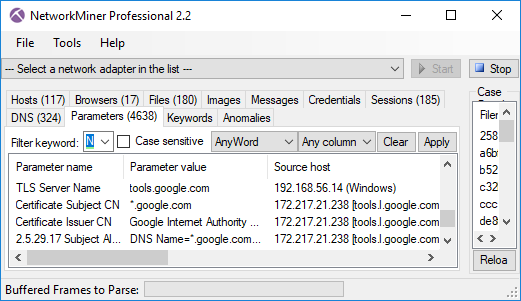
TLS Server Name (aka SNI) and Subject CN values don’t match for AdwindRAT Image: TLS Server Name (aka SNI) and Subject CN values don’t match for AdwindRAT

TLS Server Name (SNI) with matching Subject CN from Google Image: TLS Server Name (SNI) with matching Subject CN from Google.

My conclusion is therefore that Brad’s recommendations from 2015 are still pretty okay, even for the latest wave of Adwind RAT traffic. However, instead of looking for a fix CN string I’d prefer to use the following heuristics to hunt for this type of C2 traffic:

  • SSL traffic to non-standard SSL port
  • Self signed X.509 certificate
  • The SNI domain name in the Client Hello message does not match the CN or Subject Alternative Name of the certificate.

These heuristics will match more than just Adwind RAT traffic though. You’ll find that the exact same heuristics will also help identify other pieces of SSL-enabled malware as well as Tor traffic.

Posted by Erik Hjelmvik on Monday, 04 September 2017 19:01:00 (UTC/GMT)

Tags: #NetworkMiner#SSL#TLS#port#PCAP#PIPI#X.509#certificate#extract

Short URL: https://netresec.com/?b=1798dc3


NetworkMiner 2.2 Released

NetworkMiner 2.2 = Harder Better Faster Stronger

NetworkMiner 2.2 is faster, better and stronger than ever before! The PCAP parsing speed has more than doubled and even more details are now extracted from analyzed packet capture files.

The improved parsing speed of NetworkMiner 2.2 can be enjoyed regardless if NetworkMiner is run in Windows or Linux, additionally the user interface is more responsive and flickers way less when capture files are being loaded.

User Interface Improvements

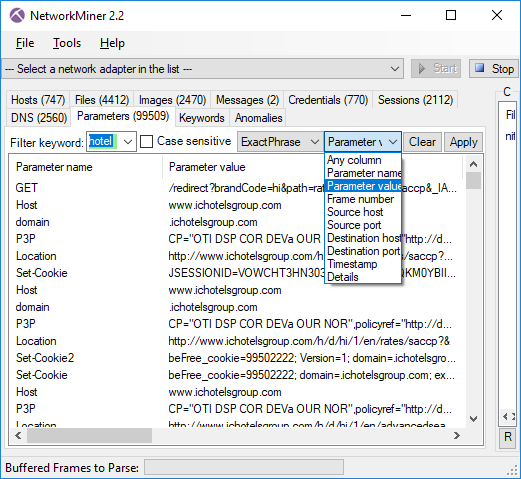
The keyword filter available in the Files, Messages, Sessions, DNS and Parameters tabs has been improved so that the rows now can be filtered on a single column of choice by selecting the desired column in a drop-down list. There is also an “Any column” option, which can be used to search for the keyword in all columns.

Keyword drop-down in NetworkMiner's Parameters tab

The Messages tab has also received an additional feature, which allows the filter keyword to be matched against the text in the message body as well as email headers when the “Any column” option is selected. This allows for an efficient analysis of messages (such as emails sent/received through SMTP, POP3 and IMAP as well as IRC messages and some HTTP based messaging platforms), since the messages can be filtered just like in a normal e-mail client.

We have also given up on using local timestamp formats; timestamps are now instead shown using the yyyy-MM-dd HH:mm:ss format with time zone explicitly stated.

Protocol Parsers

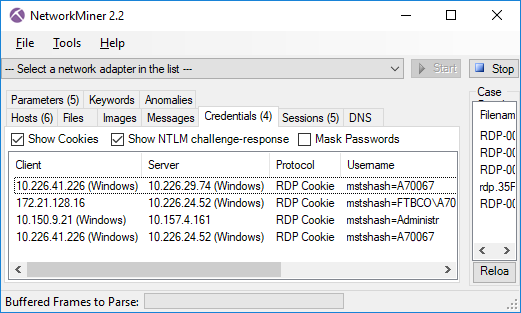
NetworkMiner 2.2 comes with a parser for the Remote Desktop Protocol (RDP), which rides on top of COTP and TPKT. The RDP parser is primarily used in order to extract usernames from RDP cookies and show them on the Credentials tab. This new version also comes with better extraction of SMB1 and SMB2 details, such as NTLM SSP usernames.

RDP Cookies extracted with NetworkMiner 2.2

One big change that has been made behind the scenes of NetworkMiner is the move from .NET Framework 2.0 to version 4.0. This move doesn’t require any special measures to be taken for most Microsoft Windows users since the 4.0 Framework is typically already installed on these machines. If you’re running NetworkMiner in Linux, however, you might wanna check out our updated blog post on how to install NetworkMiner in Linux.

We have also added an automatic check for new versions of NetworkMiner, which runs every time the tool is started. This update check can be disabled by adding a --noupdatecheck switch to the command line when starting NetworkMiner.

NetworkMiner.exe --noupdatecheck capturefile.pcap

NetworkMiner Professional

Even though NetworkMiner 2.2 now uses ISO-like time representations NetworkMiner still has to decide which time zone to use for the timestamps. The default decision has always been to use the same time zone as the local machine, but NetworkMiner Professional now additionally comes with an option that allows the user to select whether to use UTC (as nature intended), the local time zone or some other custom time zone for displaying timestamps. The time zone setting can be found in the “Tools > Settings” menu.

UPDATE: With the release of NetworkMiner 2.3 the default time zone is now UTC unless the user has specifically selected a different time zone.

The Port-Independent-Protocol-Detection (PIPI) feature in NetworkMiner Pro has been improved for more reliable identification of HTTP, SSH, SOCKS, FTP and SSL sessions running on non-standard port numbers.

CASE / JSON-LD Export

We are happy to announce that the professional edition of NetworkMiner 2.2 now has support for exporting extracted details using the Cyber-investigation Analysis Standard Expression (CASE) format, which is a JSON-LD format for digital forensics data. The CASE export is also available in the command line tool NetworkMinerCLI.

We would like to thank Europol for recommending us to implement the CASE export format in their effort to adopt CASE as a standard digital forensic format. Several other companies in the digital forensics field are currently looking into implementing CASE in their tools, including AccessData, Cellebrite, Guidance, Volatility and XRY. We believe the CASE format will become a popular format for exchanging digital forensic data between tools for digital forensics, log correlation and SIEM solutions.

We will, however, still continue supporting and maintaining the CSV and XML export formats in NetworkMiner Professional and NetworkMinerCLI alongside the new CASE format.

Credits

I would like to thank Sebastian Gebhard and Clinton Page for reporting bugs in the Credentials tab and TFTP parsing code that now have been fixed. I would also like to thank Jeff Carrell for providing a capture file that has been used to debug an issue in NetworkMiner’s OpenFlow parser. There are also a couple of users who have suggested new features that have made it into this release of NetworkMiner. Marc Lindike suggested the powerful deep search of extracted messages and Niclas Hirschfeld proposed a new option in the PCAP-over-IP functionality that allows NetworkMiner to receive PCAP data via a remote netcat listener.

Upgrading to Version 2.2

Users who have purchased a license for NetworkMiner Professional 2.x can download a free update to version 2.2 from our customer portal.

Those who instead prefer to use the free and open source version can grab the latest version of NetworkMiner from the official NetworkMiner page.

Posted by Erik Hjelmvik on Tuesday, 22 August 2017 11:37:00 (UTC/GMT)

Tags: #pcap#CASE#PIPI#HTTP#SOCKS#FTP#SSL#port#forensics

Short URL: https://netresec.com/?b=17888cb


BPF is your Friend

CapLoader BPF

CapLoader comes with support for Berkeley Packet Filter (BPF), which makes it possible to filter network traffic based on IP addresses, protocols and port numbers without using external tools. Being able to filter captured network traffic is crucial when analyzing large sets of PCAP files as well as in order to hunt down compromised hosts with Rinse Repeat Intrusion Detection.

There are two ways to apply filters with BPF in CapLoader; you can either apply an input filter before loading your PCAPs, or you can apply a display filter after the capture files have been loaded.


Input Filter

The fastest way to filter a large set of PCAP files with CapLoader is to enter an Input Filter before loading the capture files. Having an input filter will speed up the loading time significantly, since CapLoader will not need to analyze packets and flows that don't match the BPF syntax. The downside is that you will need to know beforehand what filter you want to use. In order to apply a changed input filter you need to reload the loaded PCAP files (pressing F5 will do this for you).

CapLoader with input filter “tcp port 443”
Image: CapLoader with input filter “tcp port 443”

Display Filter

CapLoader supports display filters in order to allow filters to be changed on the fly, without having to reload the PCAP files. As the name implies, display filters affect what flows/services/hosts that are displayed in CapLoader. A changed display filter does not require the dataset to be reloaded, but it does require the GUI to update the visible flows. This GUI update will be somewhat slower compared to when setting an input filter.

CapLoader with display filter “host 94.23.23.39”
Image: CapLoader with display filter “host 94.23.23.39”

BPF Syntax

CapLoader's BPF implementation does not support the full BPF syntax. In fact, only the most central primitives are implemented, which are:

host <IP address>Flows to or from the specified IPv4 or IPv6 address
net <CIDR> Flows to or from the specified IP network, uses CIDR notation
port <port>Flows to or from the specified port number
ip6Flows using IPv6 addresses
ipFlows using IPv4 addresses
tcpTCP flows
udpUDP flows
sctpSCTP flows

More complex filter expressions can be built up by using the words and, or, not and parentheses to combine primitives. Here are some examples:

  • host 8.8.8.8 and udp port 53
  • net 199.16.156.0/22 and port 80
  • (port 80 or port 443) and not host 192.168.0.1

For all boolean algebra geeks out there we can confirm that our BPF implementation gives and precedence over or, which means that the last example above would give a different result if the parentheses were removed.


Keeping it Short

Steve McCanne gave a keynote presentation at SharkFest 2011, where he talked about how he created BPF. Steve's work was guided by Van Jacobson, who challenged him to make the BPF syntax human friendly rather than requiring the user to type a clunky filtering syntax. We've adopted this thinking and therefore allow filters like these:

  • 10.1.1.3
    Flows to or from IP address 10.1.1.3. Translates to “ip host 10.1.1.3”

  • 128.3/16
    Flows to or from the 128.3.0.0/16 network. Translates to “ip net 128.3.0.0/16”

  • port 53
    Flows to or from TCP, UDP or SCTP port 53.


Try it for Free!

We've made the BPF implementation available even in the free version of CapLoader. You don't need to register to get the free version; just download, extract and run. The tool is portable, so you won't even have to install it. Visit https://www.netresec.com/?page=CapLoader to grab a copy and start filtering!


UPDATE 2016-05-23

With the release of CapLoader 1.4 it is now possible to apply Display Filters not only to the Flows tab, but also to the Services and Hosts tab.

Posted by Erik Hjelmvik on Monday, 30 November 2015 08:15:00 (UTC/GMT)

Tags: #CapLoader#BPF#PCAP#Berkeley Packet Filter#filter#IP#port#CIDR

Short URL: https://netresec.com/?b=15B2F44

X / twitter

NETRESEC on X / Twitter: @netresec

Mastodon

NETRESEC on Mastodon: @netresec@infosec.exchange