Did you know that there is a setting in Wireshark for changing the default save file format from pcapng to pcap?
In Wireshark, click Edit, Preferences. Then select Advanced and look for the capture.pcap_ng setting. Change the value to FALSE if you want Wireshark to save packets in the pcap file format. You have to double-click the “TRUE” text to change it into “FALSE”.
This setting can also be accessed from the Capture tab in Preferences.
I recently learned about this setting from Sake Blok when he commented on my feature request to have Wireshark use pcap as default savefile format instead of pcapng. I have a feeling that this feature request will not be accepted though, since it has received several downvotes. That’s why I’m trying to spread the word about this setting instead, so that everyone who prefers the pcap file format over pcapng can change the default behavior in their own Wireshark installation.
This setting doesn’t affect command line tools, like dumpcap, tshark, mergecap etc. So if you want to capture packets with dumpcap to a pcap file then you need to use the -P switch like this:
dumpcap -P -i eth0 -w dump.pcap
Other command line tools in the Wireshark suite, like tshark and mergecap, require that you instead specify -F pcap like this:
mergecap -F pcap -w out.pcap in1.pcap in2.pcap
What’s Wrong with PCAP-NG?
Why all this fuss about using PCAP instead of PCAP-NG? Well, it turns out that most Wireshark users are happily unaware of just how much metadata there is in the pcapng files they share online. This metadata typically contains information about the CPU of their computer, the exact version and build of their operating system as well as the name of the network interface on which the capture was performed. For Windows users the network interface details even contain a GUID that usually is a world-unique identifier.
I was once even able to identify a person, who had anonymously shared a pcapng file online, by inspecting metadata in the shared capture file github.pcapng.
Here's the metadata in that capture file:
This screenshot shows the output from the “Show Metadata” functionality in NetworkMiner Professional.
There's also a great way to show pcapng metadata in Wireshark: Open the pcapng file, click View, Reload as File Format/Capture (Ctrl+Shift+F).
Mergecap
The previously mentioned command line tool mergecap, which joins multiple capture files into one, outputs pcapng files by default. In fact, if it is tasked to merge two pcap files (having no metadata), it then creates a pcapng file containing the packets from the two input pcap files enriched with metadata about the computer running mergecap. This metadata is typically information about the operating system as well as the version of mergecap that was used.
Providing an output file with the “.pcap” suffix to mergecap will not help, mergecap still generates a pcapng file. You have to use the -F pcap switch to have it generate a pcap file without metadata about your operating system.
What do Wireshark Users Want?
I recently conducted two unscientificpolls, where I asked which savefile format Wireshark should use as default.
In total the polls got 86 votes, where 51 voted for pcap and 35 preferred pcapng.
I don't want to draw any real conclusions from these results though, primarily due to the low number of participants but also because there might be a bias among the people who were reached by these polls.
Looking Ahead
I reach out to people I know every now and then when I notice that they are sharing pcapng files containing potentially sensitive metadata. They then have to decide if they are okay with this or if they want to go through the process of replacing the pcapng files with pcap files. In many cases they choose the latter, which can be quite tricky if that involves removing files from GitHub.
I eventually got tired of doing this, especially when I realized that even very skilled Wireshark users often don’t know that pcapng files store metadata about their computers. Reminding people to select the “pcap” format every time they save a capture file doesn’t seem to be the solution. I therefore hope that this blog post can help Wireshark users avoid accidentally sharing unnecessary metadata in the future.
For more information about the pcapng format, please visit pcapng.com.
Posted by Erik Hjelmvik on Tuesday, 25 February 2025 10:33:00 (UTC/GMT)
Do you want to analyze decrypted TLS traffic in Wireshark or let an IDS, like Suricata, Snort or Zeek, inspect the application layer data of potentially malicious TLS encrypted traffic? There are many different TLS inspection solutions to choose from, but not all of them might be suitable for the specific challenge you’re facing. In this blog post I describe three different methods for decrypting TLS and explain when to use one or the other.
RSA Private Key
TLS Key Log
TLS Inspection Proxy
Works for all ciphers
No (DHE cipher suites not supported)
Yes
Yes
TLS 1.3 supported
No
Yes
Yes
Zero client configuration required
Yes
No (pre-master secrets must be logged or extracted from TLS libraries)
No (root CA certificate must be installed)
Decrypts traffic from any application
No (most applications use modern ciphers with forward secrecy, which RSA doesn’t provide)
No (each method for TLS key extraction typically only supports a specific set of applications or TLS libraries)
No (apps that use certificate pinning or a custom certificate trust store cannot be intercepted without patching the app)
L7 traffic in PCAP files can be analyzed without decrypting TLS
No
No
Yes
Allows decrypted traffic to be mirrored to a network interface
No
No
Yes
RSA Private Key
TLS decryption with a private RSA key was for a long time the preferred method for inspecting SSL and TLS traffic. This approach allowed anyone with access to the server’s private RSA key to decrypt the traffic and inspect the application layer (L7) communication.
The primary drawback with RSA private key decryption is that a stolen or leaked private RSA key can be used by an attacker to decrypt all previously captured traffic from that server, if RSA key exchange is being used. Modern TLS stacks have therefore deprecated such ciphers in favor of ones that support forward secrecy, which typically perform an ephemeral Diffie–Hellman (DHE) key exchange instead of reusing the same private RSA key over and over. This means that the RSA private key decryption method cannot be used if the client and server are using a key exchange algorithm that supports forward secrecy.
RSA private key decryption can only be performed when all these conditions are met:
The protocol version is SSL 3.0, TLS 1.0, TLS 1.1 or TLS 1.2 (RSA was removed in TLS 1.3)
The server has selected a cipher suite that use RSA key exchange, such as
TLS_RSA_WITH_AES_256_GCM_SHA384,
TLS_RSA_WITH_AES_128_GCM_SHA256,
TLS_RSA_WITH_AES_256_CBC_SHA256,
TLS_RSA_WITH_AES_128_CBC_SHA256,
TLS_RSA_WITH_AES_256_CBC_SHA or
TLS_RSA_WITH_AES_128_CBC_SHA
The private key matches the server certificate (traffic cannot be decrypted with a client certificate or an intermediate or root certificate)
The session has not been resumed (the handshake must include a Client Key Exchange message)
This Wireshark display filter can be used to check if the server has selected an RSA cipher:
tls.handshake.type == 2 and tls.handshake.ciphersuite in {10,47,53,60,61,156,157}
You can check for a client key exchange message with:
tls.handshake.type == 16
A private RSA key can be loaded into Wireshark by clicking Edit, Preferences and RSA Keys. Another alternative is to use the command line tool tshark’s -ouat:rsa_keys switch like this:
Wireshark can decrypt the TLS layer in captured network traffic if the pre-master secrets used to establish the encrypted connection are provided. These secrets, or encryption key material, can be loaded into Wireshark from an SSLKEYLOGFILE by clicking Edit, Preferences, Protocols, TLS, and setting the (Pre)-Master-Secret log filename to the path of your SSLKEYLOGFILE.
Another alternative is to encode the key material as metadata in a pcap-ng file with editcap like this:
The primary drawback with the TLS key log decryption method is that only Wireshark and tshark can be used to analyze the decrypted TLS traffic.
You also need to get hold of the keys or pre-master secrets in order to perform the decryption.
Some applications, such as Firefox, Chrome and curl, can be configured to export a key log.
Another alternative is to install an agent that extracts key material from specific TLS libraries.
The limitation of only being able to extract keys from a specific set of applications or TLS libraries makes the TLS key log method unsuitable for analyzing TLS encrypted C2 traffic from malware, which often use custom TLS libraries.
It is also difficult to send decrypted TLS traffic to an IDS or a network security monitoring tool using a TLS key log.
If you, on the other hand, want to analyze network traffic from your own Firefox or Chrome browser in Wireshark, then the TLS key log approach is probably the best solution.
TLS Inspection Proxy
A TLS inspection proxy acts as a man-in-the-middle that intercepts and decrypts TLS traffic for inspection, it then re-encrypts the traffic and forwards it to the intended destination.
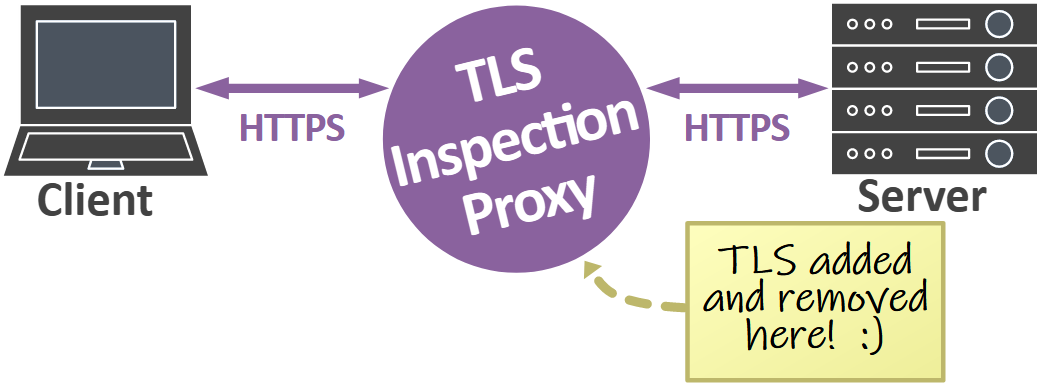
A major advantage of using a TLS inspection proxy is that decrypted TLS traffic can be analyzed from applications even if they use modern ciphers with forward secrecy and don’t support logging of TLS keys. The drawback, however, is that clients have to trust the root CA certificate that the proxy is using.
TLS inspection proxies often differ in how they make the decrypted traffic available to external tools, if at all. In fact, many TLS inspection proxies and Next-Generation Firewalls (NGFW) only make the decrypted payload available to the internal application or appliance. Such an approach prevents analysis of the decrypted traffic with an external tool, like Wireshark, Snort, Suricata, Zeek or NetworkMiner.
Another approach, used by proxies like mitmproxy, is to save a TLS key log for all proxied traffic. That approach allows captured TLS traffic to or from the proxy to be decrypted and inspected with Wireshark, but the application layer traffic cannot be inspected with other tools that don’t support TLS decryption using a key log.
The third and most integration friendly approach is to save the decrypted traffic in clear text form, so that other applications can inspect the unencrypted traffic without having to decrypt TLS. Some TLS proxies, like PolarProxy and SSLsplit, can even save the decrypted traffic to a PCAP file. Decrypted TLS traffic in PCAP format can easily be ingested into other tools or be replayed to a network interface for inspection by an external security appliance.
Best Practices
The list below can be used to select the best suited TLS inspection method for the particular challenge you’re tasked with.
Use RSA private key inspection if it is acceptable to use an older TLS version and less secure ciphers.
Use a TLS key log if your web server can be configured to export one or if you have an agent based key extraction solution that supports the TLS library used by the web server.
Use a TLS inspection proxy if you want to inspect the traffic with something other than Wireshark.
Inspect potentially malicious TLS traffic with an IDS or security appliance.
Update: The class in October has been canceled. If you'd like to take the online class then November 18 is your chance!
I will teach two live online classes this autumn, one in October and one in November. The subject for both classes is network forensics for incident response.
The training is split into four interactive morning sessions, so that you have the afternoon free to either practice what you learned in class or catch up with your “normal” day job. The number of attendees will be limited in order to provide a good environment for taking questions. A maximum of 15 attendees will be accepted per class. The registration will be closed once we reach this attendee limit.
🇺🇸 October 21-24, 2024: PCAP in the Morning US
🇪🇺 November 18-21, 2024: PCAP in the Morning Europe
⏲️ Time: 8:30 AM to 12:30 PM CET
💸 Price: € 920 EUR per student
We will analyze a 14 GB PCAP data set captured on an Internet connected network with multiple clients, an AD server, a web server, an android tablet and some embedded devices. As you’ve probably guessed, the capture files contain traffic from multiple intrusions by various attackers, including APT style attackers and botnet operators. The initial attack vectors are using techniques like exploitation of web vulnerabilities, spear phishing, a supply chain attack and a man-on-the-side attack! In this training you'll get first-hand experience looking at C2 and backdoor protocols, such as Cobalt Strike, TrickBot, njRAT and Meterpreter.
See our training page for more info about the “PCAP in the Morning” classes.
To sign up for a class, simply send an email to sales@netresec.com with the class dates, your name and invoice address. We will then send you a PayPal payment link that you can use to complete your training registration.
Hope to see you there!
Cheers,
Erik Hjelmvik Creator of NetworkMiner and founder of Netresec
Posted by Erik Hjelmvik on Monday, 03 June 2024 10:20:00 (UTC/GMT)
I will teach two live online network forensics classes in March, one on European morning time, and the other on US morning time. The subject for both classes is network forensics in an incident response context.
The training is split into four interactive morning sessions, so that you have the afternoon free to either practice what you learned in class or catch up with your “normal” day job. The number of attendees will be limited in order to provide a good environment for taking questions. A maximum of 15 attendees will be accepted per class. The registration will be closed once we reach this attendee limit.
🇪🇺 March 4-7, 2024: PCAP in the Morning Europe
⏲️ Time: 8:30 AM to 12:30 PM CET
💸 Price: € 930 EUR per student
🇺🇸 March 25-28, 2023: PCAP in the Morning US
⏲️ Time: 9:30 AM to 1:30 PM EDT
💸 Price: $1,000 USD per student
We will be analyzing a unique 30GB PCAP data set captured during June 2020
on an Internet connected network with multiple clients, an AD server, a web server,
an android tablet and some embedded devices.
As you’ve probably guessed, the capture files contain traffic
from multiple intrusions by various attackers, including APT style attackers and botnet operators.
The initial attack vectors are using techniques like exploitation of web vulnerabilities,
spear phishing, a supply chain attack and a man-on-the-side attack!
In this training you'll get first-hand experience looking at C2 and backdoor protocols, such as Cobalt Strike, TrickBot, njRAT and Meterpreter.
See our training page for more info about the “PCAP in the Morning” classes.
To sign up for a class, simply send an email to sales@netresec.com with the class dates,
your name and invoice address.
We will then send you a PayPal payment link that you can use to complete your training registration.
Hope to see you there!
Cheers,
Erik Hjelmvik Creator of NetworkMiner and founder of Netresec
Posted by Erik Hjelmvik on Monday, 11 December 2023 12:55:00 (UTC/GMT)
I will be teaching two live online network forensics classes this spring,
one in March and one in April.
The March class is adapted to American time
and the April one is adapted to European time.
Both classes focus on doing network forensics in an incident response context.
The training is split into four interactive morning sessions,
so that you have the afternoon free to either practice what you learned in class or do your “normal” day job.
The number of attendees will be limited in order to enable attendees to ask questions
or even cover short ad-hoc side tracks.
We plan to accept 10 to 15 attendees per class.
The class registration will be closed once we reach this attendee limit.
🇺🇸 March 20-23, 2023: PCAP in the Morning US
⏲️ Time: 9:30 AM to 1:30 PM EDT
💸 Price: $1,000 USD per student
🇪🇺 April 17-20, 2023: PCAP in the Morning Europe
⏲️ Time: 8:30 AM to 12:30 PM CEST
💸 Price: € 950 EUR per student
We will be analyzing a unique 30GB PCAP data set captured during June 2020
on an Internet connected network with multiple clients, an AD server, a web server,
an android tablet and some embedded devices.
As you’ve probably guessed, the capture files contain traffic
from multiple intrusions by various attackers, including APT style attackers and botnet operators.
The initial attack vectors are using techniques like exploitation of web vulnerabilities,
spear phishing, a supply chain attack and a man-on-the-side attack!
See our training page for more info about the “PCAP in the Morning” classes.
To sign up for a class, simply send an email to sales@netresec.com with the class dates,
your name and invoice address.
We will then send you a PayPal payment link that you can use to complete your training registration.
Hope to see you there!
Cheers,
Erik Hjelmvik Creator of NetworkMiner and founder of Netresec
Posted by Erik Hjelmvik on Tuesday, 17 January 2023 10:18:00 (UTC/GMT)
Did you know that the SCADA protocol IEC 60870-5-104 (IEC-104) can be used to transfer files? This file transfer feature is primarily used for retrieving disturbance data from electric grid protection devices,
such as protective relays, but can in practice be used to transfer any type of data.
In this video I demonstrate how IEC-104 file transfers can be extracted from network traffic with NetworkMiner.
The network traffic that was captured with NetworkMiner in this video can be downloaded here:
NM_2022-12-13T14-16-00.pcap
The IEC-104 software used in the video was the IEC 104 RTU Server Simulator and IEC 104 Client Simulator from FreyrSCADA.
Posted by Erik Hjelmvik on Monday, 09 January 2023 09:00:00 (UTC/GMT)
A PCAP file is a container for packets captured on a computer network, such as a WiFi or Ethernet network. Each packet in a PCAP file is tagged with a timestamp indicating when it was captured.
The term PCAP is short for Packet CAPture. Other common names are capture file, trace file, packet trace, packet dump, dumpfile and pcap savefile.
The PCAP file format was created by Van Jacobson, Craig Leres and Steven McCanne around 1987 as part of the work they did on tcpdump and libpcap at the Lawrence Berkeley Laboratory.
File endings: .pcap .cap .dmp .trc
Media type: application/vnd.tcpdump.pcap
PCAP File Header Format
A PCAP file always starts with a 24 byte header,
referred to as pcap_file_header in the libpcap source code,
which contains the following fields:
Magic Number (4 bytes) = d4 c3 b2 a1
Version Major (2 bytes) = 02 00
Version Minor (2 bytes) = 04 00
Timezone (4 bytes) = 00 00 00 00
Timestamp Accuracy (4 bytes) = 00 00 00 00
Snap Length (4 bytes)
Link-Layer Type (4 bytes)
As shown above, the first 16 bytes in the PCAP header have fixed values. There is one common exception though, which is when the field values are encoded as big endian rather than little endian.
A big endian capture file typically starts with these 8 bytes:
Magic Number (4 bytes) = a1 b2 c3 d4
Version Major (2 bytes) = 00 02
Version Minor (2 bytes) = 00 04
There are a few additional magic number variants, such as “4d 3c b2 a1” used to indicate nanosecond timestamps and FRITZ!Box’s “34 cd b2 a1”, as well as big endian versions of those magic numbers.
The timezone and accuracy fields aren’t used in practice, they should therefore be all zeroes.
The snap length value is a 32 bit number indicating the maximum packet size that can be stored in the PCAP without truncating the packet data. This value is often “00 00 04 00” (256 kB) or “ff ff 00 00” (65535 bytes), but can in theory be any value except zero.
The link layer type defines which type of packets the capture file contains.
As an example, if the link-layer field is “01 00 00 00” in a little endian PCAP file,
then all packets in that file should be parsed as Ethernet packets.
Some of the most common link-layer type values are:
A list of all link layer type values is available on the tcpdump website.
Packet Header Format
Each captured packet in a PCAP file is prefixed by a 16 byte header,
referred to as pcap_sf_pkthdr in the libpcap source code,
which contains the following fields:
Timestamp Seconds (4 bytes)
Timestamp Microseconds (4 bytes)
Captured Length (4 bytes)
Original Length (4 bytes)
The “timestamp seconds” field is a standard epoch or Unix time field, indicating the number of seconds that have elapsed since 1 January 1970. As you’ve probably guessed, the microsecond field indicates the microsecond fractions of the packet timestamp. However, PCAP files with the magic number “4d 3c b2 a1” in the file header use this field to represent nanosecond fractions instead. The nanosecond variant makes a lot of sense, since only 20 bits of this 32 bit field are used when representing microsecond fractions, but 30 bits are needed to represent nanosecond fractions.
The captured length field indicates the number of bytes of packet data that follows after the 16 byte packet header. This value should never be larger than the snap length value in the PCAP file header.
The original length field indicates the size of the actual packet on the network. This value is typically the same as the captured length, provided that a large enough snap length was used when capturing packets.
Packet Data
Following right after each packet header is the actual packet data that was being transferred over the network. This data is written to the PCAP file exactly as it was received, without caring about endianness or correctness of the data.
Now that I’ve covered all the different parts of a PCAP file, let’s have a look at the contents of an actual PCAP file.
The data in the illustration above was cut off after the second packet header, but you get the idea. A PCAP file can contain an unlimited number of packet headers and packets, but there can only be one PCAP file header per file.
I’d also like to stress the fact that the endianness defined in the PCAP file header doesn’t affect how the packet data gets stored in the packet data. Most network protocols use big endian encoding, but most PCAP files — including the one in the illustration above — use little endian. That’s why the TCP destination port 80 is encoded as “00 50” in the packet data, even though the little endian “d4 c3 b2 a1” magic number is specified in the PCAP file header.
Other Packet Capture Formats
The PCAP file format is by far the most widely used one for storing packet data, but it's not the only one.
Common alternative packet capture formats are PcapNG, ETL and Endace ERF.
Posted by Erik Hjelmvik on Thursday, 27 October 2022 06:50:00 (UTC/GMT)
In this video I look for C2 traffic by doing something I call Rinse-Repeat Threat Hunting,
which is a method for removing "normal" traffic in order to look closer at what isn't normal.
The video was recorded in a Windows Sandbox in order to avoid accidentally infecting my Windows PC with malware.