NETRESEC Network Security Blog - Tag : HTTP

rss Google News

NetworkMiner 2.6 Released

NetworkMiner 2.6

We are happy to announce the release of NetworkMiner 2.6 today! The network forensic tool is now even better at extracting emails, password hashes, FTP transfers and artifacts from HTTP and HTTP/2 traffic than before.

Some of the major improvements in this new release are related to extraction and presentation of emails from SMTP, POP3 and IMAP traffic. On that note, we’d like to thank Mandy van Oosterhout for reporting a bug in our email parser!

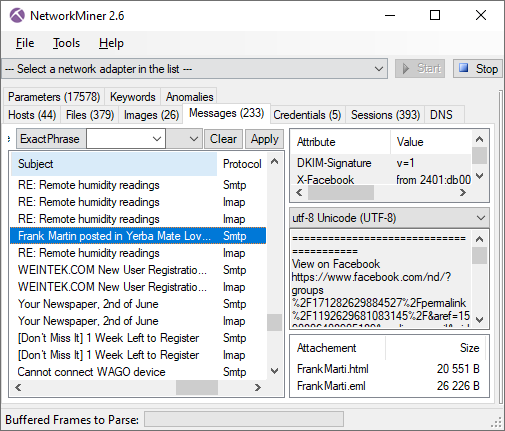
Emails extracted with NetworkMiner 2-6
Image: Emails extracted from SMTP and IMAP traffic

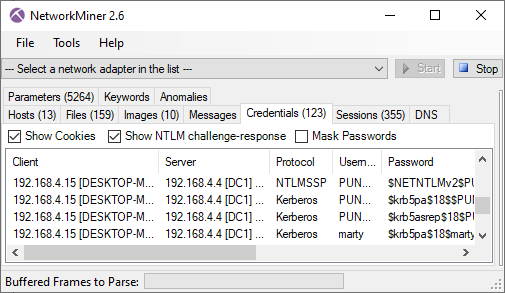
I have previously blogged about how to extract John-the-Ripper hashes from Kerberos network traffic with NetworkMiner. We have now added support for presenting LANMAN and NTLM credentials as JtR hashes as well.

NTLMv2 and Kerberos hashes in NetworkMiner 2.6
Image: JtR formatted NTLMv2 and Kerberos hashes in NetworkMiner 2.6

We have also improved NetworkMiner’s Linux support. Files, images and folders can now be opened in external tools directly from the NetworkMiner GUI also when running NetworkMiner in Linux using Mono 6 (or later). Linux users previously got a “System.ComponentModel.Win32Exception” error message saying something like “Cannot find the specified file” or “Access denied” due to a breaking change introduced in Mono version 6.

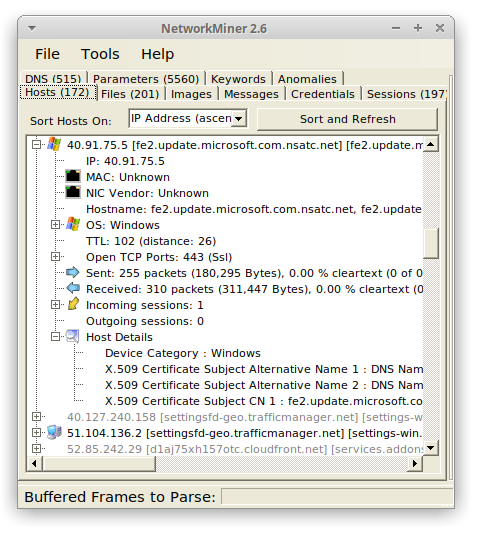
NetworkMiner running in Ubuntu 20.04
Image: NetworkMiner 2.6 running in Ubuntu 20.04 with Mono 6.8.0.105

The new release also comes with several updates of how HTTP and HTTP/2 traffic is handled and presented. We have, for example, added better extraction of data sent in HTTP (or HTTP/2) POST requests. Posted JSON formatted parameters are also extracted even if the JSON data has been gzip compressed. The “Accept-Language” header values in HTTP and HTTP/2 are extracted as “Host Details” in order to support forensic analysis of user language settings, as shown by Fox-IT in their “Operation Wocao - Shining a light on one of China’s hidden hacking groups” report.

NetworkMiner has supported decapsulation of tunneling protocols and protocols for network virtualization, like 802.1Q, GRE, PPPoE, VXLAN, OpenFlow, MPLS and EoMPLS, since version 2.1. We have now improved our GRE parser to also support NVGRE (RFC 7637) by adding support for Transparent Ethernet Bridging.

Jan Hesse sent us a feature request on Twitter earlier this year, where asked about support for FritzBox captures. We are happy to announce that NetworkMiner now supports the modified pcap format you get when sniffing network traffic with a FritzBox gateway.

Fritz!Box

NetworkMiner 2.6 can now also parse and extract SIP chat messages (RFC 3428) to the “Messages” tab. Audio extraction of VoIP calls is still a feature that is exclusively available only in NetworkMiner Professional though.

NetworkMiner Professional

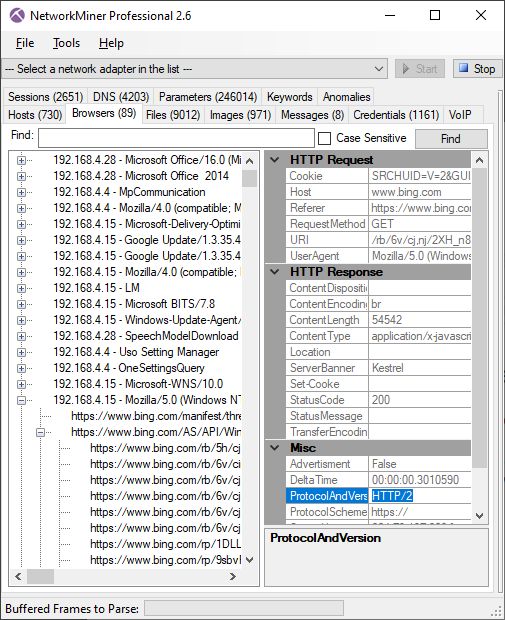
Our commercial tool NetworkMiner Professional has received a few additional updates, such as support for analysis of HTTP/2 traffic in the “Browsers tab”. However, please note that NetworkMiner does not perform TLS decryption, so the HTTP/2 traffic will have to be decrypted by a TLS proxy like PolarProxy prior to being saved to a PCAP file.

HTTP/2 traffic in NetworkMiner Professional's Browsers tab

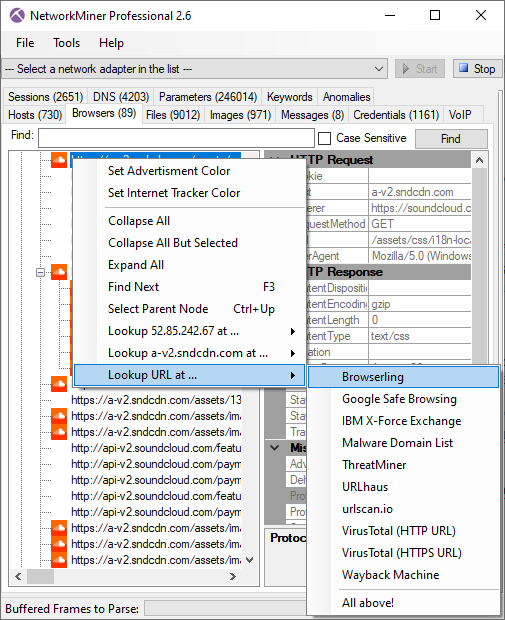
We have added a few new great online services to NetworkMiner Pro’s OSINT lookup as well, such as shouldiclick.org, Browserling, MalwareDomainList and VirusTotal lookups of URL’s in the “Browsers” tab. We have also added some additional external OSINT sources for lookups of IP addresses and domain names, such as MalwareDomainList and mnemonic ACT. The JA3 hash lookup menu in NetworkMiner Professional’s “Hosts” tab has also been extended to include GreyNoise.

URL lookup menu in NetworkMiner Professional's Browsers tab

NetworkMiner Pro previously played back G.722 VoIP audio at half speed. This issue has now been fixed, so that G.722 RTP audio is extracted and played back in 16k samples/s. The bug was due to an error in RFC 1890 that was later corrected in RFC 3551. Thanks to Michael "MiKa" Kafka for teaching us about this!

Excerpt from RFC 3551:

Even though the actual sampling rate for G.722 audio is 16,000 Hz, the RTP clock rate for the G722 payload format is 8,000 Hz because that value was erroneously assigned in RFC 1890 and must remain unchanged for backward compatibility. The octet rate or sample-pair rate is 8,000 Hz.

We’d also like to mention that NetworkMiner Professional now comes with improved analytical support to help investigators detect Tor traffic.

Upgrading to Version 2.6

Users who have purchased a license for NetworkMiner Professional 2.x can download a free update to version 2.6 from our customer portal, or use the “Help > Check for Updates” feature. Those who instead prefer to use the free and open source version can grab the latest version of NetworkMiner from the official NetworkMiner page.

Posted by Erik Hjelmvik on Wednesday, 23 September 2020 09:10:00 (UTC/GMT)

Tags: #NetworkMiner#SMTP#POP3#IMAP#email#FTP#JtR#John#Mono#Linux#HTTP#HTTP/2#JSON#GRE#SIP#VoIP#Tor#PCAP

Short URL: https://netresec.com/?b=209ff4e


Reverse Proxy and TLS Termination

PolarProxy is primarily a TLS forward proxy, but it can also be used as a TLS termination proxy or reverse TLS proxy to intercept and decrypt incoming TLS traffic, such as HTTPS or IMAPS, before it is forwarded to a server. The proxied traffic can be accessed in decrypted form as a PCAP formatted data stream, which allows real-time analysis of the decrypted traffic by an IDS as well as post incident forensics with Wireshark.

PolarProxy version 0.8.15 and later can import an existing X.509 server certificate (aka leaf certificate or end-entity certificate) in order to perform the TLS decryption using a valid certificate signed by a trusted certificate authority. If no server certificate is provided, then PolarProxy falls back to generating server certificates on the fly and signing them with its own root CA certificate.

There are two principal ways to run PolarProxy as a reverse proxy, either as a TLS termination proxy or as a reverse proxy that decrypts and re-encrypts the traffic.

PolarProxy as a TLS Termination Proxy

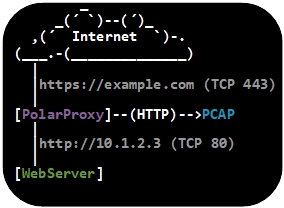
TLS Termination Proxy

The TLS termination proxy mode is useful in order to offload the task of performing TLS encryption to PolarProxy instead of doing the decryption on the web server. This mode can also be used when the proxied services don’t support TLS encryption, such as legacy web servers or servers hosting other unencrypted services that you want to secure with TLS.

The following command sequence shows how to create a Let’s Encrypt SSL certificate, convert it to the PKCS#12 format, and load the server certificate into PolarProxy to terminate incoming HTTPS connections. In this setup PolarProxy decrypts the TLS traffic and relays the HTTP traffic to the web server on TCP port 80.

sudo certbot certonly --manual --preferred-challenges dns -d example.com,www.example.com

sudo openssl pkcs12 -export -out /etc/example.p12 -inkey /etc/letsencrypt/live/example.com/privkey.pem -in /etc/letsencrypt/live/example.com/fullchain.pem --passout pass:PASSWORD

sudo mkdir /var/log/TlsTerminationProxy/

sudo ./PolarProxy --terminate --connect 10.1.2.3 --nosni www.example.com --leafcert load:example.com,www.example.com:/etc/example.p12:PASSWORD -p 443,80,80 -o /var/log/TlsTerminationProxy/

Here’s a breakdown of the arguments sent to PolarProxy:

  • --terminate : Terminate incoming TLS sessions and forward proxied traffic in unencrypted form.
  • --connect 10.1.2.3 : Forward all proxied traffic to 10.1.2.3 instead of connecting to the host name provided in the SNI extension of the TLS ClientHello message.
  • --nosni www.example.com : Treat incoming TLS sessions that don’t define a host name with the SNI extension as if they wanna to connect to “www.example.com”.
  • --leafcert load:example.com,www.example.com:/etc/example.p12:PASSWORD : Use the server certificate “/etc/example.p12” for incoming connections to “example.com” and “www.example.com”.
  • -p 443,80,80 : Listen on TCP port 443, save decrypted traffic in PCAP file as if it was directed to port 80, forward decrypted traffic to port 80.
  • -o /var/log/TlsTerminationProxy/ : Save decrypted traffic to hourly rotated PCAP files in “/var/log/TlsTerminationProxy/”.

PolarProxy is a generic TLS proxy that doesn’t care what application layer protocol the TLS tunnel carries. So if you want to terminate the TLS encryption of incoming IMAPS sessions as well, then simply append an additional argument saying “-p 993,143,143” to also forward decrypted IMAP sessions to 10.1.2.3. This method can be used in order to wrap almost any TCP based protocol in a TLS tunnel, which can be useful for privacy reasons as well as to prevent network monitoring tools from detecting the actual application layer protocol.

PolarProxy as a Reverse TLS Proxy

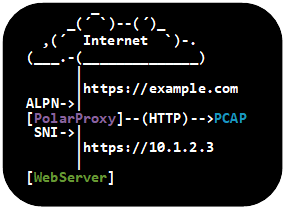
Reverse TLS Proxy

There are setups for which it is preferable to also encrypt the internal sessions between PolarProxy and the final server. One such setup is when the server is hosting a web service with support for the HTTP/2 protocol, which in practice always uses TLS. Luckily PolarProxy is designed to decrypt and re-encrypt proxied traffic while also forwarding important TLS parameters, such as ALPN and SNI, between the internal and external TLS sessions.

To use TLS encryption on the inside as well as outside of PolarProxy, simply do as explained in the previous TLS termination section, but remove the “--terminate” argument and change the port argument to “-p 443,80,443” like this:

sudo ./PolarProxy --connect 10.1.2.3 --nosni www.example.com --leafcert load:example.com,www.example.com:/etc/example.p12:PASSWORD -p 443,80,443 -o /var/log/ReverseTlsProxy/

PolarProxy will save the decrypted traffic as cleartext HTTP (or HTTP/2) to PCAP files in the “/var/log/ReverseTlsProxy/” directory.

Real-Time Analysis of Decrypted Traffic

Both the external (client-to-proxy) and internal (proxy-to-server) TCP sessions, in the reverse TLS proxy example above, are encrypted with TLS. This prevents passive network security monitoring tools, such as IDSs, DPI and DLP appliances, from analyzing the application layer data being sent and received. The PCAP files written to “/var/log/ReverseTlsProxy/” can be a valuable forensic asset when investigating an incident, but a real-time stream of the decrypted data is needed in order to swiftly detect and alert on potential security breaches and other incidents.

PolarProxy’s “--pcapoverip” option can be used to provide such a real-time stream of the decrypted data passing through the proxy. This data can easily be sent to a network interface using tcpreplay, as explained in our blog post “Sniffing Decrypted TLS Traffic with Security Onion”.

Security Considerations

The examples shown in this blog post all run PolarProxy with root privileges using sudo, which can be dangerous from a security perspective. PolarProxy is actually designed to be run without root privileges, but doing so prevents it from listening on a port below 1024. Luckily, this issue can easily be overcome with a simple port forwarding or redirect rule. The following iptables redirect rule can be used if PolarProxy is listening on TCP port 20443 and incoming HTTPS request are arriving to the eth0 interface of the proxy:

iptables -t nat -A PREROUTING -i eth0 -p tcp --dport 443 -j REDIRECT --to 20443

PolarProxy does not support loading settings from a config file. The password for the PKCS12 certificate will therefore need to be supplied on the command line, which can make it visible from a process listing. If this is a concern for you, then please consider using “hidepid” to hide processes from other users. You can find instructions on how to use hidepid in hardening guides for Debian, Arch, SUSE and most other Linux flavors.

Posted by Erik Hjelmvik on Thursday, 12 March 2020 15:45:00 (UTC/GMT)

Tags: #PolarProxy#TLS#SSL#PCAP#decrypt#HTTPS#HTTP#HTTP/2#http2#IMAPS#SNI#decrypt#ASCII-art

Short URL: https://netresec.com/?b=2033d38


Installing a Fake Internet with INetSim and PolarProxy

INetSim + PolarProxy

This is a tutorial on how to set up an environment for dynamic malware analysis, which can be used to analyze otherwise encrypted HTTPS and SMTPS traffic without allowing the malware to connect to the Internet. Dynamic malware analysis (or behavioral analysis) is performed by observing the behavior of a malware while it is running. The victim machine, which executes the malware, is usually a virtual machine that can be rolled back to a clean state when the analysis is complete. The safest way to prevent the malware from infecting other machines, or doing other bad things like sending SPAM or taking part in DDoS attacks, is to run the victim machine in an offline environment. However, network traffic analysis of malware is a central part of dynamic malware analysis, which is is why a “fake Internet” is needed in most malware labs.

INetSim and PolarProxy

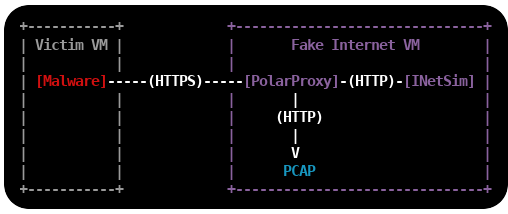
INetSim is a software suite that simulates common internet services like HTTP, DNS and SMTP, which useful when analyzing the network behavior of malware samples without connecting them to the Internet. INetSim also has basic support for TLS encrypted protocols, like HTTPS, SMTPS, POP3S and FTPS, but requires a pre-defined X.509-certificate to be loaded at startup. This can cause malware to terminate because the Common Names (CN) in the presented certificates don’t match the requested server names. The victim machine will actually get the exact same certificate regardless of which web site it visits. INetSim’s TLS encryption also inhibits analysis of the network traffic captured in the malware lab, such as C2 traffic or SPAM runs, because the application layer traffic is encrypted. PolarProxy can solve both these issues because it generates certificates on the fly, where the CN value is dynamically set to the requested host name, and saves the network traffic in decrypted form to PCAP files. It is therefore a good idea to replace the TLS services in INetSim with PolarProxy, which will be used as a TLS termination proxy that forwards the decrypted traffic to INetSim’s cleartext services.

Malware Lab Setup

Install Linux

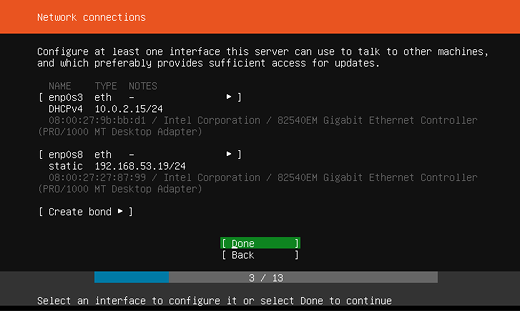
The first step is to install a Linux VM, which will act as a fake Internet to the victim machine(s). I'm using Ubuntu Server 18.04.3 LTS in this tutorial, but you can use any 64-bit linux distro. I'm adding two network interfaces to the Linux VM, one interface with Internet access and one that connects to an isolated offline network to which the victim VM's will be connected. The offline interface is configured to use the static IP 192.168.53.19.

Important: Do not bridge, bond or enable IP forwarding between the two interfaces!

Network connection config Ubuntu Server 18.04

Install INetSim

INetSim is available in Ubuntu's repo, so it is possible to install it with "apt install inetsim". However, I recommend installing INetSim as described in the official documentation to get the latest packaged version of INetSim.

sudo -s

echo "deb http://www.inetsim.org/debian/ binary/" > /etc/apt/sources.list.d/inetsim.list

curl https://www.inetsim.org/inetsim-archive-signing-key.asc | apt-key add -

apt update

apt install inetsim

exit

INetSim listens on 127.0.0.1 by default, change this to INetSim's offline IP address by un-commenting and editing the service_bind_address variable in /etc/inetsim/inetsim.conf.

service_bind_address    192.168.53.19

Also configure INetSim's fake DNS server to resolve all domain names to the IP of INetSim with the dns_default_ip setting:

dns_default_ip    192.168.53.19

Finally, disable the "start_service https" and "start_service smtps" lines, because these services will be replaced with PolarProxy:

start_service dns
start_service http
#start_service https
start_service smtp
#start_service smtps

Restart the INetSim service after changing the config.

sudo systemctl restart inetsim.service

Verify that you can access INetSim's HTTP server with curl:

curl http://192.168.53.19

<html>
  <head>
    <title>INetSim default HTML page</title>
  </head>
  <body>
    <p></p>
    <p align="center">This is the default HTML page for INetSim HTTP server fake mode.</p>
    <p align="center">This file is an HTML document.</p>
  </body>
</html>

It looks like INetSim's web server can be accessed alright.

Install PolarProxy

Next step is to install PolarProxy as a systemd service (as instructed here):

sudo adduser --system --shell /bin/bash proxyuser

sudo mkdir /var/log/PolarProxy

sudo chown proxyuser:root /var/log/PolarProxy/

sudo chmod 0775 /var/log/PolarProxy/

sudo su - proxyuser

mkdir ~/PolarProxy

cd ~/PolarProxy/

curl https://www.netresec.com/?download=PolarProxy | tar -xzvf -

exit

sudo cp /home/proxyuser/PolarProxy/PolarProxy.service /etc/systemd/system/PolarProxy.service

We will need to modify the PolarProxy service config file a bit before we start it. Edit the ExecStart setting in /etc/systemd/system/PolarProxy.service to configure PolarProxy to terminate the TLS encryption for HTTPS and SMTPS (implicitly encrypted email submission). The HTTPS traffic should be redirected to INetSim's web server on tcp/80 and the SMTPS to tcp/25.

ExecStart=/home/proxyuser/PolarProxy/PolarProxy -v -p 10443,80,80 -p 10465,25,25 -x /var/log/PolarProxy/polarproxy.cer -f /var/log/PolarProxy/proxyflows.log -o /var/log/PolarProxy/ --certhttp 10080 --terminate --connect 192.168.53.19 --nosni nosni.inetsim.org

Here's a break-down of the arguments sent to PolarProxy through the ExecStart setting above:

  • -v : verbose output in syslog (not required)
  • -p 10443,80,80 : listen for TLS connections on tcp/10443, save decrypted traffic in PCAP as tcp/80, forward traffic to tcp/80
  • -p 10465,25,25 : listen for TLS connections on tcp/10465, save decrypted traffic in PCAP as tcp/25, forward traffic to tcp/25
  • -x /var/log/PolarProxy/polarproxy.cer : Save certificate to be imported to clients in /var/log/PolarProxy/polarproxy.cer (not required)
  • -f /var/log/PolarProxy/proxyflows.log : Log flow meta data in /var/log/PolarProxy/proxyflows.log (not required)
  • -o /var/log/PolarProxy/ : Save PCAP files with decrypted traffic in /var/log/PolarProxy/
  • --certhttp 10080 : Make the X.509 certificate available to clients over http on tcp/10080
  • --terminate : Run PolarProxy as a TLS termination proxy, i.e. data forwarded from the proxy is decrypted
  • --connect 192.168.53.19 : forward all connections to the IP of INetSim
  • --nosni nosni.inetsim.org : Accept incoming TLS connections without SNI, behave as if server name was "nosni.inetsim.org".

Finally, start the PolarProxy systemd service:

sudo systemctl enable PolarProxy.service

sudo systemctl start PolarProxy.service

Verify that you can reach INetSim through PolarProxy's TLS termination proxy using curl:

curl --insecure --connect-to example.com:443:192.168.53.19:10443 https://example.com

<html>
  <head>
    <title>INetSim default HTML page</title>
  </head>
  <body>
    <p></p>
    <p align="center">This is the default HTML page for INetSim HTTP server fake mode.</p>
    <p align="center">This file is an HTML document.</p>
  </body>
</html>

Yay, it is working! Do the same thing again, but also verify the certificate against PolarProxy's root CA this time. The root certificate is downloaded from PolarProxy via the HTTP service running on tcp/10080 and then converted from DER to PEM format using openssl, so that it can be used with curl's "--cacert" option.

curl http://192.168.53.19:10080/polarproxy.cer > polarproxy.cer

openssl x509 -inform DER -in polarproxy.cer -out polarproxy-pem.crt

curl --cacert polarproxy-pem.crt --connect-to example.com:443:192.168.53.19:10443 https://example.com

<html>
  <head>
    <title>INetSim default HTML page</title>
  </head>
  <body>
    <p></p>
    <p align="center">This is the default HTML page for INetSim HTTP server fake mode.</p>
    <p align="center">This file is an HTML document.</p>
  </body>
</html>

Yay #2!

Now let's set up routing to forward all HTTPS traffic to PolarProxy's service on tcp/10443 and SMTPS traffic to tcp/10465. I'm also adding a firewall rule to redirect ALL other incoming traffic to INetSim, regardless of which IP it is destined to, with the final REDIRECT rule. Make sure to replace "enp0s8" with the name of your interface.

sudo iptables -t nat -A PREROUTING -i enp0s8 -p tcp --dport 443 -j REDIRECT --to 10443

sudo iptables -t nat -A PREROUTING -i enp0s8 -p tcp --dport 465 -j REDIRECT --to 10465

sudo iptables -t nat -A PREROUTING -i enp0s8 -j REDIRECT

Verify that the iptables port redirection rule is working from another machine connected to the offline 192.168.53.0/24 network:

curl --insecure --resolve example.com:443:192.168.53.19 https://example.com

<html>
  <head>
    <title>INetSim default HTML page</title>
  </head>
  <body>
    <p></p>
    <p align="center">This is the default HTML page for INetSim HTTP server fake mode.</p>
    <p align="center">This file is an HTML document.</p>
  </body>
</html>

Yay #3!

curl --insecure --resolve example.com:465:192.168.53.19 smtps://example.com

214-Commands supported:
214- HELO MAIL RCPT DATA
214- RSET NOOP QUIT EXPN
214- HELP VRFY EHLO AUTH
214- ETRN STARTTLS
214 For more info use "HELP <topic>".

Yay #4!

It is now time to save the firewall rules, so that they will survive reboots.

sudo apt-get install iptables-persistent

Install the Victim Windows PC

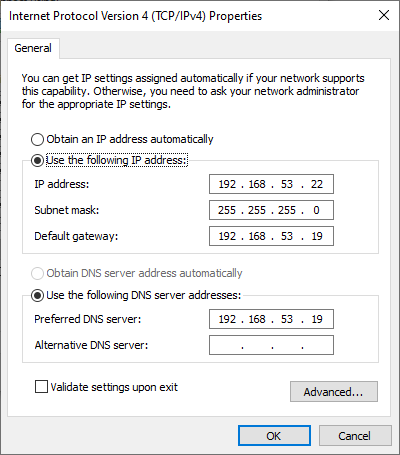
Configure a static IP address on the victim Windows host by manually setting the IP address. Set the INetSim machine (192.168.53.19) as the default gateway and DNS server.

Windows IPv4 Properties

Download the X.509 root CA certificate from your PolarProxy installation here:
http://192.168.53.19:10080/polarproxy.cer

  1. Double-click on "polarproxy.cer"
  2. Click [Install Certificate...]
  3. Select 🔘 Local Machine and press [Next]
  4. Select 🔘 Place all certificates in the following store and press [Browse...]
  5. Choose "Trusted Root Certification Authorities" and press [OK], then [Next]
  6. Press [Finish]

You might also want to install the PolarProxy certificate in your browser. This is how you install it to Firefox:

  1. Options / Preferences
  2. Press [Privacy & Security]
  3. Scroll down to "Certificates" and press [View Certificates...]
  4. In the "Authorities" tab, press [Import...]
  5. Open "polarproxy.cer"
  6. ☑ Trust this CA to identify websites. (check the box)
  7. Press [OK]

Now, open a browser and try visiting some websites over HTTP or HTTPS. If you get the following message regardless of what domain you try to visit, then you've managed to set everything up correctly:

This is the default HTML page for INetSim HTTP server fake mode.

This file is an HTML document.

Accessing the Decrypted Traffic

PCAP files with decrypted HTTPS and SMTPS traffic are now available in /var/log/PolarProxy/

PolarProxy will start writing to a new capture file every 60 minutes. However, the captured packets are not written to disk instantly because PolarProxy uses buffered file writing in order to improve performance. You can restart the proxy service if you wish to flush the buffered packets to disk and have PolarProxy rotate to a new capture file.

sudo systemctl restart PolarProxy

I also recommend capturing all network traffic sent to INetSim with a sniffer like netsniff-ng. This way you’ll get PCAP files with traffic from INetSim’s cleartext services (like DNS and HTTP) as well.

PCAP or it didn’t happen!

Credits

I'd like to thank Thomas Hungenberg and Patrick Desnoyers for providing valuable feedback for this blog post!

Posted by Erik Hjelmvik on Monday, 09 December 2019 08:40:00 (UTC/GMT)

Tags: #PolarProxy#HTTPS#SMTPS#HTTP#SMTP#DNS#Malware#Sandbox#TLS#PCAP#proxy#tutorial#ASCII-art

Short URL: https://netresec.com/?b=19Ce12f


NetworkMiner 2.2 Released

NetworkMiner 2.2 = Harder Better Faster Stronger

NetworkMiner 2.2 is faster, better and stronger than ever before! The PCAP parsing speed has more than doubled and even more details are now extracted from analyzed packet capture files.

The improved parsing speed of NetworkMiner 2.2 can be enjoyed regardless if NetworkMiner is run in Windows or Linux, additionally the user interface is more responsive and flickers way less when capture files are being loaded.

User Interface Improvements

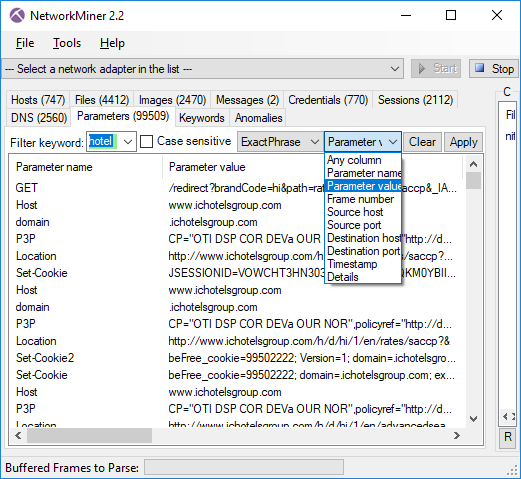
The keyword filter available in the Files, Messages, Sessions, DNS and Parameters tabs has been improved so that the rows now can be filtered on a single column of choice by selecting the desired column in a drop-down list. There is also an “Any column” option, which can be used to search for the keyword in all columns.

Keyword drop-down in NetworkMiner's Parameters tab

The Messages tab has also received an additional feature, which allows the filter keyword to be matched against the text in the message body as well as email headers when the “Any column” option is selected. This allows for an efficient analysis of messages (such as emails sent/received through SMTP, POP3 and IMAP as well as IRC messages and some HTTP based messaging platforms), since the messages can be filtered just like in a normal e-mail client.

We have also given up on using local timestamp formats; timestamps are now instead shown using the yyyy-MM-dd HH:mm:ss format with time zone explicitly stated.

Protocol Parsers

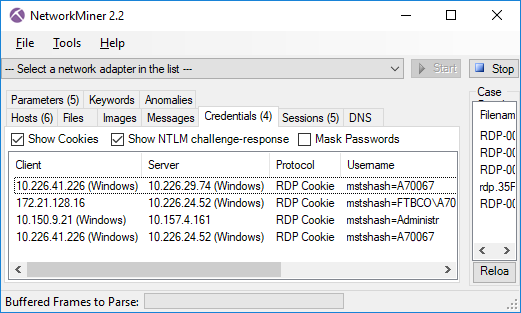
NetworkMiner 2.2 comes with a parser for the Remote Desktop Protocol (RDP), which rides on top of COTP and TPKT. The RDP parser is primarily used in order to extract usernames from RDP cookies and show them on the Credentials tab. This new version also comes with better extraction of SMB1 and SMB2 details, such as NTLM SSP usernames.

RDP Cookies extracted with NetworkMiner 2.2

One big change that has been made behind the scenes of NetworkMiner is the move from .NET Framework 2.0 to version 4.0. This move doesn’t require any special measures to be taken for most Microsoft Windows users since the 4.0 Framework is typically already installed on these machines. If you’re running NetworkMiner in Linux, however, you might wanna check out our updated blog post on how to install NetworkMiner in Linux.

We have also added an automatic check for new versions of NetworkMiner, which runs every time the tool is started. This update check can be disabled by adding a --noupdatecheck switch to the command line when starting NetworkMiner.

NetworkMiner.exe --noupdatecheck capturefile.pcap

NetworkMiner Professional

Even though NetworkMiner 2.2 now uses ISO-like time representations NetworkMiner still has to decide which time zone to use for the timestamps. The default decision has always been to use the same time zone as the local machine, but NetworkMiner Professional now additionally comes with an option that allows the user to select whether to use UTC (as nature intended), the local time zone or some other custom time zone for displaying timestamps. The time zone setting can be found in the “Tools > Settings” menu.

UPDATE: With the release of NetworkMiner 2.3 the default time zone is now UTC unless the user has specifically selected a different time zone.

The Port-Independent-Protocol-Detection (PIPI) feature in NetworkMiner Pro has been improved for more reliable identification of HTTP, SSH, SOCKS, FTP and SSL sessions running on non-standard port numbers.

CASE / JSON-LD Export

We are happy to announce that the professional edition of NetworkMiner 2.2 now has support for exporting extracted details using the Cyber-investigation Analysis Standard Expression (CASE) format, which is a JSON-LD format for digital forensics data. The CASE export is also available in the command line tool NetworkMinerCLI.

We would like to thank Europol for recommending us to implement the CASE export format in their effort to adopt CASE as a standard digital forensic format. Several other companies in the digital forensics field are currently looking into implementing CASE in their tools, including AccessData, Cellebrite, Guidance, Volatility and XRY. We believe the CASE format will become a popular format for exchanging digital forensic data between tools for digital forensics, log correlation and SIEM solutions.

We will, however, still continue supporting and maintaining the CSV and XML export formats in NetworkMiner Professional and NetworkMinerCLI alongside the new CASE format.

Credits

I would like to thank Sebastian Gebhard and Clinton Page for reporting bugs in the Credentials tab and TFTP parsing code that now have been fixed. I would also like to thank Jeff Carrell for providing a capture file that has been used to debug an issue in NetworkMiner’s OpenFlow parser. There are also a couple of users who have suggested new features that have made it into this release of NetworkMiner. Marc Lindike suggested the powerful deep search of extracted messages and Niclas Hirschfeld proposed a new option in the PCAP-over-IP functionality that allows NetworkMiner to receive PCAP data via a remote netcat listener.

Upgrading to Version 2.2

Users who have purchased a license for NetworkMiner Professional 2.x can download a free update to version 2.2 from our customer portal.

Those who instead prefer to use the free and open source version can grab the latest version of NetworkMiner from the official NetworkMiner page.

Posted by Erik Hjelmvik on Tuesday, 22 August 2017 11:37:00 (UTC/GMT)

Tags: #pcap#CASE#PIPI#HTTP#SOCKS#FTP#SSL#port#forensics

Short URL: https://netresec.com/?b=17888cb


Packet Injection Attacks in the Wild

I have previously blogged about packet injection attacks, such as the Chinese DDoS of GitHub and Covert Man-on-the-Side Attacks. However, this time I've decided to share some intelligence on real-world packet injection attacks that have been running for several months and that are still active today.


Packet Injection by Network Operators

Gabi Nakibly, Jaime Schcolnik and Yossi Rubin recently released a very interesting research paper titled “Website-Targeted False Content Injection by Network Operators”, where they analyzed packet injection attacks in the wild. Here's a snippet from the paper's abstract:

It is known that some network operators inject false content into users’ network traffic. Yet all previous works that investigate this practice focus on edge ISPs (Internet Service Providers), namely, those that provide Internet access to end users. Edge ISPs that inject false content affect their customers only. However, in this work we show that not only edge ISPs may inject false content, but also core network operators. These operators can potentially alter the traffic of all Internet users who visit predetermined websites.

The researchers analyzed 1.4 petabits of HTTP traffic, captured at four different locations; three universities and one corporation. Some of their findings have been made available as anonymized PCAP files here:
http://www.cs.technion.ac.il/~gnakibly/TCPInjections/samples.zip

We have attempted to recreate these packet injections by visiting the same URLs again. Unfortunately most of our attempts didn't generate any injected responses, but we did manage to trigger injections for two of the groups listed by Nakibly et al. (“hao” and “GPWA”).


Redirect Race between hao.360.cn and hao123.com

We managed to get very reliable packet injections when visiting the website www.02995.com. We have decided to share one such PCAP file containing a packet injection attack here:
https://media.netresec.com/pcap/hao123-com_packet-injection.pcap

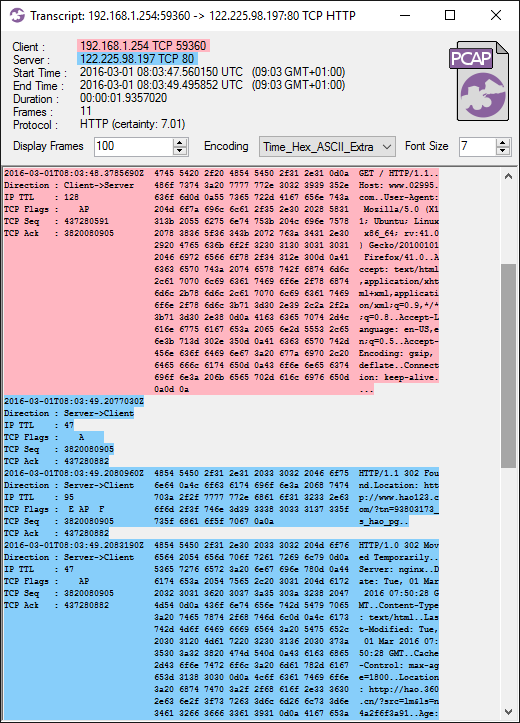
This is what it looks like when loading that PCAP file into CapLoader and doing a “Flow Transcript” on the first TCP session:

CapLoader Flow Transcript of race between hao.360.cn and hao123.com
Image: CapLoader Flow Transcript (looks a bit like Wireshark's Follow-TCP-Stream)

We can see in the screenshot above that the client requests http://www.02995.com/ and receives two different responses with the same sequence number (3820080905):

  • The first response is a “302 Found”, forwarding the client to:
    http://www.hao123.com/?tn=93803173_s_hao_pg
  • The second response is a “302 Moved Temporarily”, that attempts a redirect to:
    http://hao.360.cn/?src=lm&ls=n4a2f6f3a91

Judging from the IP Time-To-Live (TTL) values we assume that the first response (hao123.com) was an injected packet, while the second response (hao.360.cn) was coming from the real webserver for www.02995.com.

If you have an eye for details, then you might notice that the injected packet doesn't use the standard CR-LF (0x0d 0x0a) line breaks in the HTTP response. The injected packet only uses LF (0x0a) as line feed in the HTTP header.

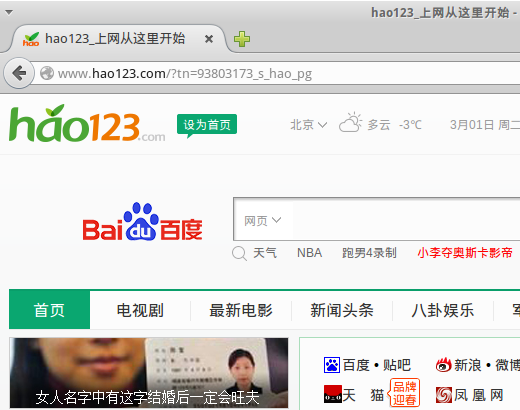
Since the injected response arrived before the real response the client followed the injected redirect to www.hao123.com. This is what the browser showed after trying to load www.02995.com:

Browser showing www.hao123.com when trying to visit www.02995.com

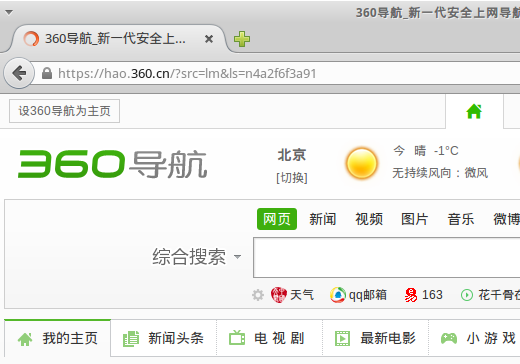
SSL encryption is an effective protection against packet injection attacks. So if the user instead enters https://www.02995.com then the browser follows the real redirect to hao.360.cn

Browser showing hao.360.cn when using SSL to visit www.02995.com


id1.cn redirected to batit.aliyun.com

Prior to the release of Gabi's packet injection paper, the only publicly available PCAP file showing a real-world packet injection was this one:
https://github.com/fox-it/quantuminsert/blob/master/presentations/brocon2015/pcaps/id1.cn-inject.pcap

That PCAP file was released after Yun Zheng Hu (of Fox-IT) gave a presentation titled “Detecting Quantum Insert” at BroCon 2015. A video recording of Yun Zheng's talk is available online, including a live demo of the packet injection.

We have managed to re-trigger this packet injection attack as well, simply by visiting http://id1.cn. Doing so triggers two injected HTTP responses that attempts to do a redirect to http://batit.aliyun.com/alww.html. The target page of the injected responses has a message from the Alibaba Group (aliyun.com) saying that the page has been blocked.

Website blocked message from Alibaba Group

We have decided to also share a PCAP file containing a packet injection attack for id1.cn here:
https://media.netresec.com/pcap/id1-cn_packet-injection.pcap

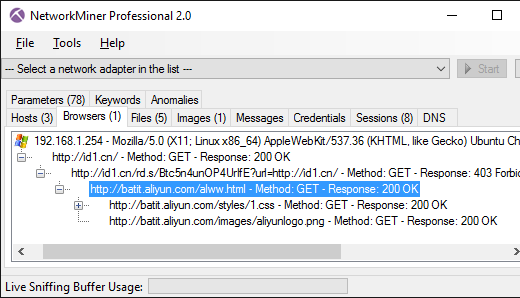
This is what it looks like when that PCAP file is loaded into NetworkMiner Professional, and the Browsers tab is opened in order to analyze the various HTTP redirections:

Browsers tab in NeworkMiner Professional 2.0
Image: Browsers tab in NetworkMiner Professional 2.0

Here's a short recap of what is happening in our shared PCAP file for id1.cn:

  • Frame 13 : http://id1.cn is opened
  • Frame 18 : Real server responds with an HTML refresh leading to http://id1.cn/rd.s/Btc5n4unOP4UrIfE?url=http://id1.cn/
  • Frame 20 : The client also receives two injected packets trying to do a “403 Forbidden” that redirects to http://batit.aliyun.com/alww.html. However, these injected packets arrived too late.
  • Frame 24 : The client proceeds by loading http://id1.cn/rd.s/Btc5n4unOP4UrIfE?url=http://id1.cn/
  • Frame 25 : Two new injected responses are sent, this time successfully redirecting the client to the Alibaba page.
  • Frame 28 : The real response arrives too late.
  • Frame 43 : The client opens the Alibaba page with message about the site being blocked


Protecting against Packet Injection Attacks

The best way to protect against TCP packet injection attacks is to use SSL encryption. Relying on HTTP websites to do a redirect to an HTTPS url isn't enough, since that redirect could be targeted by packet injection. So make sure to actually type “https://” (or use a browser plug-in) in order to avoid being affected by injected TCP packets.


Referenced Capture Files

The following PCAP files have been referenced in this blog post:

For more PCAP files, please visit our list of publicly available PCAP files here: https://www.netresec.com/?page=PcapFiles

Posted by Erik Hjelmvik on Tuesday, 01 March 2016 13:37:00 (UTC/GMT)

Tags: #NetworkMiner#HTTP#browser#CapLoader#MOTS#HTTPS#TCP#PCAP

Short URL: https://netresec.com/?b=163e02b


Analyzing Web Browsing Activity

NetworkMiner logo HTTP GET

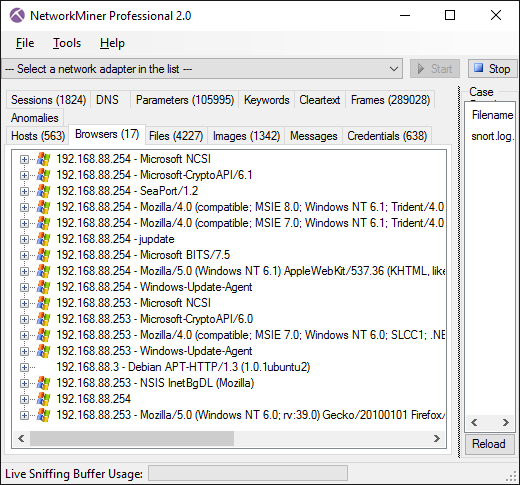
One of the features included in the newly released version 2.0 of NetworkMiner Professional is a new tab called “Browsers”. This tab shows web browsing requests and reponses in a hierarchical tree view, with the identified web browsers as root nodes.

The idea of tracking browser activity this way was suggested to me by Steffen Thorkildsen way back in 2009. I'm therefore happy to finally have this feature implemented in NetworkMiner!

At first glance, the Browser tab looks somewhat like the Hosts tab. One difference is that there can be multiple browsers per host, since each unique HTTP User-Agent is considered a separate browser.

NetworkMiner Professional 2.0 Browsers tab

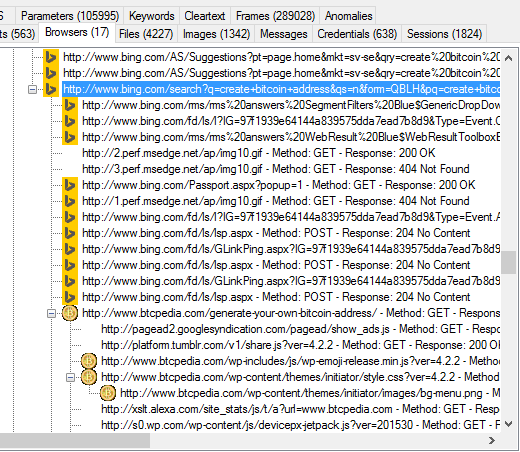
The web pages (URLs) visited by a browser can be analyzed by expanding the node of that browser. The URLs are organized in a hierarchical structure, so that all URLs visited by clicking a link on a web page are placed under the node of that web page. This enables the analyst to see how a user ended up at a particular URL. NetworkMiner primarily uses the HTTP referer header (the misspelling of referrer stems back to RFC1945) to backtrack the pages visited before landing at a particular page.

NetworkMiner Professional 2.0 Browsers tab - Bing search
Image: Bing search for “create bitcoin address” that led the user to www.btcpedia.com

The browser tree view also shows HTTP redirects, such as “302 Found” and “301 moved permanently”. These redirects can be used in order to see encrypted HTTPS URLs that a user is redirected to, for example when logging in at a website.

NetworkMiner Professional 2.0 Browsers tab - 302 Moved Temporarily
Image: Microsoft responding with a “302 Moved Temporarily" redirect

The icons that show up at some web servers are favicon images that have been passively extracted from the analyzed PCAP file.

NetworkMiner Professional 2.0 Browsers tab - Favicon
Image: Website icons extracted from favicon.ico downloads

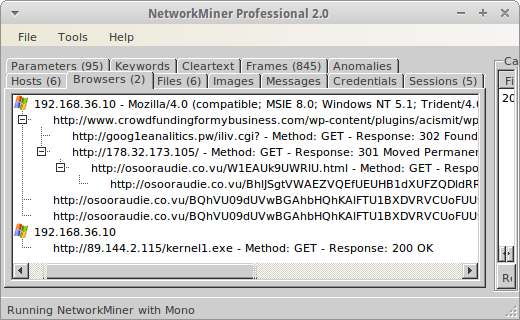
We hope the Browser tab can be of help in criminal investigations in order to show whether or not a suspect visited a particular website intentionally. This feature can also be used to track the activity of malware that uses HTTP for command-and-control (C2) as well as to analyze redirect chains used for malware downloads.

NetworkMiner Professional 2.0 Browsers tab - Redirect Chain
Image: PCAP file containing a redirect chain leading to malware downloads

The PCAP file loaded in the screenshot above originally comes from malware-traffic-analysis.net. Note that our analysis was done by running NetworkMiner in Linux to prevent accidental malware infection. The events shown in NetworkMiner's browser tab matches the description of the redirect chain provided at malware-traffic-analysis.net:

162.144.66.10 port 80 - www.crowdfundingformybusiness.com - Compromised website
185.14.30.37 port 80 - goog1eanalitics.pw - First redirect
178.32.173.105 port 80 - 178.32.173.105 - Second redirect
46.101.59.201 port 80 - osooraudie.co.vu - Nuclear EK

The redirect chain leads to a Nuclear Exploit Kit (SWF file with MD5 695a07cbcac3ca64010e168fe495ff4a, VirusTotal). Later on the Nuclear EK retrieves the file “kernel1.exe”, which seems to be related to the Kelihos botnet.

Posted by Erik Hjelmvik on Thursday, 18 February 2016 13:37:00 (UTC/GMT)

Tags: #NetworkMiner#NetworkMiner Professional#HTTP#browser#favicon#redirect#malware#NSM#PCAP

Short URL: https://netresec.com/?b=162ef93

X / twitter

NETRESEC on X / Twitter: @netresec

Mastodon

NETRESEC on Mastodon: @netresec@infosec.exchange