Sniffing Tutorial part 2 - Dumping Network Traffic to Disk

This blog post is the second part of a two-part tutorial that shows how to sniff network traffic. The first part covered how to intercept the traffic, i.e. how to get the packets to arrive to your network card. This second part covers how to best capture the network traffic to disk once you've managed to have them sent to your network card.
The first thing I recommend you to do before you start sniffing is to ensure that your sniffer computer stays quiet, so that you don't pollute the sniffed traffic with packets from your sniffer computer. How to do this varies between Windows, Linux and FreeBSD, so I will briefly cover how to silence all three OS's.
Silencing Windows
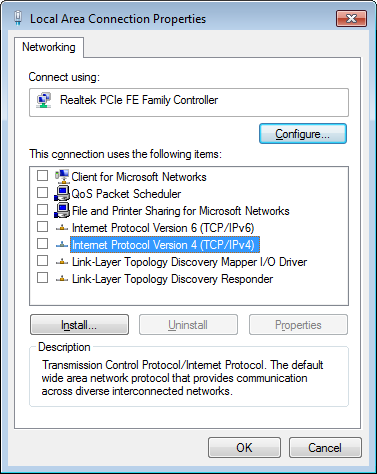
Windows is normally quite chatty on the network, but there is a simple trick that makes it shut up without disconnecting it from the network. Simply bring up the properties window for your network adapter and un-check all clients, services and protocols from the list of used items.
Silencing Linux
I don't know any good way to disable the TCP/IP stack in Linux similar to what we just did to Windows. But by disabling ARP and not giving the interface any IP address the risk of leaking packets can be reduced significantly. To achieve this you'll also need to set the interface to promiscuous mode and disable IPv6. Here's an example of how this can be done in Debian/Ubuntu:
# ifconfig eth0 -arp upHowever, in general it is better to configure the sniffer interface by modifying /etc/network/interfaces to look as follows:
# ifconfig eth0 promisc
# ip addr del 192.168.3.4/24 dev eth0
# ifconfig eth0 del fe80::1234:ddff:fe3f:1337/64
auto eth0
iface eth0 inet manual
up ifconfig $IFACE -arp up
up ip link set $IFACE promisc on
down ip link set $IFACE promisc off
down ifconfig $IFACE down
For more details on shuting up your Linux machine I suggest you take a look at the “Undetectable Sniffing On Ethernet” blog post on the Ask Apache blog. I also recommend reading the Ubuntu instructions at the NetworkConfiguration wiki page for Security Onion.
Silencing FreeBSD
One of the many great things about FreeBSD is that it is really easy to configure a network interface to be silent. All you need to do is to issue this single command:
# ifconfig em0 monitor up
Read Richard Bejtlich's blog post “Ifconfig Monitor Option” for more info about this command.
Sniff with dumpcap
The most common software used for sniffing traffic is undoubtedly Wireshark, other common tools are tshark and tcpdump. All these three tools parse the packets as they come in and show data about the sniffed packets in the GUI or on the command line. This isn't desirable when doing network forensics since these application could use up too much resources on parsing the incoming packets, which during traffic peaks can lead to packets being dropped. There might also be bugs in the packet parsing code that can cause the application to crash completely, there have been plenty of such bugs in Wireshark for example.
A much more reliable way to sniff traffic is therefore to use an application that is designed to reliably dump traffic to disk, without trying to parse or analyze the contents of the sniffed frames. One such application is dumpcap, which is a command line tool developed by the Wireshark crew. In fact, as of version 1.4.0 of Wireshark both tshark and Wireshark run dumpcap in the background rather than doing the sniffing themselves. Another great thing about dumpcap is that it is available on Windows as well as on Linux and FreeBSD. My recommendation is to run it under FreeBSD since I consider it to be more reliable than the other operating systems. In order to get dumcap you need to download either Wireshark or tshark since dumpcap doesn't have an installation package of its own.
Dumpcap supports capture filtering with BPF, but I recommend that you sniff ALL packets if you are authorized to do so and have enough disk space. It is much better to do the filtering later on in the analysis phase. The feature I like best in dumpcap is the ring buffer functionality, where it will continue writing incoming frames to a new pcap file once the old one has reached a specific size limit. In order to have dumpcap write sniffed frames to disk and roll over to a new file when it reaches 100.000 kB you'd run this command:
# dumpcap -i em0 -w wiretap.pcap -b filesize:100000
When you've dumped the traffic to disk is when the fun starts, i.e. analyzing the pcap files. You can read more analyzing pcap files in my blog posts about the TCP/IP Weapons School Sample Lab, DFRWS 2009 Challenge, Webmail Information Leakage and Command-line forensics.
Posted by Erik Hjelmvik on Friday, 11 March 2011 16:56:00 (UTC/GMT)